FlexNet Manager Suite
2020 R1
(On-Premises)
To download the adapters archive:
-
Download the Adapter Tools for FlexNet Manager Suite 2020 R1.zip
archive. One path is through the Flexera
Community:
Tip: Your Community credentials are required for login.
-
Log into community.flexera.com.
-
In the top right, in the navigation bar, expand Other
Resources and select Product and License
Center.
-
Under the right-hand list of products that includes
FlexNet Manager Platform, click
LET'S GO! (and subsequently wait for the
redirection to occur).
-
On the right side, scroll down through the list of Your
Downloads and click FlexNet Manager
Platform.
The Download Packages page for
FlexNet Manager Platform
appears.
-
In the Latest Versions tab, click
FlexNet Manager Suite
2020 R1.
A EULA page may appear. If so, accept the license, as this grants
access to the list of Downloads.
-
In the list of available Downloads, in the
File Name column, click Adapter
Tools for FlexNet Manager Suite2020 R1.
A new browser tab may appear temporarily, and the download of
Adapter Tools for FlexNet Manager Suite 2020 R1.zip
commences.
-
In your browser dialog, choose to save the file, and if the browser
allows it, direct the saved file to a convenient working location (such
as C:\temp on a central, accessible server).
If your browser saves the file to a default location (such as your
Downloads folder), move or copy it to the
appropriate working location when the download is finished.
-
Right-click the zip archive, and choose Extract
All....
-
In the extracted archive, navigate to Adapter Tools\App-V Management
Server Agent\AppVManagementServer5.
Tip: As an alternative to downloading the archive again, if you still have access to the
'CD image' you downloaded to install FlexNet Manager Suite itself on your
application server(s), you can also find these files in the
unzipped installation archive under FlexNet Manager
Suite\Installers\App-V Management Server
Agent\AppVManagementServer5.
-
Use your preferred method to deploy the
AppVMgmtSvr.ps1
PowerShell script to your App-V Management Server.
You may install the script in your preferred folder.
-
Use your preferred task scheduling technology to schedule data collection by
the PowerShell script.
Typically you want the .raa file uploaded to the central
FlexNet Manager Suite
operations databases before the system import and license calculations
take place. By default, this occurs daily at 2am central server time. As a
two-hour upload buffer should be more than adequate, this suggests (within a
single time zone) a data collection trigger at around midnight.
These example steps are for Windows Server 2012. Adjust as necessary for your
server operating system, or your chosen scheduling tool.
-
In Windows Explorer, navigate to Control Panel >
System and Security > Administrative
Tools, and double-click Task
Scheduler.
The Task Scheduler window appears.
-
In the navigation tree on the left, select Task Scheduler
Library, and then in the Actions list on
the right, click New Folder....
A dialog appears for entering the folder name.
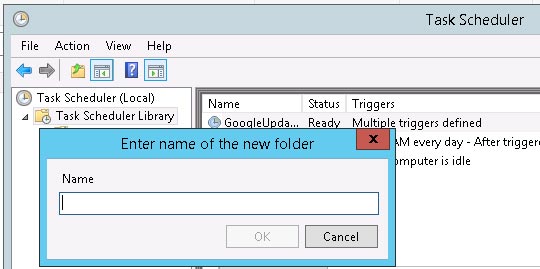
A
suggested value is
FlexNet Manager Suite.
-
Click OK, and select the new folder in the navigation
tree.
-
Select Action > Create
Task....
The Create Task dialog appears.
-
Enter an appropriate Name, such as
FlexNet Manager Agent for App-V 5.x, and add
any Description to help future maintenance of
this task.
Your description may be something like Collects App-V data
from the Management Server and uploads to an inventory beacon.
-
Click Change User or Group....
The Select User, Service Account,
or Group dialog appears.
-
Enter the account name that is to run the scheduled task,
and click OK.
An appropriate account:
- Can run a Windows scheduled task on the App-V Management
Server
- Can execute the PowerShell script
- Is an App-V Management Server administrator
- May conveniently be a domain account that can upload the results
(using HTTP PUT) to the inventory beacon,
although a separate account and password can be configured in
the command line (required only where that inventory beacon is using Basic Authentication — if
the inventory beacon uses anonymous
authentication, ignore this requirement).
-
Further down in the Security options
group, select Run whether user is logged in or not.
-
Switch to the Triggers tab, and
click New....
The New Trigger dialog
appears.
-
Ensure that the default setting Begin the
task
On a schedule is selected, set the parameters for
the schedule, and from the Advanced settings group, be
sure that Enabled is selected.
The suggested schedule is daily at or before midnight local time, but
be sure that this suits the upload procedures for your
enterprise.
-
Switch to the Action tab, and
click New....
The New Action
dialog appears.
-
Ensure that the default Action,
Start a program, is selected, and
browse to your local copy of
AppVMgmtSvr.ps1.
-
In the Add arguments (optional) field,
specify all the command-line arguments you need for the agent.
This example uploads the
.raa file to the
flexnetbeacon
inventory beacon, using the credentials of the account
running the scheduled
task.
.\AppVMgmtSvr.ps1 -beaconUrl http://flexnetbeacon
Tip: You need to specify only the basis server in the URL,
Internally, the FlexNet Beacon service briefly saves the
uploaded file to
%CommonAppData%\Flexera Software\Incoming\RemoteApplications
before uploading the file to its parent. (If security within your
enterprise prevents the PowerShell script uploading the
.raa file to a inventory beacon, you can arrange an alternative method to save the
.raa file to this folder on a convenient
inventory beacon, and it is automatically
uploaded and processed from this point.)
-
Click OK.
-
Optionally, make any preferred adjustments to the
Conditions or Settings tabs
(normally the defaults are acceptable).
-
Click OK to close the
Create Task dialog.
The new task appears in the list of scheduled tasks
for this server.
-
Right-click the new task, and click Run
in the context menu.
This checks that the scheduled task completes successfully.
-
Validate operations in the following ways:
- Review the log file (by default,
AppVMgmtSvr.log in the same folder as
the PowerShell script) for any errors or warning messages.
- Review the content of the output file (by default,
FNMS_AppV.raa in the same folder as the
PowerShell script). This file contains the results of the most
recent execution of the PowerShell script, and is replaced at
each invocation of the script. For more details of the file
format, see File Format for .raa.
- If uploaded to the inventory beacon, check for
the presence of the FNMS_AppV.raa output
file in %CommonAppData%\Flexera Software\Incoming\RemoteApplications on the
inventory beacon. Remember that you have
only a brief time window to check this before it is uploaded to
the central application server and removed (by default,
around 10 minutes).
The AppVMgmtSvr.ps1 PowerShell script is now configured on your
App-V release 5.0 or later Management Server. You can now configure the adapter itself
that runs on the inventory beacon (see Configuring the Adapter).
FlexNet Manager Suite (On-Premises)
2020 R1