FlexNet Manager Suite 2020 R2 (On-Premises)
Advanced filters have more power, and you can create the entire filter before the
list is updated.
Advanced filters allow you to create complex relationship of several rules, linked by
Boolean relationships (like AND, and OR, mixed across different groups within your
filter). The current setting for your advanced filter displays in a special row
above the list, and also in the simple filter display underneath the page title.
To create an advanced filter:
-
Above the list, click the advanced filter icon (
 ).
).
A new bar appears above the list, showing the same icon on the left end,
and an
Advanced filter link.
Tip: If
space is tight, you can show/hide the advanced filter bar by clicking the
same icon. If you hide the bar when a filter rule is active, the rule
remains in play and displays next time you expose the advanced filter
bar.
-
Click the Advanced filter link.
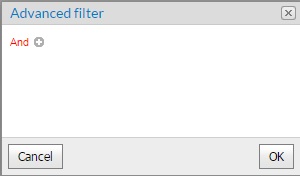
The
Advanced filter dialog appears. If there is
no active rule, it shows the default Boolean condition for linking rules
together (
And), with a plus sign icon for adding
another rule.
-
To change the relationship between rules that you will create, click the red,
current value of the relationship (by default,
And).
a drop-down list appears, where you can choose one of the following
values:
| Option |
Meaning |
| And |
Sets the relationship between all the rules at this level to a
logical AND. Every one of this set of rules must be satisfied for a
matching line of data to appear in the filtered list. |
| Or |
Sets the relationship between all the rules at this level to a
logical OR. If any one of this set of rules is satisfied, the
matching line of data appears in the filtered list. |
| Add Group |
Adds a new group, one level inset from the current one, for
which different relationships between rules can exist. (If you are
familiar with Boolean expressions, this is the same as inserting
brackets in the expression.) The group is indicated by a group
header line that shows the Boolean condition connecting the rules
within the group (AND or OR). |
| Add Condition |
Adds a new default rule at the current level. (This is
identical to clicking the + icon in the
heading for this level.) |
| Remove |
Deletes all the rules included below this heading. There is no
undo. |
-
To add a new rule in this group, click the plus + icon
in the heading for the group.
A new rule, made up of default settings, appears at the bottom of this
group. Each rule is made up of four elements in this order:
- Column name (shown in blue)
- Test (shown in green)
- Value(s) (shown in gray)
- A cross icon x that you can click to delete this
rule.
-
To change the data column used in this rule, click the blue column name.
A list of available columns appears. (The random order is the default
ordering of columns for the main list, including those hiding in the column
chooser.) Choose the column name to use for this rule.
Tip: This
means you can filter on columns that are not currently visible in the list.
Be careful that you don't accidentally filter out things using an off-screen
column that you've forgotten about.
-
To change the test that the rule applies (mathematically called the
'operator'), click the current value shown in green, and choose one of the
options from the list that appears.
There are different tests available, depending on the data types (the kinds of
information in the chosen column).
-
When a rule requires a value, the current value displays in gray. Click the
value to change it.
For text or numbers, a small field appears where you can type in a value. When
a column has a fixed set of values, a drop-down list appears where you can
choose one of the valid values.
Tip: Don't add extra quotation marks
around text values.
-
If you chose a test of Is any of or
Is none of, your rule shows an extra plus
+ icon on the right. Click this to add another value
to your list.
You can repeat this as many times as necessary.
Tip: These values
must be exact matches for items in your chosen column. A partial value will
not work (for example, a filter rule matching a license
Name of Ima will not
display a license called ImageReady).
-
To use wildcards (_ for single character and
% for any number of characters) for pattern
matching, use the Is like or Is not
like test conditions and specify the string pattern. For
example, the pattern Flex% when used with the
Is like test, will match the items beginning
with the word Flex, followed by any number of
characters.
-
You may repeat to add as many rules as you like to your filter. When satisfied
with your filter, click OK.
The dialog closes, and after a moment the list is refreshed, showing
those values that match your filter. As well, the current filter settings
display in all visible filter controls:
- In the simple filter setting at top left, under the page name
- In the header filters, if you have this top row of the list exposed
- In the advanced filter bar immediately above the list, while you have
this control exposed.
Example
Your manager says, "What's our exposure to Microsoft? How much could they cost us?"
You think, "That could be through an audit, or because of true-ups."
Let's assume all your Microsoft applications are linked to licenses. You can filter
the
All Licenses list to show licenses where "Publisher is
Microsoft
and (either the license is out of compliance
or it is
subject to true-up)". Notice how the brackets provide grouping. The dialog settings
could look like this:
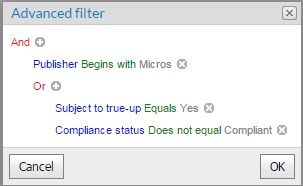
When you click
OK, you'll see the list of licenses to investigate
further.
You may change the filter either by re-opening the editor (click on the current
setting in the Advanced filter bar), or by tweaking values in
the header filter row (when you have exposed that control).
You can clear the filter entirely by clicking the large X
cross at the end of the advanced filter value, or by clicking each
X in the groups shown in the simple filter.
FlexNet Manager Suite (On-Premises)
2020 R2