Specifying a Log File
Log files help you monitor the operations of your business adapter. You can specify a log file that is used for all imports using this business adapter. The log that you specify is updated automatically by the Business Importer, overwriting the previous log file on each occasion.
To specify the log file details:
- Right-click on the adapter name in the structure tree.
-
From the context menu, select Add New Item, and from the
submenu select Log.
A page of log file settings appears, populated with default values.
Figure: The default values for a log file 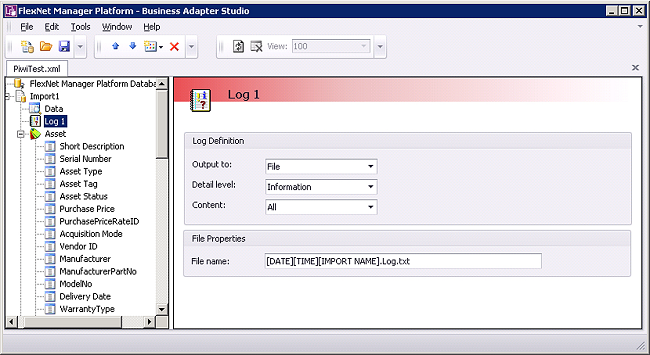
-
Adjust the following Log Definition settings to your
requirements.
Setting Notes Output to The type of log output to generate. Possible values are:
- Console — Output appears on the console of the test computer during development of the business adapter. It is likely to be less useful when the production version of the business adapter is running on the inventory beacon or the application server.
- File — Output will be saved to a text-based log file. When you select this option, additional fields appear at the bottom of the page to specify the file details.
-
Database — In connected mode
only (not available on the inventory beacon), the log is written into the compliance database, in the
following tables (available only in Microsoft SQL Server
Management Studio, and not in the user interface for
FlexNet Manager Suite):
-
BusinessImportLogDetail— A record is written here for every database record that has tracing turned on (see Tracing) when the record is rejected, created, updated or deleted. -
BusinessImportLogObject— A record is written here for each compliance database standard object that is created or updated during an import. Custom objects are not logged automatically, although you can cause a log entry to be added for a custom object (see Creating Custom SQL). -
BusinessImportLogSummary— A record is written here each time the Business Importer is started, either for a data import or for a simulation during testing. The record includes aStatusresult of0for a task not completed (error), and1for success.
-
- Tcp/IP socket — Output is written to a TCP/IP socket. When you select this option, additional fields appear at the bottom of the page to specify the TCP/IP details.
Detail level The depth of logging to provide. Choosing a given level of logging includes information for all higher levels in this ordered list:
- Silent — (highest value) No details are recorded for individual database objects, although a record of the overall import/simulation still appears in the summary table (for database logging).
- Critical
- Errors
- Warnings
- Information
- Debug — (lowest value) The most detailed logging information is written.
Content Primary control for what is written to the log. The settings are:
- Detail — Writes information for each object to the log according to the level specified in the Detail level setting (above)
- Summary — At the end of the import, writes a summary for each affected object.
- All — Combination of the Summary and Detail levels.
-
If you selected Output to
File, specify the name of the log file in the
File name setting.
- If you clear this field, the default file name is
MBI.log.txt. - You may include UNC path definitions, or relative paths starting from the directory where the Business Importer executable is running.
- When no file path is specified, the default is a subfolder
Log, below theBusiness Importerfolder.
Remember that a log file with the same name is overwritten at each import. You may wish to use the following placeholder variables to create a unique file name for each pass at least during test and development (log files with unique names are not automatically cleaned up, and you assume that responsibility):
- [DATE] — the date the import was started (formatted as yyyymmdd)
- [TIME] — the time the import was started (formatted as hhmmss)
- [IMPORT NAME] — the name of the adapter used for this import, taken from the name set for the adapter in the structure tree of the Business Adapter Studio.
- If you clear this field, the default file name is
-
If you selected Output to
Tcp/IP Socket, specify the settings in the
TCP/IP Socket Properties section that appears:
- Server — The server name where the listener is installed. For the same computer on which the Business Importer is running, use localhost.
- Port number — The port where the listener is waiting.
FlexNet Manager Suite (On-Premises)
2022 R1