Adding a New Step to an Inventory Adapter
FlexNet Manager Suite
2022 R1
(On-Premises)
You may add customized steps to your inventory adapter, choosing its position in the appropriate folder. (Remember that you cannot edit a factory-supplied inventory adapter on an inventory beacon. To edit a factory-supplier adapter, you must be working on your application server.)
To add a new step to an inventory adapter:
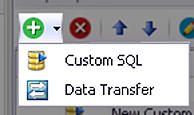
-
Use the down arrow next to the add icon to expand the choices, and click
either:
- Custom SQL to write any SQL scripting that runs on either the source database or your target operations database. Use these steps to massage data within the database, such as scrubbing data into a temporary table within the same database.
- Data Transfer to move data from one database to another. These steps can include custom SQL statements to select the data for transfer.
The new step appears in the Step Explorer, and its details appear in the editing pane on the right, potentially in a new tab (if you are already editing other steps).
FlexNet Manager Suite (On-Premises)
2022 R1