FlexNet Manager Suite
2022 R1
(On-Premises)
You must know either the server name or its IP address (together with database
instance name, if any) to type in during the following process. (There is no browse
facility to find the server.)
This process establishes the link between the adapter and the source inventory
database. This connection may be used for both reading inventory, and also writing
data (if additional context is required for good information gathering).
This process assumes that you already have the appropriate adapter open in the Step
Explorer and edit panel. This process creates a test connection, because new
adapters are not ready for production. Test connections are not imported by the
Compliance Importer in its normal operations. Data from this connection is imported
only after you publish the completed and tested connector.
To create a source connection:
-
In the toolbar, on right-hand end of the Source
Connection control, click the [...]
ellipsis button.

The Select Source Connection dialog
opens.

Tip: You must create a new test
connection for this adapter. You may not reuse an existing connection for
this adapter. (The existing connections are those previous declared on your
inventory beacon, and editing or deleting from this
dialog affects the connections for your inventory adapter.) Only test
connections, those displaying a check mark in the
Test column, may be created from the Inventory Adapter Studio.
-
Click New....
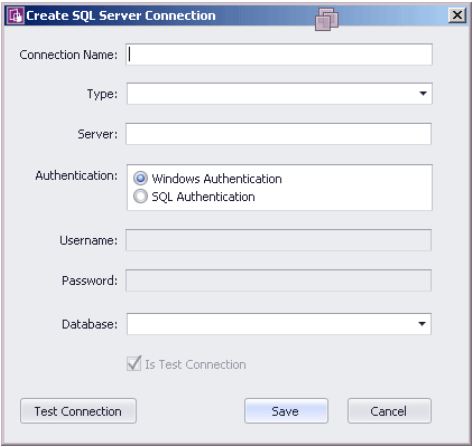
The Create SQL Server Connection dialog opens. (If
not, see note below.)
-
Complete the details:
-
Provide a descriptive name in the Connection
Name field, perhaps referencing the name of the adapter
using this connection.
-
From the Type pull-down, select the name of
the adapter you are editing (or just created). Scroll down the
list to find your adapter's name. Every connection must be tightly
coupled to an adapter through this Type
setting.
-
In the Server field, type the server name or IP
address. If the server hosts multiple SQL instances, you may append the
appropriate instance name after a backslash. For example, with an
instance called Inst1232, you could enter
10.200.3.102\Inst1232.
-
In the Authentication field, select the
authentication method:
Windows Authentication — Uses standard Windows authentication
to access the server. The credentials of the operator currently
logged on will be used to access the SQL Server database. Any
operators that require access to the database must be added to the
security groups that already have access to the database.
SQL Authentication — If you select this option, you must then
specify an account and password already known to SQL Server. This
account’s credentials will be used to access the source database,
regardless of the operator or account running the adapter.
-
If you selected SQL Authentication, complete the
Username and Password
fields with the account name and password to be used during SQL
authentication.
-
In the Database field, type the name of the
database, or use the pull-down list to select from database names
automatically detected on your specified server.
-
Click Test Connection. If the compliance server
can successfully connect to the nominated database using the server and
authentication details supplied, a Database connection
succeeded message displays. Click
OK to close the message. Click
Save to complete the addition of these
connection details.
You cannot save the connection details if the connection test fails. If you cannot
get the connection test to succeed, click Cancel to cancel the
addition of these connection details.Note: There is a second type of connection that may
be created using the New… button on the Select
Source Connection dialog. This is used for database connections to
non-Microsoft databases. The difference is that a full database connection string
must be entered manually for this connection.

FlexNet Manager Suite (On-Premises)
2022 R1