Once installation and configuration of the tool are complete (see
Installing and Configuring the Inventory Export Tool), data about installed software can be exported
to
Software Vulnerability Manager at any time, simply by invoking the
Inventory Export Tool with the export verb and no other command line options.
Operation is then fully automatic.
FNMS-VIM.exe export
Remember: MSPs must always include the
tenantUID
parameter.
FNMS-VIM.exe export --tenantUID tenantuid
The export process is fast (worst case is in the order of a few minutes), and since
no data is written to the operations databases, no data locking can occur to
interfere with other processes in FlexNet Manager Suite. As an indication of
performance, an export of around 340,000 installed items took around five minutes to
successfully transfer into Software Vulnerability Manager, with about a minute of that time
needed for execution on FlexNet Manager Suite.
If the tool runs without error, the following message is displayed on the command
line: Data upload to VIM successfully completed. You may also check
the log file for results.
The data uploaded to Software Vulnerability Manager is visible if you navigate in its
web interface to tab, and find the appropriate software asset list (the default name
is FNMS_Import).
For normal operation, Flexera recommends that you create
a Microsoft Windows Scheduled Task to trigger the data exchange daily, after data
imports have been completed from all regular data sources. Given that the default
trigger for the internally-scheduled Inventory import and license reconcile occurs at 2am, you might consider a time around 5am (for more about
schedules, see Server-Side Scheduled Tasks).
The process for setting up Windows scheduled tasks varies
across different editions of Windows Server. The following example is for
Windows Server 2012. Adjust to suit your application server (or batch server).
-
In Windows Explorer, navigate to Control Panel >
System and Security > Administrative
Tools, and double-click Task
Scheduler.
The Task Scheduler window appears.
-
In the navigation tree on the left, select Task Scheduler
Library, and then in the Actions list on
the right, click New Folder....
A dialog appears for entering the folder name.
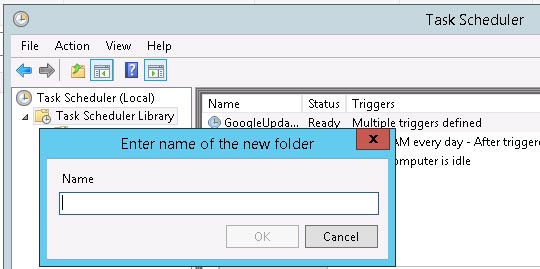
A
suggested value is
FlexNet Manager Suite.
-
Click OK, and select the new folder in the navigation
tree.
-
Select Action > Create
Task....
The Create Task dialog appears.
-
Enter an appropriate Name, such as Installed
Software Export to VIM, and add any
Description to help future maintenance of this task.
Your description may be something like Exports identified
applications and unrecognized installer evidence to VIM for security
assessment.
-
Click Change User or Group....
The Select User, Service Account,
or Group dialog appears.
-
Enter the account name that is to run the scheduled task,
and click OK.
This is the service account that runs on your application server (or
web application server in a multi-server implementation), for which the
name suggested during implementation was svc-flexnet.
-
Further down in the Security options
group, select Run whether user is logged in or not.
-
Switch to the Triggers tab, and
click New....
The New Trigger dialog
appears.
-
Ensure that the default setting Begin the
task
On a schedule is selected, set the parameters for
the schedule, and from the Advanced settings group, be
sure that Enabled is selected.
A suggested time is 5am daily, but choose a setting that suits your
environment.
-
Switch to the Action tab, and
click New....
The New Action
dialog appears.
-
Ensure that the default Action, Start a
program, is selected, and browse to your local copy of
FNMS-VIM.exe.
Remember to add the export command line parameter, which is
all that is needed for regular operation in a single tenant, on-premises implementation. (MSPs must add the tenant UID as always.)
-
Click OK.
-
Optionally, make any preferred adjustments to the
Conditions or Settings tabs
(normally the defaults are acceptable).
-
Click OK to close the
Create Task dialog.
The new task appears in the list of scheduled tasks
for this server.
-
Right-click the new task, and click Run
in the context menu.
This checks that the scheduled task completes successfully.
-
You may validate the results in the first place by inspecting the log file, and
subsequently examining the appropriate asset list within Software Vulnerability Manager.
FlexNet Manager Suite (On-Premises)
2022 R1