Upgrade/Create Databases

Any existing compliance databases must be upgraded.

Important: If you are using Microsoft SQL Server 2016, ensure that at least SP1 has been installed. This update addresses a defect in SQL Server that triggers a fatal error, as documented in https://support.microsoft.com/en-au/help/3173976/fix-fatal-error-when-you-run-a-query-against-the-sys-sysindexes-view-in-sql-server-2016.
Important: If you are using Microsoft SQL Server 2019, ensure that you have installed Cumulative Update Package 25 for SQL Server 2019 or later.
Important: If you are using Microsoft SQL Server 2019 or Microsoft SQL Server 2022, ensure that, for all your databases used in FlexNet Manager Suite, you are not using the "memory-optimized tempdb metadata" feature, which was introduced in SQL Server 2019. This is because SQL Server does not allow access to these memory-optimized tables from within SQL CLR (Common Language Runtime) stored procedures, and FlexNet Manager Suite uses a signed CLR assembly (with the SAFE permission set). For this reason, if the feature is left enabled, database errors will result. The feature may be disabled on each installed SQL Server 2019 or 2022 instance prior to creating the databases for FlexNet Manager Suite on that instance. To do so:
  1. Start SQL Server Management Studio.
  2. Open the New Query window.
  3. Paste either of the following queries into the window:
    ALTER SERVER CONFIGURATION SET MEMORY_OPTIMIZED TEMPDB_METADATA = OFF
    GO
    or
    EXEC sp_configure 'tempdb metadata memory-optimized', 0
    GO
    RECONFIGURE
    GO
  4. Click the Execute button to run your chosen query.
  5. Restart SQL Server so that it loads the new configuration.
With the memory-optimized tempdb metadata now disabled on this server, you may proceed with database installation. Remember to repeat this on each SQL Server 2019 or 2022 instance where you are creating databases for FlexNet Manager Suite.
You may wish only to update your existing database(s) for the new release. However, if you have previously been running a single combined database, you may wish to take this opportunity to scale up to separate databases (potentially sharing the same server, of course) for inventory and compliance. Separate databases are shown in the architectural diagram in Design the Final Topography.
Note: Database compatibility settings have a big impact on performance, especially for the nightly license reconciliation. Recommended settings are:
  • For Microsoft SQL Server 2014 through 2016, set the compatibility level for each database to SQL Server 2012 (110)
  • For Microsoft SQL Server 2017 you may use either the default compatibility level (such as SQL Server 2017 (140)), or set the compatibility mode to 110
  • For Microsoft SQL Server 2019 or Microsoft SQL Server 2022, use the default compatibility level (SQL Server 2019 (150)).
Important: All database scripts use Unicode character sets to allow for necessary localization. This means that:
  • Any FTP transfer of these files must be in binary mode (not ASCII mode)
  • The files must be edited only in editors that support Unicode character sets.
Failure to observe these precautions may result in failures in script operations.
Important: If you have been using Flexera Analytics (powered by Cognos), be aware that Cognos may acquire schema locks on objects within the operations databases of FlexNet Manager Suite. For this reason it is important to stop the Cognos server before updating databases, and to restart it afterwards.

Take note of all the database names you create with the -d parameter in the following steps. You need the names later (if database setup is done by a separate DBA, the database names must be handed off to the installing administrator). While it is possible to create your own database names, using the default names makes it easier to follow the rest of the documented processes.

Tip: There may be several accounts needing to log in directly to the application server for tasks related to FlexNet Manager Suite, such as manipulating log files, scheduling tasks, and the like (this excludes access through the web interface, which is not relevant to this discussion.) It is often convenient for these accounts to have the same database permissions as the services account on all components of the operations databases: compliance data, warehouse data, snapshot data, and inventory data. A suggested method is to create either a local or Active Directory security group (such as FNMS Administrators) and add all such accounts to this group. Then you can, for example, set these permissions by opening each database in Microsoft SQL Server Management Studio, and granting the appropriate privileges to the security group. The procedures are detailed in the topics covering database creation. Accounts to list in the security group minimally include:
  • The operational service account (suggested: svc-flexnet)
  • The installing administrator account (suggested: fnms-admin) for post-installation on-going administration (remembering that db_owner membership is required temporarily during installation, as described in Identify (or Set Up) Accounts)
  • Any operational account needing to log in to a central inventory beacon installed on your batch server (remember that, since the inventory beacon requires administrator privileges to run, this account is both a local administrator on the batch server and a db_owner)
  • Any future back-up administrator accounts needed for the application server.

To upgrade databases and extend where required:

  1. If your previous implementation included Flexera Analytics (powered by Cognos), stop the Cognos server.
  2. Create a security group (suggested: FNMS Administrators), and (optionally) add to it all accounts directly logging into the central application server (or you can add accounts later).
  3. In SQL Server Management Studio, ensure that the AD security group (suggested: FNMS Administrators) has a secure login:
    1. Under Security > Logins, create a new login.
      The Select User, Service Account or Group dialog appears.
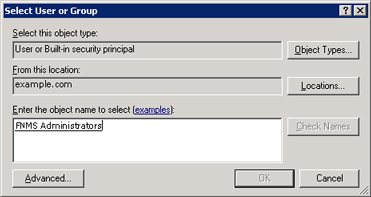
    2. Use the Object Types... button to ensure that User or Built-in security principal is selected as the object type.
    3. Use the Locations... button to select your Active Directory domain.
    4. As the object name, enter the name of your security group (suggested: FNMS Administrators), and use Check Names to validate that the group name is found.
    5. Click OK.
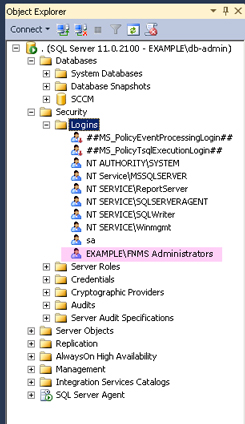
      The newly added group is visible under the Security > Logins node. (You will use this group after the creation of each database.)

  4. Do a full backup your existing FlexNet Manager Suite database(s).
    This is very important, especially as you may interrupt transaction logging in a few steps time.
  5. Back up any customized files to a temporary location, (for example, C:\temp).
    Customized files may include compliance importer procedures (XML files located by default in installation_dir\Compliance\ImportProcedures.
  6. Ensure that the target database instance is set for case-insensitive and accent-sensitive collations (as required by all databases in this system). To check the collation settings at the server level:
    1. In SQL Server Management Studio, locate the SQL Server instance in the Object Explorer pane.
    2. Right-click the server, and select Properties from the context menu.
    3. On the server Properties dialog, select the General tab, and check the current collation sequence.
    If the collation sequence includes the codes _CI_AS (for example, SQL_Latin1_General_CP1_CI_AS), you may proceed with the installation.
    Tip: Other suffixes like _KS or _WS are optional.
    If the server's default collation does not include _CI_AS, you can set the collation sequence for each database, as you create it, by right-clicking the new database, selecting Properties from the context menu, and choosing the collation on the Options tab. Remember that the collation sequence must be identical for:
    • The compliance database (suggested name: FNMSCompliance)
    • The reporting snapshot database (suggested: FNMSSnapshot)
    • The data warehouse database (suggested: FNMSDataWarehouse).
    For example, if the first of these has the collation sequence called SQL_Latin1_General_CP1_CI_AS, then all of them must have the exact same collation sequence. In contrast, the inventory database, when separate (suggested: FNMSInventory), and the Cognos content store may have different collation sequences, provided that these also include the same _CI_AS codes. The tempdb database (alone) may have any collation sequence, since FlexNet Manager Suite creates the required tables here with the appropriate collation sequence.
  7. Wherever possible, use SQL Server Management Studio to ensure that the database Recovery model is set to Simple (first recording its current value before changing it if necessary).
    1. In SQL Server Management Studio, right-click the database, and select Properties from the context menu.
    2. Select the Options tab.
    3. Check that Recovery model is set to Simple (or note its current value, change it to Simple, and click OK).
    Especially for large databases, this prevents the transaction log from growing to excessive proportions. Because of this growth, for databases of all sizes, the upgrade process will truncate the transaction log at the end of the process, and this truncation relies on the simple Recovery model. If the model is not currently Simple, note the existing value — there is a reminder below to restore this value after a successful database upgrade.
    Note: In some cases it is not possible to set the Recovery model to Simple, such as when you are using Availability Groups. In these cases, it is critical to allow sufficient space for the transaction logs to expand dramatically — as a general guideline, to 2-3 times the disk space currently used by your FlexNet databases. It is also important to remain vigilant during database migration, monitoring both the remaining available space as well as the rate at which the logs are growing. Finally, after processing each individual database, consider truncating the transaction logs before proceeding to the next one; and truncate again after the final database is processed.
  8. If you have not already done so, login to the central application server with a privileged account (suggestion: db-admin) that has the privileges described in Identify (or Set Up) Accounts.
  9. If you cannot access your downloaded and unzipped archives from your current login on this application server, copy Database Migration to FNMS 2024 R1.zip to this server and unzip it to a convenient location, such as C:\Temp\FNMSDownloads\Database Migration\.
    The archive unzips two subdirectories of your chosen path, Normal and Partitioned.
  10. In the Command Prompt window, navigate to your working copy of the migration folder (such as C:\Temp\FNMSDownloads\Database Migration\Normal).
    Tip: If your console window is in QuickEdit mode (visible in the Properties for the window), simply clicking in the window when it already has focus puts it into Mark or Select mode. In such a mode, a process that is writing to the window is paused, awaiting your input. Beware of unintentionally pausing database migration by extra clicking in this command prompt. A process that has been paused in this way is resumed when the window already has focus and you press any key.
  11. Remember: For a single database, use the same -d FNMSCompliance parameter as for the compliance database; or for a separate inventory database (recommended), use a different name such as FNMSInventory (shown here).
    Update the database for FlexNet native inventory collection by running the mgsDatabaseUpdate.exe program, using the following syntax:
    Important: Be very careful with copy and paste. Some tools "helpfully" convert a pasted minus (dash, or hyphen) character to something else, perhaps from an extended character set. Such substitutions will cause the command line to fail.
    mgsDatabaseUpdate.exe -i InventoryManagerMigration.xml -nsu -d FNMSInventory
                          [-l logFile] 
                          [-s serverName\instanceName] 
                          [-u userName] 
                          [-p password]
    where:
    -d <databaseName>
    The name of the database to connect to. A suggested name is FNMSInventory.
    Note: If you are currently operating from a new application server that has not previously connected to the database server, this parameter is mandatory. If you are upgrading an existing application server that has separately run your compliance product (not in co-location with Inventory Manager), the registry entry listed below for the -s option is normally set. In this case, if you omit the -d option, the database name is taken from the registry key.
    -i InventoryManagerMigration.xml This is the configuration file describing the upgrade tasks, and is of course mandatory.
    -l <logFile> Identifies the path and name of the file to receive a log of the upgrade tasks that occurred. If this option is not specified, a log file called InventoryMigration.log is created in the same folder where the executable is running.
    -nsu Run the database update without putting the database into single user mode. (The steps to perform migration require that multiple connections are made.)
    -p <password> The password for the username specified with -u. This is only required if the database server is configured to use SQL Server authentication.

    -s <serverName>
    or
    -s <serverName>\<instanceName>

    The name of the database server to connect to. If -s is not specified, the value at HKEY_LOCAL_MACHINE\SOFTWARE\Wow6432Node\ManageSoft Corp\ManageSoft \Reporter\CurrentVersion\DatabaseConnectionString is used. The registry key is present on the compliance and inventory servers. (If you have chosen to run this script on the database server itself, the registry entry is not available, and you must therefore specify the server name, or use the dot notation [.] to refer to the current server.)

    If the database is in a named instance (and not in the default database on the server), the instance name must be specified as well.

    -u <userName> The username with which to connect to the database. This is only required if the database server is configured to use SQL Server authentication. If not specified, Windows Integrated Authentication is used to connect to the database server using the current user’s credentials.
    Example: The following command performs the database upgrade using the standard configuration file. Instead of recording the log in the default log file, it will be written to the mig.log file specified in the command. Because the upgrade is running on a new server, the database server name (and, if required, instance name) and database name must be specified, and Windows Authentication is used to log in as the account name running the executable.
        mgsDatabaseUpdate.exe -i InventoryManagerMigration.xml 
                          -nsu 
                          -l mig.log 
                          -s MyDBServer\thisInstance 
                          -d FNMSInventory
    Check messages on the command line to confirm that the database upgrade was successful. If any error messages occur, check the log file to troubleshoot the problem. Do not proceed to the next step until the database upgrade is successful. For more information about database validation and remedies, see Database Validation.
    Tip: If, after the upgrade is complete, the database size still seems much larger than before, ask your database administrator to check whether there is a significant amount of unused space in the database files (using Microsoft SQL Server Management Studio). If so, a database shrink operation can reclaim this unused space.
  12. On this database, grant db_owner privileges to the security group (suggested: FNMS Administrators):
    1. Open this database in Microsoft SQL Server Management Studio, expose the Security > Users node, right-click and choose to create a new user.
      Tip: To ensure that every account is guaranteed to use the same default schema, in the Default schema field of the Database User - New dialog, enter the same dbo schema name for each of the operations databases for FlexNet Manager Suite. Do not enclose the name in square brackets.
    2. In the Database User - New dialog, set the User type to SQL user with login, and enter a User name (for example, call it FNMS Administrators as well).
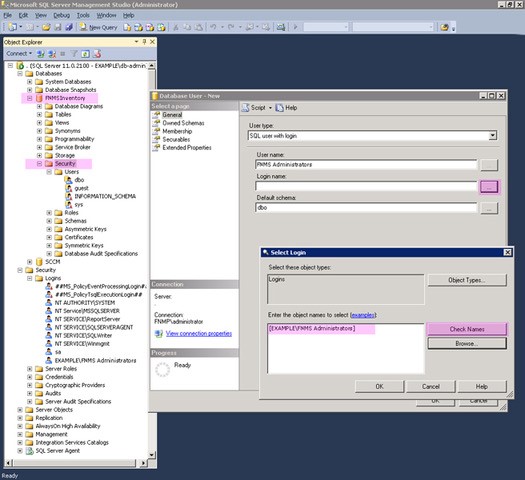
    3. Next to the Login name field, click the ellipsis (...) button, and use the Select Login dialog to select your Active Directory security group (suggested: FNMS Administrators). Click OK to close both dialogs.


    4. For your newly-added user, right-click and select the properties, and select the Membership page. Check the db_owner role, and click OK .
    5. Strongly recommended—set the compatibility level on this database:
  13. Optionally, re-index the inventory database.
    For details, see Re-Indexing a Database.
  14. Similarly, update the compliance database.
    1. Still in the command window on the database server, using the administrative account (db-admin), and in the same folder of the unzipped archive, execute:
      mgsDatabaseUpdate.exe -i ComplianceMigration.xml -nsu -d FNMSCompliance
                            [-l logFile] 
                            [-s serverName\instanceName] 
                            [-u userName] 
                            [-p password]
    2. Open this database in Microsoft SQL Server Management Studio, and grant db_owner privileges to the security group (suggested: FNMS Administrators).
      For more information about database validation and remedies, see Database Validation.
    3. Strongly recommended—set the compatibility level on this database:
  15. If you previously changed the setting for the database Recovery model, restore the original value now.
  16. Optionally, re-index the compliance database.
    For details, see Re-Indexing a Database.
  17. Upgrade your data warehouse database, running the mgsDatabaseUpdate.exe program again with different parameters:
    mgsDatabaseUpdate.exe -i DataWarehouseMigration.xml -nsu -d FNMSDataWarehouse 
                          [-l logFile] 
                          [-s serverName\instanceName] 
                          [-u userName] 
                          [-p password]
    Important: In this instance, the database name (-d parameter) is mandatory. (The suggested value is shown, which you should customize if your database name is different.)

    Check messages on the command line to confirm that the warehouse upgrade was successful. If any error messages occur, check the log file to troubleshoot the problem. Do not proceed to the next step until the upgrade is successful. For more information about database validation and remedies, see Database Validation.

  18. Strongly recommended—set the compatibility level on this database:
  19. If you began this process by stopping your Cognos server, you may restart it now.
Note: The snapshot database does not require migration.