Create Databases

Important: If you are using Microsoft SQL Server 2016, ensure that at least SP1 has been installed. This update addresses a defect in SQL Server that triggers a fatal error, as documented in https://support.microsoft.com/en-au/help/3173976/fix-fatal-error-when-you-run-a-query-against-the-sys-sysindexes-view-in-sql-server-2016.
Important: If you are using Microsoft SQL Server 2019, ensure that you have installed Cumulative Update Package 25 for SQL Server 2019 or later.
Important: If you are using Microsoft SQL Server 2019 or Microsoft SQL Server 2022, ensure that, for all your databases used in FlexNet Manager Suite, you are not using the "memory-optimized tempdb metadata" feature, which was introduced in SQL Server 2019. This is because SQL Server does not allow access to these memory-optimized tables from within SQL CLR (Common Language Runtime) stored procedures, and FlexNet Manager Suite uses a signed CLR assembly (with the SAFE permission set). For this reason, if the feature is left enabled, database errors will result. The feature may be disabled on each installed SQL Server 2019 or 2022 instance prior to creating the databases for FlexNet Manager Suite on that instance. To do so:
  1. Start SQL Server Management Studio.
  2. Open the New Query window.
  3. Paste either of the following queries into the window:
    ALTER SERVER CONFIGURATION SET MEMORY_OPTIMIZED TEMPDB_METADATA = OFF
    GO
    or
    EXEC sp_configure 'tempdb metadata memory-optimized', 0
    GO
    RECONFIGURE
    GO
  4. Click the Execute button to run your chosen query.
  5. Restart SQL Server so that it loads the new configuration.
With the memory-optimized tempdb metadata now disabled on this server, you may proceed with database installation. Remember to repeat this on each SQL Server 2019 or 2022 instance where you are creating databases for FlexNet Manager Suite.
FlexNet Manager Suite uses a number of separate databases. While scripts are provided, it is typical that these scripts will be inspected and executed by a database administrator (DBA).
Important: All database scripts use Unicode character sets to allow for necessary localization. This means that:
  • Any FTP transfer of these files must be in binary mode (not ASCII mode)
  • The files must be edited only in editors that support Unicode character sets.
Failure to observe these precautions may result in failures in script operations.
Create the databases in the order shown below: first the inventory collection database, then the compliance database, and so on.

Take note of all the database names you create with the -d parameter in the following steps. You need the names later (if database setup is done by a separate DBA, the database names must be handed off to the installing administrator). While it is possible to create your own database names, using the default names makes it easier to follow the rest of the documented processes.

Tip: There may be several accounts needing to log in directly to the application server for tasks related to FlexNet Manager Suite, such as manipulating log files, scheduling tasks, and the like (this excludes access through the web interface, which is not relevant to this discussion.) It is often convenient for these accounts to have the same database permissions as the services account on all components of the operations databases: compliance data, warehouse data, snapshot data, and inventory data. A suggested method is to create either a local or Active Directory security group (such as FNMS Administrators) and add all such accounts to this group. Then you can, for example, set these permissions by opening each database in Microsoft SQL Server Management Studio, and granting the appropriate privileges to the security group. The procedures are detailed in the topics covering database creation. Accounts to list in the security group minimally include:
  • The operational service account (suggested: svc-flexnet)
  • The installing administrator account (suggested: fnms-admin) for post-installation on-going administration (remembering that db_owner membership is required temporarily during installation, as described in Accounts)
  • Any operational account needing to log in to a central inventory beacon installed on your batch server (remember that, since the inventory beacon requires administrator privileges to run, this account is both a local administrator on the batch server and a db_owner)
  • Any future back-up administrator accounts needed for the application server.
Note: Database compatibility settings have a big impact on performance, especially for the nightly license reconciliation. Recommended settings are:
  • For Microsoft SQL Server 2014 through 2016, set the compatibility level for each database to SQL Server 2012 (110)
  • For Microsoft SQL Server 2017 you may use either the default compatibility level (such as SQL Server 2017 (140)), or set the compatibility mode to 110
  • For Microsoft SQL Server 2019 or Microsoft SQL Server 2022, use the default compatibility level (SQL Server 2019 (150)).

After the first step, the rest of this procedure (creating the databases) must be completed using a database administrator account (suggestion: db-admin, and see the required privileges in Accounts).

Tip: While databases are being created, you can start installing the central application servers in parallel. There are no interdependencies until you start running the PowerShell configuration scripts.

To create all required databases:

  1. Create a security group (suggested: FNMS Administrators), and (optionally) add to it all accounts directly logging into the central application server (or you can add accounts later).
  2. In SQL Server Management Studio, ensure that the AD security group (suggested: FNMS Administrators) has a secure login:
    1. Under Security > Logins, create a new login.
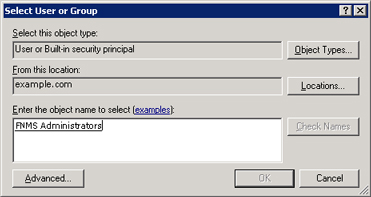
      The Select User, Service Account or Group dialog appears.

    2. Use the Object Types... button to ensure that User or Built-in security principal is selected as the object type.
    3. Use the Locations... button to select your Active Directory domain.
    4. As the object name, enter the name of your security group (suggested: FNMS Administrators), and use Check Names to validate that the group name is found.
    5. Click OK.
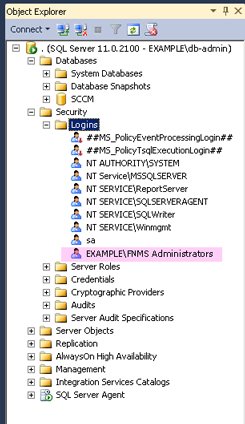
      The newly added group is visible under the Security > Logins node. (You will use this group after the creation of each database.)

  3. Ensure that the target database instance is set for case-insensitive and accent-sensitive collations (as required by all databases in this system). To check the collation settings at the server level:
    1. In SQL Server Management Studio, locate the SQL Server instance in the Object Explorer pane.
    2. Right-click the server, and select Properties from the context menu.
    3. On the server Properties dialog, select the General tab, and check the current collation sequence.
    If the collation sequence includes the codes _CI_AS (for example, SQL_Latin1_General_CP1_CI_AS), you may proceed with the installation.
    Tip: Other suffixes like _KS or _WS are optional.
    If the server's default collation does not include _CI_AS, you can set the collation sequence for each database, as you create it, by right-clicking the new database, selecting Properties from the context menu, and choosing the collation on the Options tab. Remember that the collation sequence must be identical for:
    • The compliance database (suggested name: FNMSCompliance)
    • The reporting snapshot database (suggested: FNMSSnapshot)
    • The data warehouse database (suggested: FNMSDataWarehouse).
    For example, if the first of these has the collation sequence called SQL_Latin1_General_CP1_CI_AS, then all of them must have the exact same collation sequence. In contrast, the inventory database, when separate (suggested: FNMSInventory), and the Cognos content store may have different collation sequences, provided that these also include the same _CI_AS codes. The tempdb database (alone) may have any collation sequence, since FlexNet Manager Suite creates the required tables here with the appropriate collation sequence.
  4. Enable Microsoft SQL Server Common Language Runtime (CLR) Integration.
    1. For SQL Server 2017 or later, you first need to install a Flexera signed security certificate which identifies the installation as a trusted assembly.
      Tip: If it happens that your various databases for FlexNet Manager Suite are on separate database servers running SQL Server 2017 or later, remember to install a copy of the certificate on each server, as follows.
      1. Download the file Flexera Signed Security Certificate for SQL Server 2017 and 2019.zip from the Product & License Center. Extract the FlexeraCodeSignining.cer file from the downloaded archive to a temporary location on the host where Microsoft SQL Server is running, in a file path to which the SQL Server service account has read access.
      2. Edit the SQLScript.sql file from the archive, and replace <location> with the path where you have copied the FlexeraCodeSigning.cer file. Save your change.
      3. Open SQL Server Studio and execute your updated SQLScript.sql file.
    2. Enable Microsoft SQL Server Common Language Runtime (CLR) Integration by executing the following stored procedure:
      sp_configure 'show advanced options', 1;  
                              GO  
                              RECONFIGURE;  
                              GO  
                              sp_configure 'clr enabled', 1;  
                              GO  
                              RECONFIGURE;  
                              GO 
      Note: By default the CLR integration feature is disabled and must be enabled by the DB system administrator before database creation and installation. CLR is disabled by default to increase security in shared hosting contexts. However, in this context, Flexera is a known vendor supplying trusted code for an environment fully controlled by your administrators. Flexera warrants that the CLR DLL signed by Flexera does not attempt to elevate privileges or behave maliciously.
  5. Create the database for FlexNet native inventory collection.
    Remember: If you plan to collect both inventory data and compliance data in a single database, use the same -d FNMSCompliance name parameter for this and the compliance databases; or for a separate inventory database (recommended), use a different name as shown below.
    Tip: To avoid typos, you may want to copy all five of the following command lines into your ASCII text editor, globally search for and replace the placeholders DBserver-name\instance name with the name of your SQL Server and your database instance (where that is not the default instance), and then copy/paste each modified command line when required.
    Important: Be very careful with copy and paste. Some tools "helpfully" convert a pasted minus (dash, or hyphen) character to something else, perhaps from an extended character set. Such substitutions will cause the command line to fail.
    1. On the database server (or the application server for a single-server implementation), open a command prompt.
      Tip: If your console window is in QuickEdit mode (visible in the Properties for the window), simply clicking in the window when it already has focus puts it into Mark or Select mode. In such a mode, a process that is writing to the window is paused, awaiting your input. Beware of unintentionally pausing database migration by extra clicking in this command prompt. A process that has been paused in this way is resumed when the window already has focus and you press any key.
    2. Navigate in the unzipped archive to the FlexNet Manager Suite\Database\Normal\FlexNet Manager Platform folder. (The database creation scripts can be run from a mapped network drive.)
    3. Execute the following (replacing the placeholders DBserver-name\instance name with the name of your SQL Server and your database instance):
      Note: The command-line switches (as usual), and the WindowsNT argument, are case sensitive.
      mgsDatabaseCreate -a WindowsNT -s DBserver-name\instance name -d FNMSInventory -i InventoryManagerDatabaseCreation.xml
      Wait for completion before proceeding.
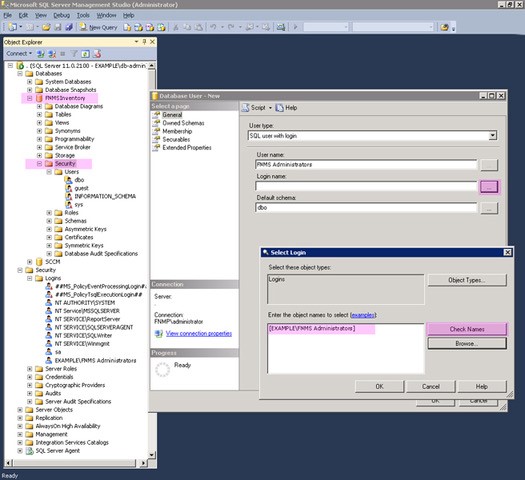
    4. Open this database in Microsoft SQL Server Management Studio, expose the Security > Users node, right-click and choose to create a new user.
      Tip: To ensure that every account is guaranteed to use the same default schema, in the Default schema field of the Database User - New dialog, enter the same dbo schema name for each of the operations databases for FlexNet Manager Suite. Do not enclose the name in square brackets.
    5. In the Database User - New dialog, set the User type to SQL user with login, and enter a User name (for example, call it FNMS Administrators as well).
    6. Next to the Login name field, click the ellipsis (...) button, and use the Select Login dialog to select your Active Directory security group (suggested: FNMS Administrators). Click OK to close both dialogs.


    7. For your newly-added user, right-click and select the properties, and select the Membership page. Check the db_owner role, and click OK .
    8. Strongly recommended—set the compatibility level on this database:
      • For Microsoft SQL Server 2014 through 2016, set to SQL Server 2012 (110)
      • For Microsoft SQL Server 2017, either set similarly to 110, or set to the default level for the version, such as SQL Server 2017 (140)
      • For Microsoft SQL Server 2019 or Microsoft SQL Server 2022, there is no need to set the compatibility level to anything other than the default.
  6. Create the operations database for compliance data (a two-part creation process):
    1. Still in the Command Prompt window on the database server, using the administrative account (db-admin), and in the same folder of the unzipped archive, execute the following (replacing the placeholders DBserver-name\instance name with the name of your SQL Server and your database instance, and paying attention to case sensitivity):
      mgsDatabaseCreate -a WindowsNT -s DBserver-name\instance name -d FNMSCompliance -i ManageSoftDatabaseCreation.xml
      (and wait for completion).
    2. Execute:
      mgsDatabaseCreate -a WindowsNT -s DBserver-name\instance name -d FNMSCompliance -i ComplianceDatabaseCreation.xml
    3. Repeat the steps outlined for the inventory database to grant db_owner privileges to the security group (suggested: FNMS Administrators).
    4. Strongly recommended—set the compatibility level on this database:
  7. Create a data warehouse database (used for trend analysis, some product reports, and Cognos-based reporting):
    1. In the same archive folder, execute:
      mgsDatabaseCreate -a WindowsNT -s DBserver-name\instance name -d FNMSDataWarehouse -i DataWarehouseCreation.xml
    2. Repeat the steps outlined for the previous databases to grant db_owner privileges to the security group (suggested: FNMS Administrators).
    3. Strongly recommended—set the compatibility level on this database:
  8. Create a snapshot database (used for performance optimization):
    1. In the same archive folder, execute:
      mgsDatabaseCreate -a WindowsNT -s DBserver-name\instance name -d FNMSSnapshot -i SnapshotDatabaseCreation.xml
    2. Repeat the steps outlined for the previous databases to grant db_owner privileges to the security group (suggested: FNMS Administrators).
    3. Strongly recommended—set the compatibility level on this database:
  9. Check all database log files for any errors before proceeding with any installation of FlexNet Manager Suite software.
  10. Close the command window.
  11. If you are also implementing Flexera Analytics, you need to create the content store database. The content store is a Microsoft SQL Server database used to store information about reporting models, folders, reports, and saved results, which is required by Flexera Analytics. Frequently, this database is installed separately from the other databases, so that it can be configured differently as described below. If your content store is on a separate database server, ensure that (like all the other databases for this system) it uses a case insensitive, accent sensitive collation sequence. If required, create the content store database now:
    1. Open SQL Server Configuration Manager, expand SQL Server Network Configuration, select Protocols for MSSQLSERVER, and ensure that TCP/IP is Enabled, as required by Cognos to access the data it needs to populate reports.
    2. Open the Microsoft SQL Server Management Studio, and:
      • In the Object Explorer panel, right-click the parent database server.
      • Select Properties from the context menu.
      • In the Server Properties dialog, select the Security page.
      • Ensure that the Server authentication is set to SQL Server and Windows Authentication mode, as required by Cognos.
      • Close the Server Properties dialog.
    3. Again in the Object Explorer panel, expand the Security folder (first-level child of the top SQL Server node), right-click Logins and select New Login....
    4. Specify the login name for the IBM Cognos Service to access the content store.
      This account needs the following permissions on the Cognos content store database:
      • Create and Drop table privileges

      • Member of the db_ddladmin, db_datareader, and db_datawriter roles

      • Must be the owner of the default schema on this database.

    5. Select SQL Server authentication and enter the appropriate password in the Password and Confirm password fields.
      Note: The password for the SQL Server login account used by the IBM Cognos Service must not contain any of the greater-than, less-than, or ampersand characters (< > &).
    6. Clear Enforce password policy.
      While saving the password, this clears all three password policy check boxes.
    7. Click OK.
    8. Again in the Object Explorer panel, right-click Databases and select New Database.... Provide an appropriate name for your database (such as contentstore) and configure the initial database settings (file size, location, and the like) as appropriate.
      This database is typically very small, in the order of 12 MB, with potential growth depending on how many reports you store.
    9. On the Options page of the New Database dialog, ensure that the selected Collation ends in CI_AS (for example, SQL_Latin1_General_CP1_CI_AS).
    10. Click OK to create the database.
    11. In the Object Explorer panel, expand Databases, expand the contentstore database, then expand its Security folder, right-click Schemas and select New Schema....
    12. Specify the Schema name, and click OK.
      Suggestion: FlexNetReportDesignerSchema
    13. With the same contentstore database selected, under its Security folder, right-click Users and select New User....
    14. For SQL Server 2012 and later, from the User type drop-down list, select SQL user with login.
    15. Specify a name for the database user in the User name field.
    16. Use the Login name field to browse and select the account that you created in step 11.c above.
    17. Use the Default schema field to browse and select the schema that you created in step 11.l.
    18. In the Owned Schemas list, select the same schema as specified in Default schema.
    19. In the Membership list (called Role Members for SQL Server 2008 R2 and earlier), select db_datareader, db_datawriter, and db_ddladmin.
    20. Click OK.
      You can test the new login by disconnecting from SQL server, and the attempt to log in again using the account. You should be able to see the database in the object explorer.
Finally, if you have not already done so, don't forget to add the necessary accounts, including the operational service account (suggested: svc-flexnet) and the installing administrator account (suggested: fnms-admin), to the FNMS Administrators security group.