Server Options / Distribution System Tab
AdminStudio 2023 | 25.0 | Application Manager | Options Dialog Box
Edition:Application Manager is included with AdminStudio Professional and Enterprise Editions.
On the Distribution System tab of the Application Manager Options dialog box, you can define multiple named connections to ConfigMgr (Formerly called as System Center Configuration Manager), Citrix XenApp Server, Microsoft App-V Server, Symantec Altiris Server, Microsoft Intune, Custom Distribution System, and Workspace ONE Server distribution systems. This enables you to both have multiple connections easily available during import and distribution, and to refer to those connection settings by name in AdminStudio PowerShell Cmdlets commands.

Options Dialog Box / Distribution System Tab
The Server Options / Distribution System tab of the Options dialog box includes the following properties:
|
Property |
Description |
|||||||||||||||||||||||||||||||||||||||||||||
|
Name |
Enter a name to identify this named connection to a distribution system. |
|||||||||||||||||||||||||||||||||||||||||||||
|
Distribution System |
Select one of the following to identify the distribution system technology of this named connection:
|
|||||||||||||||||||||||||||||||||||||||||||||
|
Server |
Enter the name of your distribution system server. |
|||||||||||||||||||||||||||||||||||||||||||||
|
Site Code |
Enter the code that identifies your distribution system site. Note:If you are creating a named connection to a Microsoft App-V, Citrix XenApp or Altiris server, leave the Site Code field blank. This field is not displayed when creating a named connection to a Casper Server. |
|||||||||||||||||||||||||||||||||||||||||||||
|
Distribution System Authentication / Authentication Type |
Choose one of the following options to identify the authentication type you are going to use to access the specified distribution system:
|
|||||||||||||||||||||||||||||||||||||||||||||
|
Distribution Point |
(Casper only) Enter the Casper distribution point you want to distribute packages to. Note:Casper supports multiple server infrastructures, but AdminStudio only supports the File Share Distribution Points infrastructure, and copies packages to a UNC File Share Distribution Point in Casper. AdminStudio currently does not support copying packages to JDS Instances, Cloud Distribution Points, Software Update Servers, or NetBoot Servers. |
|||||||||||||||||||||||||||||||||||||||||||||
|
Publish Location Information / Authentication Type |
Choose one of the following options to identify the authentication type you are going to use to access the shared location where you will be publishing packages during distribution:
Note:The fields in the Publish Location Information section are not required when setting up a connection to Workspace ONE Server. Applications are published directly to the Workspace ONE Server, not to a shared location. |
|||||||||||||||||||||||||||||||||||||||||||||
|
Script Information |
(Custom Distribution Plugin only) Enter information about the script file that you wish to be executed after a package is copied to the path specified in the Location to Publish Packages field.
Note:It is required that the specified PowerShell script file must be present in the AdminStudio installed machine. Note:The specified PowerShell script file will be executed locally on the AdminStudio installed machine during publish.
The Script Parameters field must be used to pass the AdminStudio placeholders value to the parameters in the PowerShell script file. During the execution of the script, AdminStudio will replace the specified parameters with the value of the placeholders for the package being published.
Note:Enter the script parameters in comma-separated format with no gap: For Example: -ProductName [ProductName],-Vendor [Vendor],-Version [Version] Note:If you use any other delimiter than a comma, an error message will be generated. |
|||||||||||||||||||||||||||||||||||||||||||||
|
Location to Publish Packages |
Enter or browse to the shared location where you will be publishing packages during distribution. Note:The fields in the Publish Location Information section are not required when setting up a connection to Workspace ONE Server. Applications are published directly to the Workspace ONE Server, not to a shared location. Note:When publishing to a Casper server, AdminStudio publishes packages to a directory named Packages. Note:You can add the following placeholders in the shared location path to publish packages. These placeholders are applicable only for Custom Distribution Plugin.
For Example: When publishing 7-Zip v19.00, if the following shared path is specified in the Location to Publish Package field: \\10.XXX.XXX.XXX\PackageRepo\[Vendor]\[ProductName]\[Version] then the placeholders will be resolved to create the shared path as shown below: \\10.XXX.XXX.XXX\PackageRepo\Igor Pavlov\7-Zip\19.00 |
|||||||||||||||||||||||||||||||||||||||||||||
|
New |
Click to create a new named connection. A set of empty connection setting fields are displayed. |
|||||||||||||||||||||||||||||||||||||||||||||
|
Delete |
Click to delete the selected named connection. |
|||||||||||||||||||||||||||||||||||||||||||||
|
Test |
Click to test the connection settings of the selected named connection. Messages will be displayed in the Test area to confirm the connection. |
Microsoft App-V Server Distribution Requirements
In order for you to distribute packages to a Microsoft App-V Server, the WinRM service must be running, and the App-V Server must be in the list of trusted hosts. Both of these can be accomplished from PowerShell by running the following command:
set-item wsman:\localhost\Client\TrustedHosts –value <Machine Name>
The following image is an example of starting the WinRM service in PowerShell.
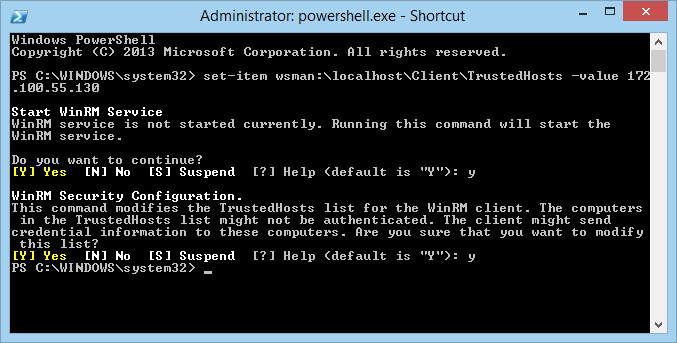
Starting the WinRM Service in PowerShell
See Also