Select Virtual Machines
AdminStudio 2023 R2 SP1 | 26.01 | Automated Application Converter
The contents of the Select Virtual Machines panel depends upon the selection you made on the Select Virtual Machine Source panel:
| • | Browse local machine—If you selected this option, there are no virtual machines listed on the Select Virtual Machines panel. You need to click Browse Folders or Browse Files to select virtual images. The Browse for Folder Dialog Box or Select Virtual Machine Image File Dialog Box would open. |
| • | Browse local machine—If you selected this option, there are no virtual machines listed on the Select Virtual Machines panel. You need to click Browse Folders or Browse Files to select virtual images. The Browse for Folder Dialog Box or Select Virtual Machine Image File Dialog Box would open. |
| • | Azure Virtual machines—If you selected this option, azure virtual machines will be listed on the Select Virtual Machines panel. |

Note:You can add only one Azure VM at a time. To add another, click “Add Machine” under the Virtual Machine Import Wizard again.
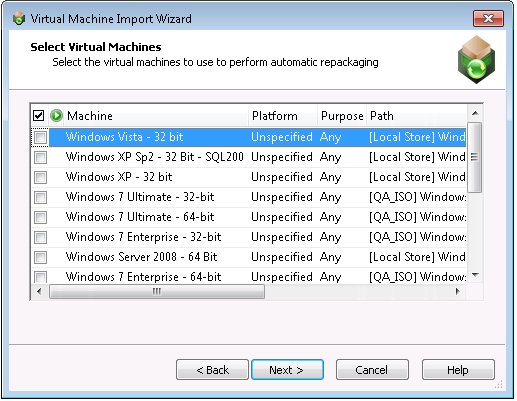
The Select Virtual Machines panel includes the following options:
|
Option |
Description |
|||||||||
|
|
Selection column. To select a virtual machine to use for automated repackaging, click the check box in this column. |
|||||||||
|
Status |
Indicates the status of the virtual machine. On the Select Virtual Machines panel, no status is indicated, but when this column is shown on the Machines tab, status will be indicated by an icon. See Machines Tab for more information. |
|||||||||
|
Machine |
Name of the virtual machine image. |
|||||||||
|
Platform |
Identifies the operating system platform of the virtual machine. When you select a virtual machine to add to the Automated Application Converter, you need to manually identify the operating system platform either on the Select Virtual Machines panel or by clicking in this field on the Machines tab and making a selection from the list. When you perform a conversion run, you are given the opportunity (on the Automated Repackaging on Virtual Machines panel) to either select a specific platform to use for the repackaging of the selected packages, or to select Any Platform, meaning that all of the selected virtual machines will be used for repackaging. |
|||||||||
|
Purpose |
By default, virtual machines that you add to the Packages tab will be available for use for both automated repackaging of packages and for testing packages. However, if you want to specify that a virtual machine should be used for only repackaging or for only testing, click in the Purpose column of that virtual machine and select one of the following options:
Important:If the Purpose column is not listed in the Machines list, you can select it in the Columns area and drag it to the list, or you can edit the Purpose value in the Properties window. Note:The Launch Package for Testing functionality will primarily be useful to test converted packages. However, if a problem occurs during conversion, it is also possible to use this function to install and launch the source package for testing. |
|||||||||
|
Path |
Path to the virtual machine on the virtual machine server or your local machine. |