Testing a Repackaged Application and Resolving Issues
In this procedure, you will test the Windows Installer packages you imported into the Application Catalog, and then distribute a package to a network location.
|
# |
Step |
Instructions |
Results |
||||||||||||
|
Perform Windows Installer best practices and OS compatibility testing |
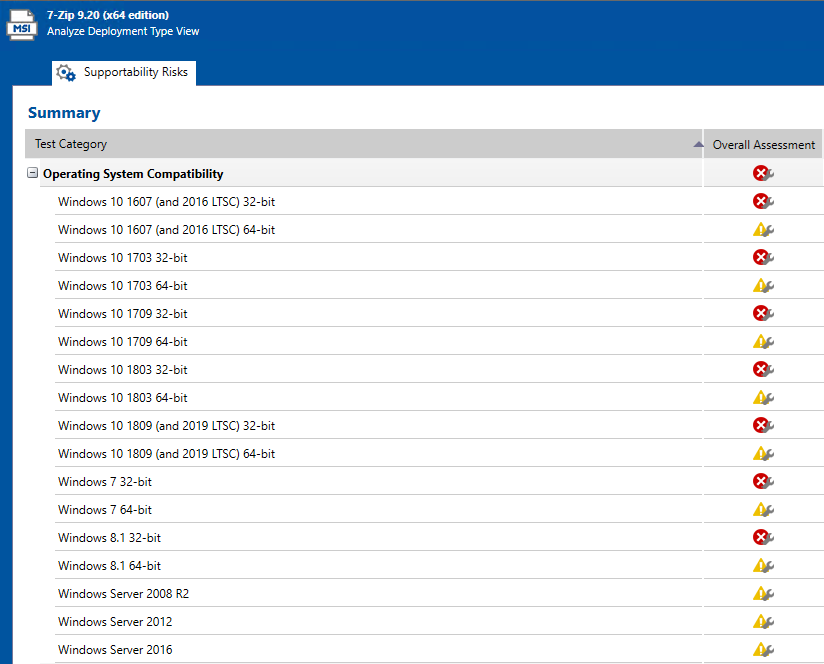
To perform Windows Installer best practices and operating system compatibility testing on all of the packages in the Application Catalog, first select the Analyze tab in the Application Manager ribbon. Then, select the Applications group in the Application Manager tree, and click Execute Tests. Note:For more information, see Performing Compatibility and Best Practices Testing. When testing is finished, view the test results by selecting a Windows Installer package in the tree to open the Summary view on the Supportability Risks tab of the Analyze Deployment Type View, as shown below:
On Analyze tab views, groups, applications, and packages are assigned a test status in each test group using status icons. For packages, the status icon identifies that package’s test status (as described in About Status Icons). For groups and applications, Application Manager considers all of the packages in that group or application, and displays the status icon for the package that has the status at the highest hierarchical level, as described in the Hierarchical Level of Status Icons section of the About Status Icons help topic. Note:For more information, see Viewing Summary Test Results. |
|||||||||||||
|
Perform application conflict testing |
Use the Conflict Wizard to detect conflicts between the following two packages:
Note:For instructions, see Testing for Conflicts Between Packages. |
|||||||||||||
|
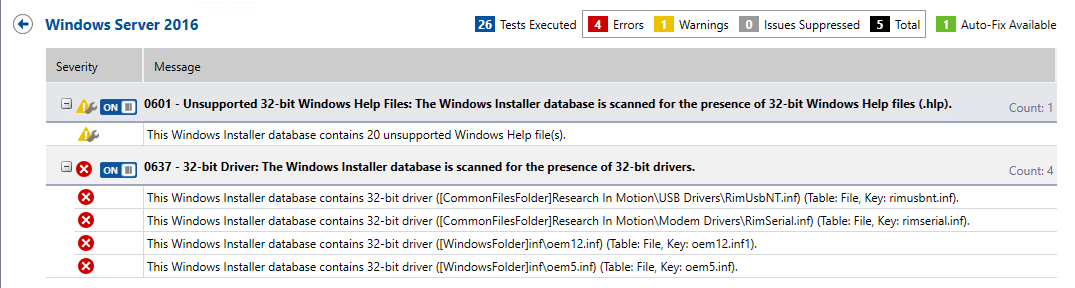
Review test results |
When application conflict testing is finished, view the test results by selecting the Sample Application Source MSI package in the tree, and then clicking on Windows Installer Conflicts under Application Conflicts on the Supportability Risks tab of the Analyze Deployment Type View. Errors and warnings are listed. Click the plus sign next to a test name to view individual error/warning messages for that package:
Next, click the suppress (ON/OFF) button next to the Identical Merge Modules error to suppress that test from test totals and from automatic resolution. The button toggles to the OFF position and the error icon turns to gray. Note:For more information, see the following topics:
|
|||||||||||||
|
Perform automatic issue resolution |
Issues for which automatic fixes are available are identified by the Error With Fix or Warning With Fix icon:
To automatically resolve all issues for which automatic fixes are available, select the Applications group node in the tree and click Resolve Issues on the Analyze tab of the ribbon. Note:For more information, see Performing Automatic Issue Resolution. |
Issue resolution begins, progress messages appear in the Output window, and Application Manager performs the following tasks:
When issue resolution and reimporting is complete, look at the Analyze Group View, Application View, or Deployment Type View of the package, application, or group that you tested. You will see that the Error With Fix and Warning With Fix icons have been replaced with the status icon with the next highest level (as described in the Hierarchical Level of Status Icons section of the About Status Icons help topic) in that test category. |
||||||||||||