Converting your Existing Packages to MSIX using Repackager Tool and Digital Signing
AdminStudio 2025 | 29.0 | Application Manager
To convert your existing packages to MSIX using the Repackager tool and digital signing, perform the following steps.
To convert existing packages to MSIX using Repackager and digital signing:
|
2.
|
Repackage an .msi or .exe to convert to .msix format. |
|
3.
|
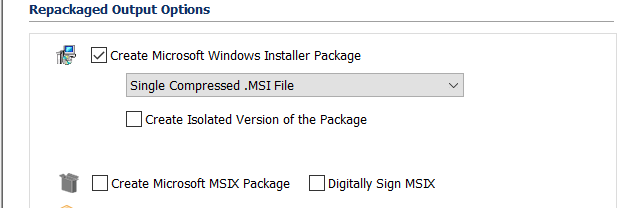
On the Repackaged Output Options dialog box, select a package. |
|
4.
|
You can select any of the following options to convert the package: |
|
•
|
Create Microsoft MSIX Package—You can convert the selected package to MSIX package but will not be signed digitally. |
|
•
|
Digitally Sign MSIX—You will need a valid Pfx file certified by CA, Pfx file password, Certificate Store Location, Store Name, and Store Subject where to find the certificate. |
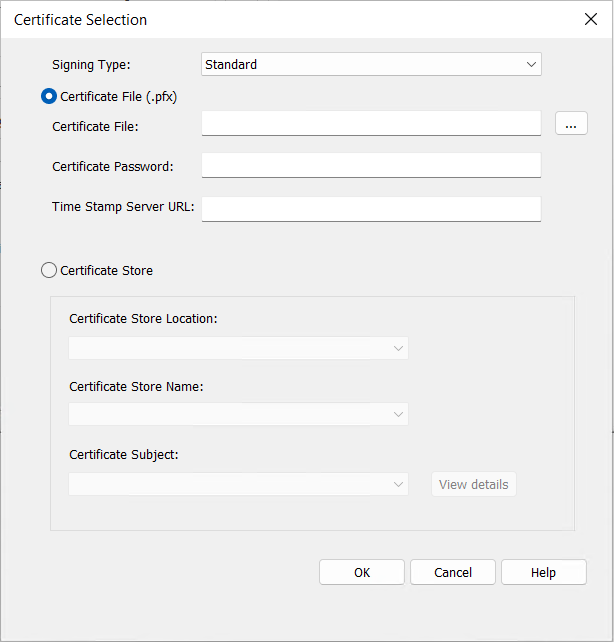
If you select the Digitally Sign MSIX option, the Certificate Selection wizard appears.
|
5.
|
To convert to digital signing: |
In the Signing Type drop down, choose one of the following.
|
•
|
Standard—Uses this option to digitally sign MSIX packages with a pre-configured certificate. Suitable for most common signing scenarios. |
|
•
|
Custom—Use this option to configure and use a custom signing solution for digitally signing MSIX packages. This is useful for automation scenarios where the standard signing option doesn't meet your requirements. |
If you select Standard, perform the following:
In the Select Certificate for Signing drop down, select either:
|
•
|
Certificate File (.pfx) |
Certificate File (.pfx)
|
•
|
Certificate File—Specify a path to a valid PFX certificate file. Click ellipses (...) to browse and select the valid path. |
|
•
|
Certificate Password—Specify the password for the PFX certificate file. |
|
•
|
Time Stamp Server URL—Specify the valid Time Stamp Server URL. |
Certificate store
|
•
|
Certificate Store Location—Select either User or Machine |
|
•
|
Certificate Store Name—Select any one of the store name from the drop down list. |
|
•
|
Certificate Subject—Select respective certificate subject from the drop down list. Click View details button to view the details of the selected Certificate. |
Note:If you select the Certificate Store option, make sure that the Certificate has been imported. For more details on importing the certificate, see Import Certificate.
If you select Custom, perform the following:
|
•
|
Path—Specify the location of the signing tool or a script. Supported file types include: |
|
•
|
.ps1 (PowerShell Script). |
Click ellipses (...) to browse and select the valid path
Examples:
<ProgramFilesFolder>\Windows Kits\10\bin\<WinSDKVer>\x86\signtool.exe
|
•
|
Arguments—Specify the required command-line arguments for the Signtool or custom script file. These arguments will be passed at runtime during signing process. |
Enter the valid command-line parameters for the specified Path field.
Examples:
sign /fd SHA256 /f <ProgramFilesFolder>\testCA.pfx /t http://timestamp.digicert.com /p 123 /v "[Filename]"
Note:The Publisher Name in the MSIX package must exactly match the Subject in the signing certificate.
Note:Always include the "[Filename]" placeholder where the MSIX file path should appear. At runtime, this will be automatically replaced with the actual MSIX file path.
For more information, see Custom Signing with HSM Support.
|
7.
|
Click Build. The package is created in the MSI_Package folder. |
Note:Repackager now support Windows Services for MSIX Packages. A Windows Service installed while converting a legacy package format (MSI/EXE) will be captured and packaged into the MSIX package upon conversion.