Editing Virtual Machine Properties on the Machines Tab
AdminStudio 2021 | 21.0 | Automated Application Converter
By default, the list of machines on the Machines tab lists the Machine, Platform, Purpose, and Path columns. Additional properties can be viewed and edited in the Properties window.
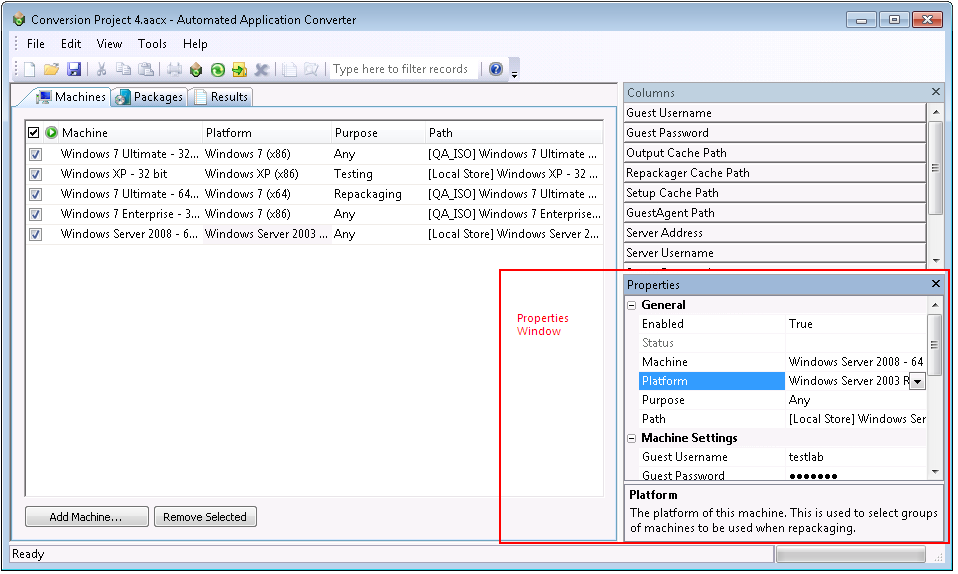
Properties Window on the Machines Tab
To edit the properties of a virtual machine, perform the following steps:
To edit a virtual machine’s properties:
| 1. | Open the Machines tab. |
| 2. | Select a virtual machine in the list. |
| 3. | Click in the list or in the Properties window to edit the following properties: |
|
Property |
Description |
|||||||||
|
Enabled |
Set to True to enable the machine or False to disable it. When enabled, it is available for use by Automated Application Converter. |
|||||||||
|
Status |
Lists a status to indicate whether the machine is idle, is in use, or has suffered an unrecoverable error in the last attempt to use it. |
|||||||||
|
Name of the virtual machine. |
||||||||||
|
Field that identifies the operating system platform of the virtual machine. When you select a virtual machine to add to the Automated Application Converter, you need to manually identify the operating system platform either on the Select Virtual Machines panel or by clicking in this field on the Machines tab and making a selection from the list. When you perform a conversion run, you are given the opportunity (on the Automated Repackaging on Virtual Machines panel) to either select a specific platform to use for the repackaging of the selected packages, or to select Any Platform, meaning that all of the selected virtual machines will be used for repackaging. |
||||||||||
|
By default, virtual machines that you add to the Packages tab will be available for use for both automated repackaging of packages and for testing packages. However, if you want to specify that a virtual machine should be used for only repackaging or for only testing, click in the Purpose column of that virtual machine and select one of the following options:
Important:If the Purpose column is not listed in the Machines list, you can edit the Purpose value in the Properties window. Note:The Launch Package for Testing functionality will primarily be useful to test converted packages. However, if a problem occurs during conversion, it is also possible to use this function to install and launch the source package for testing. |
||||||||||
|
Path on the server or file system to this virtual machine image file is located. |
||||||||||
|
The user name to use to login to this virtual machine. |
||||||||||
|
The password to use to login to this virtual machine. |
||||||||||
|
Name of the snapshot to revert to before starting an automated repackaging session. This is only used if the virtualization technology supports named snapshots. If this value is not specified, but named snapshots are supported on the virtualization technology, the default name of AutoRepack_Base will be used. |
||||||||||
|
App-V 5.x Sequencer Snapshot |
Enter the name of the snapshot to revert to before starting conversion using the App-V 5.x Sequencer. Important:If you do not specify a snapshot name and then attempt to perform conversion using the App-V 5.x with Sequencer package creation method, you will receive the following error message and the conversion will fail. Error: No snapshot name was specified for App-V 5.x Sequencer conversion. Please specify this for at least one machine in the Machines tab and retry. Important:Both the Microsoft App-V 5.x Sequencer and the Virtual Machine Preparation client must be installed on this snapshot. For more information, see Preparing a Snapshot for App-V 5.0 Conversion Using the App-V 5.0 Sequencer. |
|||||||||
|
App-V 5.x Client Snapshot |
Enter the name of the snapshot to revert to before testing an App-V 5.x package. This snapshot will be used if the user right-clicks on this App-V 5.0 virtual package on the Packages tab of Automated Application Converter and selects Launch Package for Testing from the shortcut menu. Note:If you do not specify a snapshot name and then attempt to test an App-V 5.x package by selecting Launch Package for Testing from the shortcut menu, the following error will appear in the output window: Error: No snapshot name was specified for testing with App-V 5.x Client. Please specify a snapshot name in the Machines tab and retry. Important:Both the Microsoft App-V 5.x client and the Virtual Machine Preparation client must be installed on this snapshot. For more information, see Preparing a Snapshot for App-V 5.0 Testing Using the App-V 5.0 Client. |
|||||||||
|
The virtualization technology powering this virtual machine. |
||||||||||
|
Specify the location for the repackaged output on the virtual machine. By default, this value is C:\AutoRepack. |
||||||||||
|
Specify the location where Repackager will be installed on the virtual machine. By default, this value is C:\Repackager. |
||||||||||
|
Specify the location where the package will be copied to on the virtual machine. By default, this value is C:\AppSetup. |
||||||||||
|
Specify the location where the GuestAgent.exe file will be installed on the virtual machine. By default, this value is C:\GuestAgent.exe. |
||||||||||
|
The address of the virtual machine server on which this virtual machine is found. This may be a host name or a URL. |
||||||||||
|
The user name of the account used to access the virtual machine server. |
||||||||||
|
The password of the account used to access the virtual machine server. |
||||||||||
|
Add Machine |
Click to launch the Virtual Machine Import Wizard, which you can use to add virtual machines to the Machines tab. |
|||||||||
|
Remove Selected |
Click to remove the selected virtual machine from this list. Note:A virtual machine is selected for removal when you click on it and it becomes highlighted, not by selecting the virtual machine’s check box. Use the Ctrl key to select multiple machines. |
See Also