Associating a Virtual Package with its Source Windows Installer Package
AdminStudio 2021 R2 | 22.0
You can import Microsoft App-V, VMware ThinApp, and Citrix XenApp virtual packages into the Application Catalog and associate them with their source Windows Installer package.
Virtual packages are self-contained entities which ordinarily cannot be modified after they are created. By associating a virtual package with the Windows Installer package which originated it, you have the convenience of being able to easily locate the virtual package’s originating Windows Installer package, modify the original Windows Installer package, and then regenerate the virtual package.
Application Manager uses a package’s Package Code to associate packages and to automatically group them under an application node (if they are imported into the same group).
If a Windows Installer package and a virtual package that AdminStudio created by converting that Windows Installer package are imported into the same Group, the virtual package will be associated with its source Windows Installer package. However, if you want to manually associate a virtual package to its source Windows Installer package, perform the following steps:
To manually associate a virtual package with a Windows Installer package:
| 1. | Open the Home tab of Application Manager |
| 2. | Right-click on the virtual package you want to make an association for, and select Associate Package from the shortcut menu. The Virtual Package Association dialog box opens, listing Windows Installer packages in the Application Catalog. |
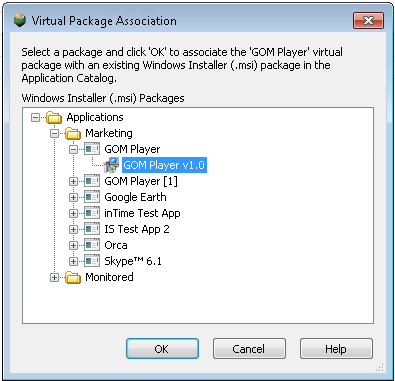
| 3. | Select the virtual package’s source Windows Installer package and click OK. The virtual package is now associated with the selected Windows Installer package. |
Caution:After you have imported a virtual package into the Application Catalog, you are permitted to use the Associate Package function to associate it with any Windows Installer package in the Application Catalog, even one that is not its source package. Therefore, use this feature with caution.
Deleting a Virtual Package Association
You can delete a virtual package’s association with a Windows Installer package by performing the following steps:
To delete a virtual package association:
| 1. | Open Application Manager. |
| 2. | Right-click on a virtual package, point to Delete and click Package Association on the shortcut menu. The Delete Virtual Package Association dialog box opens, prompting you to confirm the deletion. |
| 3. | Select the association that you want to delete and click OK. The association is deleted. |