Managing Files and Folders in a Citrix Profile
AdminStudio 2022 | 23.0 | Citrix Assistant
The directories in the destination tree on the Profile Files page of the Citrix Assistant represent how your application will be organized within its isolation environment.
On the Profile Files page, you can view all of the files and folders that are currently in your Citrix profile, add new files and folders to include in the Citrix profile, and delete files and folders from the Citrix profile.
| • | Adding Files to a Citrix Profile |
| • | Adding an Existing Folder (and its Contents) to a Citrix Profile |
| • | Creating a New Folder |
| • | Moving Files and Folders |
| • | Deleting Files and Folders |
Adding Files to a Citrix Profile
To add files to a Citrix profile, perform the following steps:
To add a files to a Citrix profile:
| 1. | In the Citrix Assistant, open the Profile Files page. The files and folders are listed in the Citrix Profile tree, organized by installation directory. |
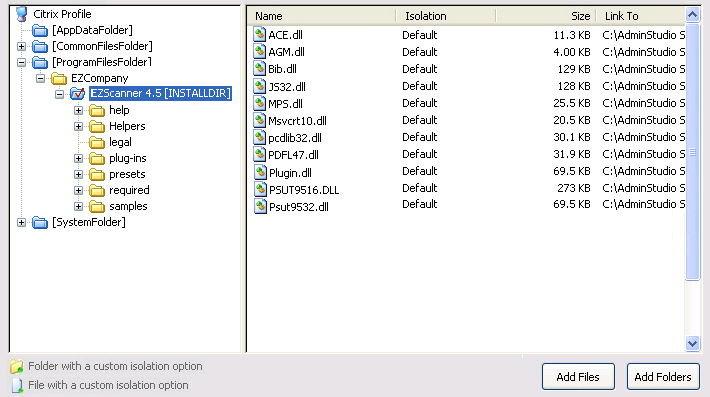
Folders are listed in the column on the left, and all of the files in the selected folder are listed on the right. Blue folders are the supported MSI standard folders. The folder with the check mark is INSTALLDIR, which represents the main product installation directory.
| 2. | Browse through the folder tree to find the folder that you would like to add files to. |
| 3. | Select the folder and click the Add Files button. The Open dialog box opens. |
| 4. | Select the file or files that you want to add and click Open. The files you selected are now listed. |
Tip:To select multiple files, use the Shift key (for contiguous files) or the Ctrl key (for non-contiguous files).
Adding a File by Dragging and Dropping Files From Your System
You can also add files or folders to your Citrix profile on the Profile Files page by dragging them from a directory on your computer to the desired location in the tree.
Adding an Existing Folder (and its Contents) to a Citrix Profile
To add an existing folder and all of the files and subfolders within it to a Citrix profile, perform the following steps:
To add an existing folder to a Citrix profile:
| 1. | In the Citrix Assistant, open the Profile Files page. The files and folders are listed in the Citrix Profile tree, organized by installation directory. |

| 2. | Browse through the folder tree to find the folder that you would like to add a folder into. |
| 3. | Select the folder and click the Add Folders button.The Browse for Folder dialog box opens, listing all of the directories available to your computer. |

| 4. | Select a folder and click OK. |
If you are editing an InstallShield project (not a Windows Installer package), you are prompted to choose whether you want to create a dynamic file link to the source folder.
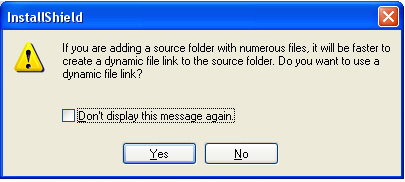
| 5. | Indicate whether you want to create a dynamic file link by selecting one of the following: |
| • | No—For more flexibility with Citrix options, it is recommended that you select No to indicate that you do not want to use a dynamic file link, because you would then not be able to customize isolation options for any of the items in this folder. |
| • | Yes—If you wish to use the default isolation options for all the files and folders under this folder, then select the dynamic file link option by clicking Yes. The Dynamic File Link Settings dialog box would then open, prompting you to specify the source folder for your dynamic link, and to set options regarding which files and folders to include in the dynamic link. See Dynamic File Link Settings Dialog Box. |
The folder that you selected is now listed, along with of the files and folders within it.
You can create a new, empty folder by selecting an existing folder in the tree and selecting New Folder from the context menu.
To create a new folder:
| 1. | Right-click on a folder in the Citrix Profile tree and select New Folder. A new folder is created as a subfolder of the selected folder: |
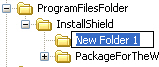
| 2. | Enter a name for the new folder. |
To change the folder’s location in the Citrix Profile folder tree structure, perform the following steps:
To move a file or folder:
| 1. | Select the file or folder that you want to move. |
| 2. | With the mouse button down, drag the file or folder to the new location. |
| 3. | Release the mouse button. |
To delete a file or a folder (and all of its contents) from a Citrix profile, perform the following steps:
To delete a file or folder:
| 1. | Select the file or folder in the Citrix Profile tree that you want to delete. |
| 2. | Select Delete from the context menu. You are prompted to confirm the deletion. |
| 3. | Click Yes. The selected file or folder is deleted. |
CautionIf you choose to delete a folder, you are also deleting all of the files and subfolders that the folder contains from the entire Project, not just from the Citrix profile.
Note:You cannot delete predefined folders. You can only turn off the display of those folders. For more information, see Controlling the Display of Predefined Folders.