
AdminStudio Inventory and Rationalization 2015 SP1
Application Recognition Service automatically recognizes Active Directory users, but does not contain any Active Directory group information. Therefore, you need to enter group information into an Excel spreadsheet template and upload it to the Application Recognition Service.
| • | Obtaining the Template |
| • | Completing the Dataset |
| • | Uploading the Data |
AdminStudio Inventory and Rationalization provides a template spreadsheet (.xlsx), or a template for a file of comma-separated values (.csv), where you can define the structure of your enterprise, and conveniently import many (or all) of your groups into the system.
To obtain the template, perform the following steps.
To download the template:
| 1. | In Application Recognition Service, select Data Inputs on the System menu, which is opened by clicking the gear icon at the top right corner of the browser: |
| 2. | On the Business Data tab, click One off upload. |
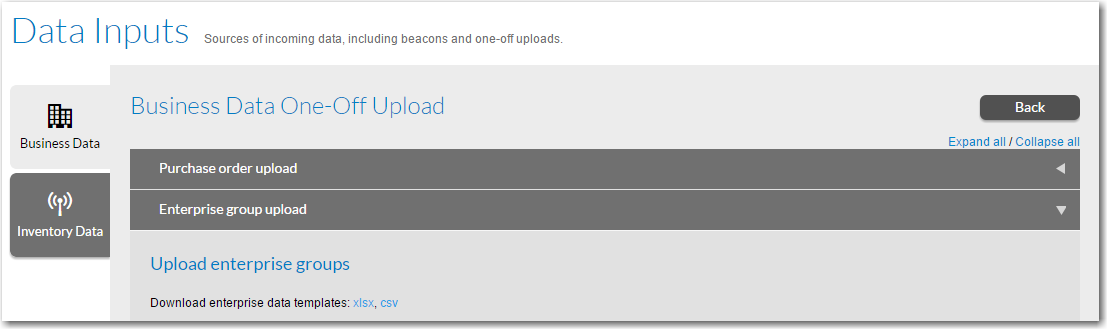
| 3. | Expand the Enterprise group upload accordion (click its title, or click Expand all). |
| 4. | To obtain the template, next to Download enterprise data templates:, click the xlsx or csv link. |
The template is downloaded from the application server to your local computer where you can insert the data.
| 5. | When the spreadsheet is complete, it must be uploaded through this same page, as described in Uploading the Data. |
The data template consists of three columns: Name, Parent Path, and Description.
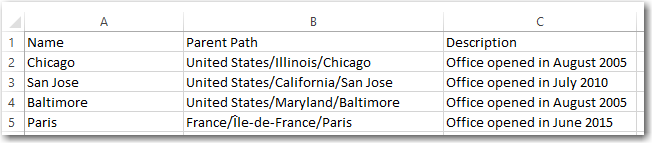
Sample Data File
Column Description
The following notes on the columns in this template may assist you in completing the appropriate data. Each row in the spreadsheet represents a single group within your enterprise.
Important: The first row, containing the column headers, must be preserved for upload.
|
Column |
Sample values |
Notes |
||||||||||||||||||||||||
|
Name |
Guangzhou |
The name of the location, cost center, or corporate unit. Maximum 256 alphanumeric characters. Spaces and simple punctuation are also supported, but the forward slash character (/) must not be used in a group name. After import, visible in the Name column of the appropriate list, once the tree of corporate structure has been sufficiently expanded. |
||||||||||||||||||||||||
|
Parent Path |
China/Guangdong Province |
Where the named group should be attached to the group hierarchy. A group identified in the Name column is created as a child of the last group in the Parent Path string.
- APAC + Australia - China - Guangdong Province Guangzhou |
||||||||||||||||||||||||
|
Description |
Office opened July 2012 |
Free-form text about the group identified in the Name column. |
Note the following:
| • | Use a separate sheet for each group—You must use a separate spreadsheet (or CSV file) for each type of enterprise group (locations, cost centers, and corporate units), identifying the type of group as you upload each spreadsheet or file. |
| • | Don’t include forward slash in group names—Group names must not include the forward slash character. In the Parent Path column, the forward slash is used to separate descendant groups. |
| • | If path starts with a forward slash, precede it with a single quote—If your spreadsheet software makes it difficult to enter a forward slash as the first character in a cell, you may start the cell entry with a single quote (this forces the cell to be treated as text). The single leading quote is ignored on import. |
| • | Do not change the name of EnterpriseGroups worksheet—You may insert additional worksheets into the spreadsheet if it assists with processing your group hierarchy. Any additional worksheets are ignored during import. However, you must not change the name of, or remove, the EnterpriseGroups worksheet supplied in the template. |
| • | Rename the spreadsheet file to reflect group type—It is best practice to rename the spreadsheet file to reflect the group type (and perhaps the section of your enterprise, if the groups are spread across multiple spreadsheets). |
| • | If Name already exists, Description field is updated—If you identify (Name) a group that already exists in your records, the Description property is updated to the value in your imported spreadsheet. |
| • | Must use interface to delete an enterprise group—There is no way to use the spreadsheet to delete an enterprise group already recorded in the system. A group may be deleted in the compliance console (the web interface) in the list of the appropriate group type: a Delete link appears on the end of each data row. Naturally, deleting a group also deletes all its descendants. |
| • | Moving a group from one parent to another—There is no support for moving a group from one parent to another. By modifying your spreadsheet to change its Parent Path (remembering to also modify any absolute paths mentioned for any of its descendants), your next import can attach a group to its new parent. You can delete the group from the incorrect parent in the compliance browser (web interface), but you may first want to consider whether to reassign any other items linked to the group and its descendants, as the links are lost during deletion. |
To uploaded a completed template containing Enterprise Group data, perform the following steps:
To upload the completed template:
| 1. | In Application Recognition Service, select Data Inputs on the System menu, which is opened by clicking the gear icon at the top right corner of the browser: |

| 2. | On the Business Data tab, click One off upload. |
| 3. | Expand the Enterprise group upload accordion (click its title, or click Expand all). |
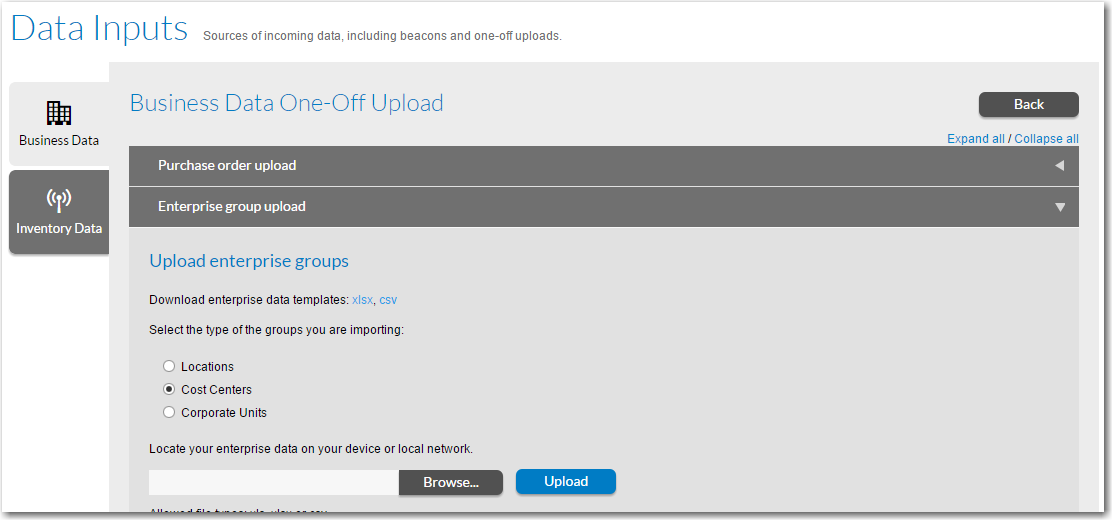
| 4. | Click the Browse button and select the completed template. The template name is displayed in the text box. |
| 5. | Click Upload to upload the file. The file will then be listed in the Last 5 uploads list. |
AdminStudio Inventory and Rationalization 2015 SP1 Help Library26 January 2016 |
Copyright Information | Flexera Software LLC |