AdminStudio Inventory and Rationalization 2015 SP1
There are some applications that are not recognized by Application Recognition Service, perhaps because the application's properties do not match properties in the database, or because it is a custom application written for your company. In these instances, the application will be listed as “unrecognized” in Rationalization Manager, which means that the application was discovered by System Center Configuration Manager but does not have a corresponding entry in the Application Recognition Service. For these applications, you can open Application Recognition Service and manually add evidence to the local Application Recognition Library so that ARS can recognize the application.
To add unrecognized applications, perform the following steps:
To add an unrecognized application:
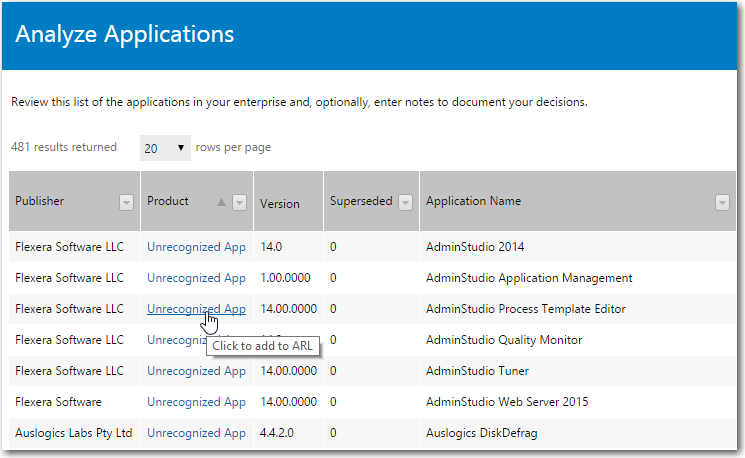
| 1. | Open the Analyze Applications page in Rationalization Manager. |
| 2. | Locate an unrecognized application, which are identified by the words Unrecognized App in the Product column: |
Note • You can also open this page directly by selecting Unrecognized Evidence on the Applications menu of the AdminStudio Inventory and Rationalization / Application Recognition Service. All evidence discovered in your enterprise but not yet linked to applications will be listed.

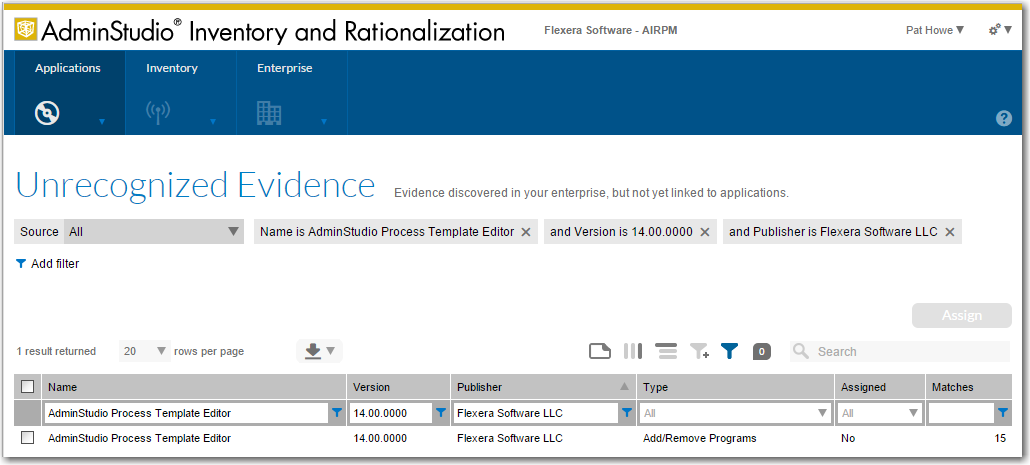
| 4. | Select the matching application and click Assign. The Assign evidence to an application area opens. |
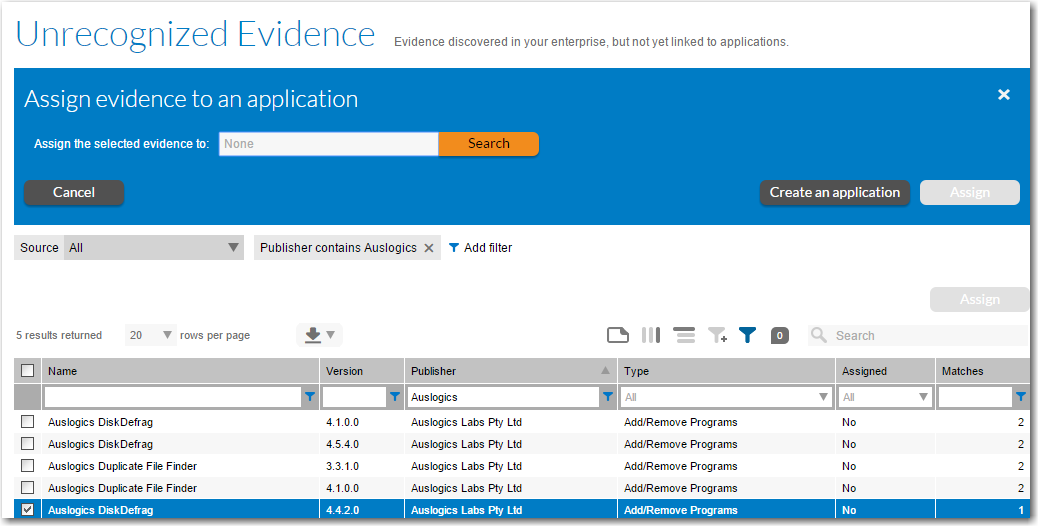
At this point you can choose to either search for an existing application to assign this evidence to, or create a new application. It is best practice to search for an existing application before creating a new one.
| 5. | Enter the product name in the box and click Search. Application Recognition Service will perform a search to attempt to find a matching application with that product name. |
| • | If a matching application is found, it is listed below the Search box and an Add button appears. Proceed with Step 7. |

| • | If a matching application is not found, the words No results are displayed. Skip to Step 9. |
| 6. | Because Application Recognition has found the matching application, you do not have to create a new application. Click Add. |
The name of the selected application is now listed in the Assign the selected evidence to: box.
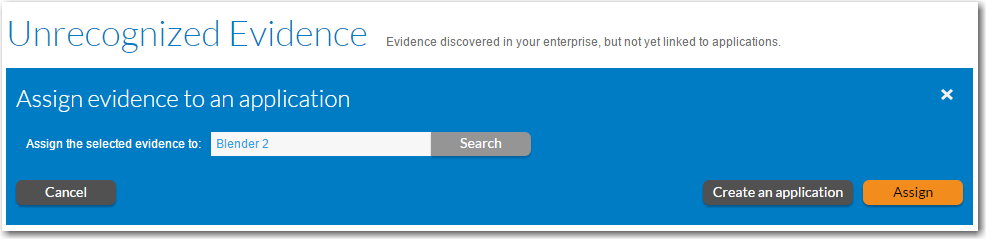
| 7. | Click Assign to assign the unrecognized evidence from your enterprise to an existing application. You have successfully assigned your application to an existing application, and after Rationalization Manager’s data has been synced, that product will no longer be listed as an Unrecognized App. |
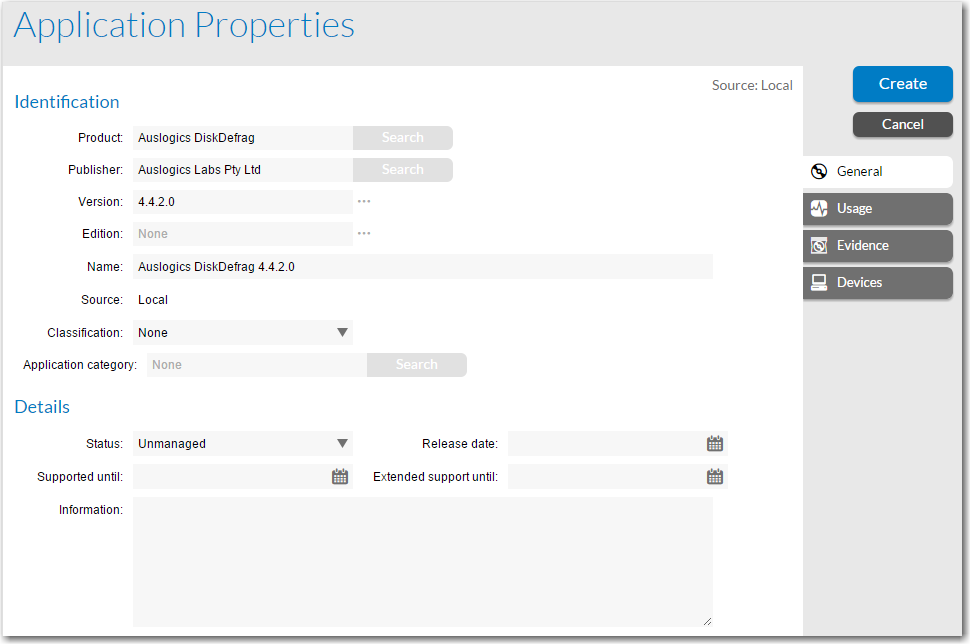
| 9. | The General tab consists of two sections: |
| • | Identification—Use to fully identify the application. |
| • | Details—Use to track both your management of the application, and its projected support life from the publisher. |
Note that the Source: Local indicator at the top right indicates that you are editing an application record that has been created in your enterprise and can therefore edit any of the properties on this tab.
| 10. | On the General tab, specify the following properties: |
|
Property |
Description |
||||||||||||||||||||||||
|
Product |
The basic name of the application, excluding references to versions or editions, and without mentioning the publisher. Product names supplied by the Application Recognition Library are not editable. Where you create your own application record:
To create a new product for this application:
The new product is added both to the application's properties and AdminStudio Inventory and Rationalization. |
||||||||||||||||||||||||
|
The name of the publisher of this software, responsible for its development and distribution. You can define a new publisher as you edit the application properties. To create a new publisher for this application:
|
|||||||||||||||||||||||||
|
Version |
The release number (or release identifier) of an application. Enter the version, or release number, of an application. Important • You cannot edit the value of a version. If a version is already displayed, and you modify its value, you are effectively adding a new version. If you are modifying existing application entries, you might need to adjust version priorities because they control automatic upgrades and downgrades for licenses that convey the product use rights. To associate a different version with the application, click the Browse (...) button and select the upgrade or downgrade version you need. When creating a new application record, any entry in the Version field is automatically copied into the Name field. However, if you are editing an existing application record, this does not happen: remember to synchronize version changes with the application's name when necessary. Tip • While you can enter any text you want in the Version field, it is best practice to restrict its use to release numbers. The reason is that a version number is used to manage automatic upgrades and downgrades that may be applicable under purchasing agreements or maintenance contracts. |
||||||||||||||||||||||||
|
Edition |
Enter the edition of this application. If you type in a value that did not previously exist for this product, a new edition entry is created, and is given the highest priority among the editions of this product. You might need to adjust editions' priorities because they control automatic upgrades and downgrades for the licenses that convey the corresponding product use rights. To do that, click displayed next to the Edition field and choose an edition you need. Note • Any application must have a unique combination of a publisher, product, edition, and version. If you are creating a new application record, any entry in the Edition field is automatically appended to the Name field (however, if you are editing the existing application’s properties, automatic update no longer occurs). The Edition field is used less often to manage automatic upgrades and downgrades that may be applicable under purchasing agreements or maintenance contracts, and therefore it is best practice to add any necessary remaining attributes of the application to this field. For example, if your licensing requires you to separately track the language of the interface, the platform (application's operating system), or a system type (such as 64-bit), you can include a brief description in this field. Important • An edition has to be assigned to an application: any unused editions are deleted from AdminStudio Inventory and Rationalization. |
||||||||||||||||||||||||
|
Name |
Enter the name of an application. |
||||||||||||||||||||||||
|
Source |
The source for this application will be Local. |
||||||||||||||||||||||||
|
To indicate how this application is classified, select an option from the list, for example:
Note • Do not use the Update classification type for major releases of a Commercial-type application (an “upgrade”). Upgrades and downgrades are significant licensing practices, whereas an Update classification is considered to have little licensing impact. |
|||||||||||||||||||||||||
|
Application category |
The default list of software categories is taken from the United Nations Standard Products and Services Code standard (http://www.unspsc.org/). To assign an application category, click Search, select a category you need, and click Add category. Tip • To add new categories, navigate to Enterprise > Categories. |
||||||||||||||||||||||||
|
Status |
From the Status list, select one of the following:
Tip • If you do not have the time to process the new records, you can assign the Deferred status to an application, and review it later. |
||||||||||||||||||||||||
|
Release date |
Select the date when the application's support agreement expires. |
||||||||||||||||||||||||
|
Supported until |
Select the date when the application's extended support agreement expires. |
||||||||||||||||||||||||
|
Extended support until |
Select a release date that is used to calculate whether you are entitled to upgrade to this release under an existing agreement with an end date. For example, if you purchase a license that states “free update until December 15, 2019”, you could record this time limit in a contract. AdminStudio Inventory and Rationalization would continue to provide automatic processing of upgrades of all releases until a date after “Dec 15, 2019” (after that date the automatic upgrade rights would be terminated). If you do not specify a release date, a series of updates cannot be terminated. Tip • You might need to check the terms of your release agreement. Some agreements require that an application should be both released and purchased prior to the end date, while others grant only perpetual use of applications that were released, purchased, and installed before the end date. AdminStudio Inventory and Rationalization only compares the end date of the agreement with the release date of the application. Other factors, for example, the linked purchase date, or the first use date, are not considered automatically. |
||||||||||||||||||||||||
|
Information |
Type in additional details about an application, if any. |
| 11. | Open the Usage tab, which is used to configure settings that determine whether an application was in use during a period leading up to the last software inventory. |
The settings on the Usage tab can help in identifying the licenses that can be recovered. License recovery means removing installations of an application that are not being used, and re-deploying them as required (as an alternative to purchasing additional licenses).
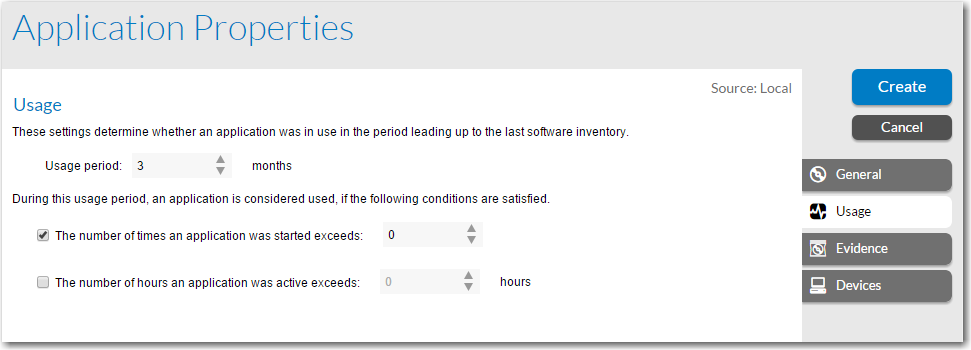
| 12. | On the Usage tab, specify the following properties: |
|
Property |
Description |
|
Usage period |
Enter the number of months of usage data to be included when calculating the number of user sessions or hours of active time. Important • A number in the Usage period field defines the most recent time interval (in months) the calculations will encompass. If you type in, for example, 5 months and enter the corresponding values in the following two fields, then the application is flagged as used if any condition is met during the 5 months before the last inventory import. A date the compliance import is activated to calculate application usage is always considered to be the end date for a usage period. |
|
The number of times an application was started exceeds |
Select this check box and enter the number of times a user can launch an application on their device before that application is considered installed and reported in the inventory. Tip • To trigger a usage record as soon as the user starts an application for the first time, enter 0. |
|
The number of hours an application was active exceeds nn hours |
Select this check box and enter the number of hours to be exceeded for an application to be considered installed and used. An active application implies the application whose window was on top of a user's screen (running in the foreground). Note • This number of hours of active time must be reported by at least one file: all active time across multiple evidence records is not summed up. |
Important • If you specify neither the times an application was started check box nor the number of usage hours check box, that application is considered unused across all installations.
Important • If you select both of these check boxes, the application will have to meet both of these requirements to be considered installed and used.
| 13. | Open the Evidence tab, which lists the installer evidence of this application in your enterprise. |
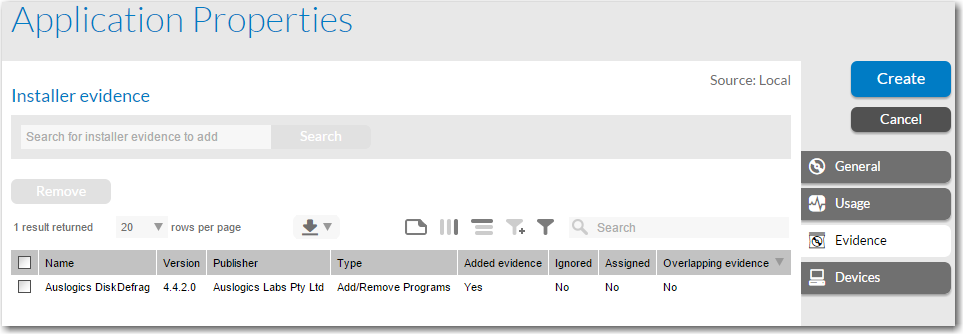
| 14. | Review the following properties on the Evidence tab: |
|
Property |
Description |
|||||||||
|
Name |
The installer evidence name is derived from native packaging tools on each device. For example, on Windows devices, this includes MSI information and Add/Remove Programs data. |
|||||||||
|
Version |
The version assigned to the installed application. The evidence version that you created manually is editable on the General tab of the file. The evidence version retrieved from Application Recognition Library is not editable. Note • Editing a version stops the inventory agent from recognizing the applications assigned to that evidence. Tip • You can edit different installer or file versions, and link them to a single application by using the wild card character (%). The wild card symbol (%) represents one or more characters. For example, the versions reported for a single application on 3 different computers might be 10.1.123.0045, 10.1.126.0000, and 10.1.123.0048 (they might represent different service packs and hot-fixes). You can merge this evidence so that they are all recognized, including any other variations, as version 10.1.%. Then all of these three pieces of evidence will be linked to the same application. |
|||||||||
|
Publisher |
The name of the publishing organization, as reported by the installer evidence. This property can be edited on the General tab. |
|||||||||
|
Type |
The source of the installation evidence. For unrecognized applications detected by AdminStudio Inventory and Rationalization, the source type is Add/Remove Programs, a Microsoft Windows utility. |
|||||||||
|
Added evidence |
One of the following is listed:
|
|||||||||
|
Ignored |
Yes is displayed if this evidence is ignored either through the Application Recognition Library setting or ignored manually by an operator. If ignored, the evidence no longer plays any part in identifying whether the associated application is installed on an inventory device. Ignored evidence records are displayed on the Ignored Evidence page. Note • An ignored evidence record means that the application linked to it is no longer recognized. |
|||||||||
|
Assigned |
Yes is displayed if the evidence is assigned to at least one application. This value is updated automatically when you assign the evidence to an application. |
|||||||||
|
Overlapping evidence |
If Yes is displayed, it indicated that the installer evidence assigned to an application has also been added to another application. This can be due to an identical piece of evidence linked to both applications, or the use of wild card characters (%) that results in the overlap. If so, the application recognition process produces confusing and unpredictable results: all applications linked to the overlapping evidence are reported as installed on each computer where the evidence is found. If Yes is displayed in the Overlapping evidence column, you can manage this status in several ways:
Important • Before deleting an application, it is best practice to check for any links to licenses, suite membership, or locally added evidence of different kinds. You must transfer all links from the application you are deleting to the one you will continue to track and manage. Links to the licenses are critically important for compliance calculations: open each license linked to the discarded application, and add that license to the correct one. |
| 15. | Open the Devices tab, where you can view all devices the application is installed on. |
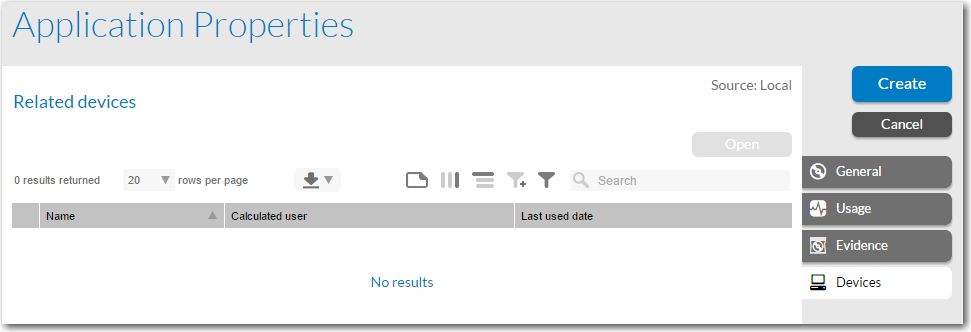
Note • Note that the full list of all devices on your network is not displayed on this tab: this data is retrieved from inventory workflows.
| 16. | Review the following properties on the Devices tab: |
|
Property |
Description |
|||||||||
|
Name |
Specifies the name of the device. |
|||||||||
|
Calculated user |
Displays the name of the end-user that was discovered to be the most frequent user of this device, over the previous 10 inventory collections. If multiple end-users are associated with an inventory device, the value of this field is calculated as follows:
AdminStudio Inventory and Rationalization generates the value of this field. This field is not available when you create an inventory device manually. |
|||||||||
|
Last date used |
If reported by an inventory tool, this column contains the last date when this application was used. |
| 17. | Click Create. A message will appear stating that Your application has been created successfully. After Rationalization Manager’s data has been synced, that product will no longer be listed as an Unrecognized App. |
AdminStudio Inventory and Rationalization 2015 SP1 Help Library26 January 2016 |
Copyright Information | Flexera Software LLC |