App Broker Cloud
Release Notes
December 2019
Introduction
App Broker Cloud enables IT managers to enforce continual software license compliance and control software deployment, while increasing employee satisfaction and the efficiency of software delivery. The enterprise app store ensures that governance is in place to check license availability and consistent software delivery.
Employees request software directly in the ServiceNow self-service portal and App Broker Cloud leverage asset management data from FlexNet Manager Suite, including product use rights, to ensure proper governance and compliance over the request and installation of software via deployment system.
New Features
This section describes the new features included in App Broker Cloud:
| • | App Broker Cloud Capabilities |
| • | Catalog Item Management |
| • | Content Management |
| • | Deployment Management |
| • | Compliance Management |
| • | ServiceNow |
App Broker Cloud Capabilities
App Broker Cloud extends the power of your ServiceNow service catalog, enable software license governance, automate and accelerate the fulfillment of software requests to any device. Using App Broker Cloud enables you to provide your employees with a single ServiceNow service portal for all request types: software, hardware, and other IT services.
App Broker Cloud introducing the below core capabilities as part of this release:
Catalog Item Management
Before software can be deployed using the App Broker Cloud, a program or deployment must be created in the Configuration Manager. An App Broker catalog item is an application, package that has been published in App Broker Cloud deployment through the software store front.
When creating a Software catalog item, App Broker Cloud connects to a deployment system (Configuration Manager) and you select one of the listed items to make available in App Broker.
We have enabled the support for multiple Configuration Manager primaries so, that the user can leverage deploying the software via individual primary deployment system to his respective client device.
You can create the following types of Software catalog items in the Configuration Manager (ConfigMgr):
| • | Application |
| • | Package |
Content Management
App Broker Cloud leverages the Technopedia data which is the World’s largest and most comprehensive repository of enterprise software and hardware data. Technopedia provides the data that you need to manage your assets by providing accurate and current product information about millions of IT assets.
We use data platform to retrieve the content details like Title, Product, Publisher, Edition, Version, Technopedia ID, etc for the applications. This retrieved attributes will get stored against the respective software catalog item in the catalog item database.
Note • App Broker Cloud only stores the application attributes retrieved from the Technopedia against the catalog items.
Deployment Management
App Broker Cloud integrates out of the box with the Configuration Manager i.e. ConfigMgr and leverage its capabilities to deliver the software to target device respectively.
The on-premises ConfigMgr which is deployed in the customer environment will communicate to the App Broker Cloud via the Proxy App client. The Proxy App will be installed in the customer environment to establish the connection and fulfills the software deployment.
We have enabled the support for multiple Configuration Manager primaries so, that the user can leverage deploying the software via individual primary deployment system to his respective client device.
Note • To know more about, how to install Proxy App in the customer environment, see Install and Configure App Broker Proxy
Compliance Management
App Broker Cloud leverages asset management data from FlexNet Manager, including product use rights and license entitlement data, to ensure proper governance and compliance over the request and installation of software. Licenses are reserved during the request process.
If you have purchased FlexNet Manager Suite, you can use App Broker Cloud to manage application licenses.
Linking a catalog item to Flexera ID
In the New Catalog Item page, catalog items can be associated with Flexera ID for respective applications.
App Broker Cloud can reserve licenses
After App Broker Cloud is connected to FlexNet Manager Suite and an application's Flexera ID has been selected, whenever an end user requests that application, App Broker Cloud will automatically connect to FlexNet Manager Suite and request that an application license be reserved for that end user.
License Scope
To display a more accurate count of available licenses at the time a user requests an application from App Broker Cloud, you can use the Enterprise Group assignment data defined in FlexNet Manager Suite to determine available application license count for respective users.
You can specify that when determining available license count for a user, you want FlexNet Manager Suite to return the number of licenses that are available in the user's Enterprise Group rather than those available to the entire enterprise. This capability enables license reservation and consumption based on group ownership and permits the roll-up of license quantities for specific groups (cost centers, business units or locations).
After the catalog item is mapped to a Flexera ID, you can specify how FlexNet Manager Suite will determine the available license count for this catalog item by making a selection from the Select the licensing availability scope list
| • | Global -When determining available license count, FlexNet Manager Suite will return the number of licenses that are available to the entire enterprise. |
| • | Enterprise Group -When determining available license count, FlexNet Manager Suite will return only the number of licenses that are available to that user or computer. |
| • | Enterprise Group First Then Global -When determining available license count, FlexNet Manager Suite will first check the number of licenses that are available to that user or computer; then, if no license is available, FlexNet Manager Suite will return the number of licenses that are available to the entire enterprise. |
Advance License Check
These additional license rights are evaluated at checkout before a license is reserved. This solution helps ensure that your organization evaluates all key entitlement rights and does not mistakenly purchase more license entitlements that you require.
App Broker Cloud gives users the ability, at a more advanced level, to check if a license reservation is needed for a catalog item by evaluating the following during checkout:
| • | Right of second use (also known as portable use)—The right to use the software on both a desktop and a laptop with the same owner and only consume one license. |
| • | Upgrade rights—The right to use the latest version of the software as soon as it becomes available. |
| • | Downgrade rights—The right to use an older version of the software than the version purchased. |
| • | Exemption by device role rights—The right to install software based upon a subscription role, such as an MSDN subscription. |
ServiceNow
App Broker Cloud publishes catalog items as service items into ServiceNow. Using App Broker Cloud enables you to provide your employees with a single ServiceNow service portal for all request types: software, hardware, and other IT services, while also enabling you to optimize software license use and enable automated software delivery through the Configuration Manager.
App Broker Cloud Features in ServiceNow
The following features of App Broker Cloud are included in the ServiceNow:
| • | Out-of-the-box ServiceNow workflow for advanced license check and deployment - App Broker Cloud includes a ServiceNow workflow which displays the flow of how advanced license check and deployment is performed (which is triggered when user submits a ServiceNow software request). This workflow is available as an update set that can be applied to any ServiceNow instance. For more information, see App Broker Cloud Software Request Workflow. |
| • | Import of App Broker Cloud catalog items into ServiceNow - Today, Admin user has to manually trigger the catalog item sync process from App Broker Cloud Admin user interface in to ServiceNow and this will add catalog items to the ServiceNow service catalog when the catalog is activated. |
| • | License compliance - App Broker Cloud leverages asset management data from FlexNet Manager, including product use rights and license entitlement data, to ensure proper governance and compliance over the request and installation of software. Licenses are reserved during the request process. |
| • | Uses ServiceNow approval and notification features - When a ServiceNow user submits a software request, all notifications and approvals will be performed by ServiceNow; App Broker Cloud is just responsible for performing the license check and deployment. |
| • | Automatic software deployment - App Broker Cloud automates the deployment of software through popular systems management and that manage the growing diversity of today's endpoint, today we support the Configuration Manager deployment system. |
| • | Ability to view deployment status in ServiceNow - App Broker Cloud passes deployment status information (deployment complete, pending, or failed) back to ServiceNow. |
ServiceNow Workflow
App Broker Cloud includes a custom ServiceNow workflow—implemented using a new set of App Broker Cloud REST API endpoints—which is used to integrate App Broker Cloud and ServiceNow. This workflow is based on industry best practices for software license governance and software delivery.
This Flexera - App Broker Cloud Software Request workflow enables ServiceNow to perform advanced license checks, reserve available licenses, and perform automated software delivery to multiple device types.
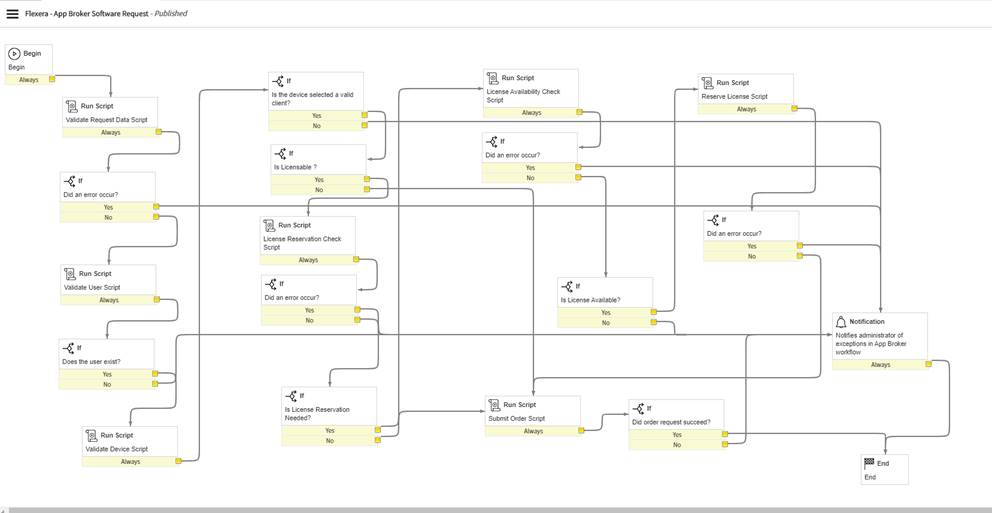
Flexera - App Broker Cloud Software Request Workflow
The Flexera App Broker Cloud custom application includes the following REST messages:
Flexera - App Broker Cloud REST Messages
|
Property |
Method |
Description |
|
App Broker – IAM Token Management |
Post |
https://login.flexera.com/oidc/token |
|
App Broker - License Availability Check |
Get |
https://api.appbroker-flexera.com/Compliance/FlexnetManagerSuite/licenses/isavailable |
|
App Broker - License Reservation Check |
Get |
http://api.appbroker-flexera.com/Compliance/FlexnetManagerSuite/licenses/isreservationneeded |
|
App Broker - Reserve License |
Post |
https://api.appbroker-flexera.com/Compliance/FlexnetManagerSuite/licenses/reserve |
|
App Broker - Submit Order |
Post |
https://api.appbroker-flexera.com/requests/software |
|
App Broker - Validate Catalog |
Get |
https://api.appbroker-flexera.com/catalog/items/software/${catalogId} |
|
App Broker - Validate Device |
Get |
https://api.appbroker-flexera.com/Deployment/ConfigMgr/devices/validate/${deviceName} |
|
App Broker - Validate User |
Get |
https://api.appbroker-flexera.com/Deployment/ConfigMgr/users/email/${email} |
Note • To know more about, how to update and configure App Broker update set into ServiceNow, see Upload and Configure App Broker Cloud Update Set into ServiceNow.
System Requirements
Prior to beginning the App Broker Cloud on boarding process, make sure that your environment meets the following system requirements:
|
Property |
Description |
|||||||||
|
Client Organization |
The specific organization for each customer is created by the Flexera team. As part of this organization creation, the Org Id will be shared to the customer directly. Org ID - This is unique ID for the organization. Reset Password - A link will be provided with instruction to reset the one-time password. Note • Note the following to create Client Organization:
|
|||||||||
|
Administrator User |
This is super user which is been created as part of the organization creation for the customer. Please reach out to Flexera personnel for more details. Administrator user account should be used to login the App Broker Cloud Administrator User Interface and this enables the user to generate the refresh token and configure third party connections, manage the catalog items, requests, monitor the catalog/request jobs. Note • Flexera team can create multiple user account for the same organization as required. |
|||||||||
|
FlexNet Manager |
If you have purchased FlexNet Manager Suite, you can use App Broker Cloud to manage application licenses. The following editions of FlexNet Manager Suite are supported:
|
|||||||||
|
Proxy App |
Proxy App will be installed in the customer premises where Configuration Manager (ConfigMgr) is available. Proxy App establishes the communication between the Configuration Manager and App Broker Cloud (on cloud). The following are the pre-requisites to Install and configure Proxy App setup:
Note • To Install and configure the Proxy App Setup, see Install and Configure App Broker Proxy. |
|||||||||
|
Deployment System |
App Broker Cloud supports Configuration Manager (Current Branch). Note • During Proxy App setup installation you will be prompted to enter Configuration Manager details. |
|||||||||
|
ServiceNow |
App Broker Cloud supports Madrid and New York version of ServiceNow. Note • To download the Flexera App Broker Cloud Update Set files for ServiceNow integration, click here. |
Customer On Boarding
The customer on boarding process involves the below steps to start with the App Broker Cloud product:
| • | Managing User Credentials |
| • | Generating Refresh Token for API Access |
| • | Install and Configure App Broker Proxy |
| • | Upload and Configure App Broker Cloud Update Set into ServiceNow |
Managing User Credentials
As a part of customer on-boarding, based on the information shared by you to the Flexera, we will generate a Org ID and provide user access to the App Broker Cloud.
Flexera will send an email with the password reset link to the user accounts which are shared earlier to get App Broker Cloud access. Click on the RESET PASSWORD link to generate a new password.

Email - Password Reset Link for User Account
Note • To purchase the App Broker Cloud, please contact your sales representative or contact us online.
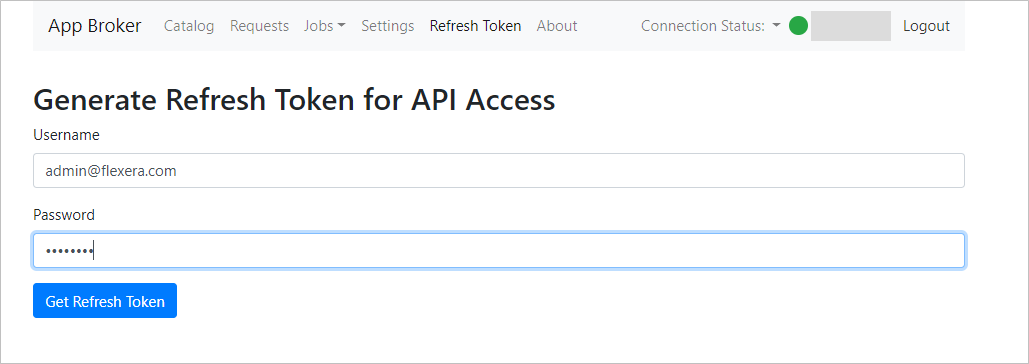
Generating Refresh Token for API Access
To access App Broker Cloud API’s in the ServiceNow instance and fulfill the self service capabilities, admin user has to generate the refresh token.
To generate a Refresh Token follow the below steps:
| • | Launch App Broker via https://admin.appbroker-flexera.com. |
| • | Login to App Broker Cloud admin UI. |
| • | Click on the Refresh Token tab in the Navigation bar. |
| • | Enter the Username and Password provided by Flexera, click Generate Refresh Token. You will see a Refresh token getting displayed. |
Note • This generated Refresh Token will be used, while configuring App Broker Cloud API access in ServiceNow and also during App Broker Cloud Proxy installation.
Install and Configure App Broker Proxy
App Broker Cloud requires a Proxy setup to be installed on your server to communicate with your on-premises deployment systems i.e. Configuration Manager.
Installing App Broker Proxy setup accomplishes the below tasks:
| • | Deploys the Proxy API. |
| • | Registers Proxy App into Proxy Manager. |
| • | Allows you to Manually Configuring Multiple Configuration Manager Sites to your App Broker Cloud Instance. |
Note • To download the App Broker Proxy setup, click here.
To install App Broker Proxy App follow the below steps:
| 1. | Launch the App Broker Proxy Setup, Welcome wizard appears. Click Next. |
| 2. | Customer Information wizard appears, you will be prompted to enter OrgId (Provided by Flexera) and Refresh Token. |
Tip • To generate Refresh Token, see Generating Refresh Token for API Access.
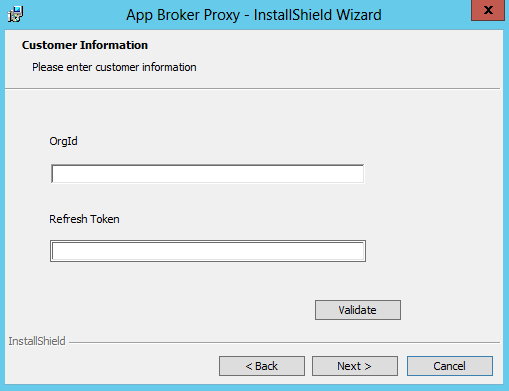
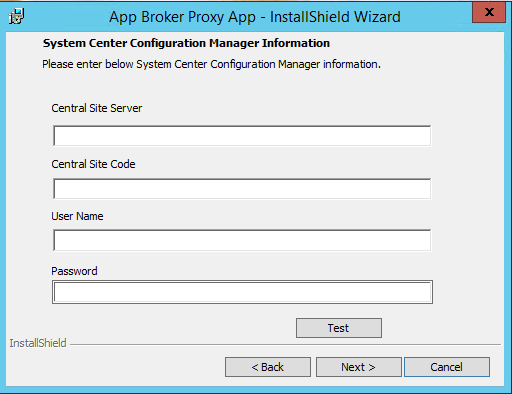
| 3. | Validate the customer information and click Next. Configuration Manager Information wizard appears. |
| 4. | You will be prompted to enter below details: |
| • | Central Site Server - Enter the machine name of the Configuration Manager (current branch) server. |
| • | Central Site Code - Defines the Central Site Code. |
| • | User Name - This user should have permissions to access the Configuration Manager (current branch). |
| • | Password - Provide the password for the above user name. |
Tip • While Installing App Broker Proxy you can configure only one Configuration Manager primary site, however after installation you can manually configure multiple Configuration Manager sites, see Manually Configuring Multiple Configuration Manager Sites.
| 5. | Test the Configuration Manager details entered and click Next. Ready to Install Program wizard appears. |
| 6. | Click Install to start the installation, click Finish button. |
Important • Verify wstunnel.exe process is running in your system Task Manager (Press Ctrl+Alt+Delete).
Manually Configuring Multiple Configuration Manager Sites
App Broker Cloud has the capability to support multiple Configuration Manager primaries, which means - in the same catalog item, admin can add the application or package from multiple Configuration Manager primaries. This will support the users who are having the clients from multiple Configuration Manager in their devices respectively. It allows user to request the software to different Configuration Manager client device.
After successful installation of App Broker Proxy, you can manually configure multiple Configuration Manager Sites.
The below table lists the properties and its descriptions required to manually configure a Configuration Manager sites.
|
Property |
Description |
|
IsDefault |
This property will set the ConfigMgr as default site code. If you have configured multiple ConfigMgr, only one of the ConfigMgr can be set as default to ‘True’ value. |
|
Central Site Server |
Enter the machine name of the System Center Configuration Manager (current branch) server. |
|
Central Site Code |
Defines the Central Site Code. |
|
User Name |
This user should have permissions to access Configuration Manager (current branch). |
|
Password |
Provide the password for the above user name |
|
UserFolderId |
Provide the UserFolderId of the folder in ConfigMgr where user collections should get created It can be “0” if don’t have any specific folder,the user collections will be created under root folder “User Collections” in ConfigMgr |
|
DeviceFolderId |
Provide the DeviceFolderId of the folder in ConfigMgr where device collections should get created It can be “0” if don’t have any specific folder,the user collections will be created under root folder “Device Collections” in ConfigMgr |
|
AdvertisementFolderId |
Provide the AdvertisementId of the folder in ConfigMgr where Advertisement should get created It can be “0” if don’t have any specific folder |
To Manually configure multiple Configuration Manager sites, follow the below steps:
| 1. | Go to the server machine where Proxy App is installed, navigate to the installed location of the App Broker Proxy. |
| 2. | In the API folder, open the appsettings.json file, you can see the below file content: |
Look for the ‘Connections’ section, as shown below
"Connections": [
{
"IsDefault": true,
"CentralSiteServer": "ConfigMgr server name 1",
"CentralSiteCode": "ConfigMgr Site code",
"UserName": "ConfigMgr username",
"Password": "Password",
"UserFolderId": "0",
"DeviceFolderId": "0",
"AdvertisementFolderId": "0"
}
Note • In the above Connection section, Configuration Manager details displayed are captured during the Proxy App installation.
| 3. | Add the second Configuration Manager primary site details separated by comma as shown below: |
"Connections": [
{
"IsDefault": true,
"CentralSiteServer": "ConfigMgr server name 1",
"CentralSiteCode": "ConfigMgr Site code",
"UserName": " ConfigMgr username",
"Password": "Password",
"UserFolderId": "0",
"DeviceFolderId": "0",
"AdvertisementFolderId": "0"
},
{
"IsDefault": false,
"CentralSiteServer": "ConfigMgr server name 2",
"CentralSiteCode": "ConfigMgr Site code",
"UserName": "ConfigMgr username",
"Password": "Password",
"UserFolderId": "0",
"DeviceFolderId": "0",
"AdvertisementFolderId": "0"
}
Note • The default value can be updated to any one of the Configuration Manager primary.
| 4. | After you successfully enter the configuration details, save the appsettings.json file. Close the file. |
| 5. | Restart the Internet Information Services (IIS). This completes the multiple Configuration Manager configuration. |
Tip • Similarly you can add multiple number of Configuration Manager primary site settings separated by comma as shown in above example.
Upload and Configure App Broker Cloud Update Set into ServiceNow
A ServiceNow update set is a group of customizations, in an XML file, that can be moved from one ServiceNow instance to another. App Broker Cloud includes an update set that, when imported into ServiceNow, will create all of the ServiceNow entities that are required for ServiceNow to work with App Broker Cloud.
App Broker - ServiceNow Update Set
When you import the App Broker ServiceNow update set XML file into ServiceNow, a custom ServiceNow application named Flexera App Broker is created with the below entities:
ServiceNow entities
| • | Workflows - Flexera Software - App Broker Software Request workflow is created. |
| • | REST Messages - All of the ServiceNow REST messages used to communicate with App Broker to perform the steps in this workflow |
| • | Table schemas - Custom tables are created to contain the imported App Broker catalog item data: |
| • | App Broker Catalog Items (x_fls_appbroker_catalog_items) |
| • | App Broker Catalog Import Service (x_fls_appbroker_import_service) |
| • | Catalog Items – This holds all the catalog items synced from App Broker Cloud into ServiceNow |
Please follow the below steps to Import and configure update set in ServiceNow
| 1. | Download the App Broker Cloud Update setup file (Flexera App Broker Cloud Update Set For ServiceNow-v1.0.1.xml) and Scheduled jobs (Flexera App Broker Scheduled Job.xml) from the Flexera Software Product and License Center. |
| 2. | Launch ServiceNow instance. |
| 3. | In the search box, enter Retrieved Update Sets. |

| 4. | In the search results, click Retrieved Update Sets. The Retrieved Update Sets page opens. |
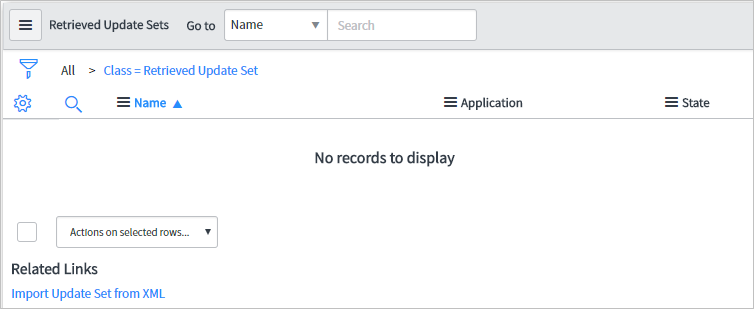
| 5. | Under Related Links, click Import Update Set from XML. The Import XML page opens. |
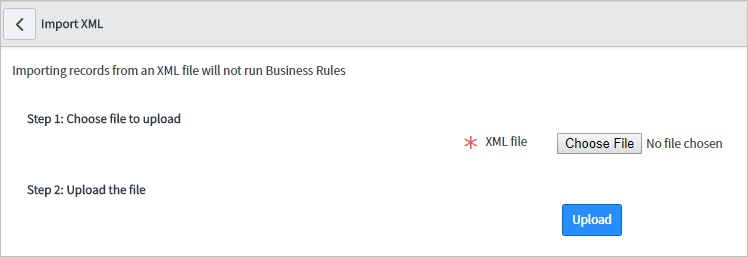
| 6. | Click Choose File, select the Flexera App Broker Cloud Update Set For ServiceNow-v1.0.1.xml and click Upload button. When the upload is complete, the file will be listed on the Retrieved Update Sets page. |
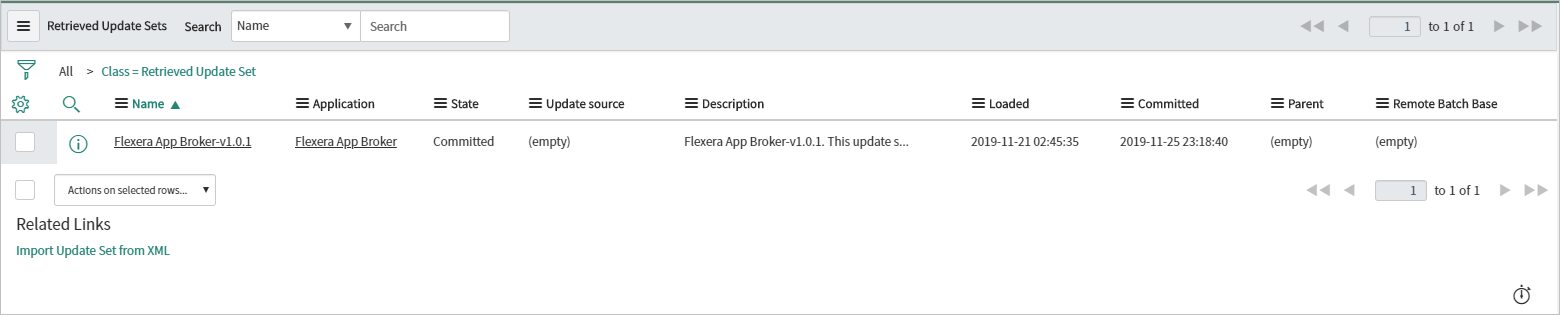
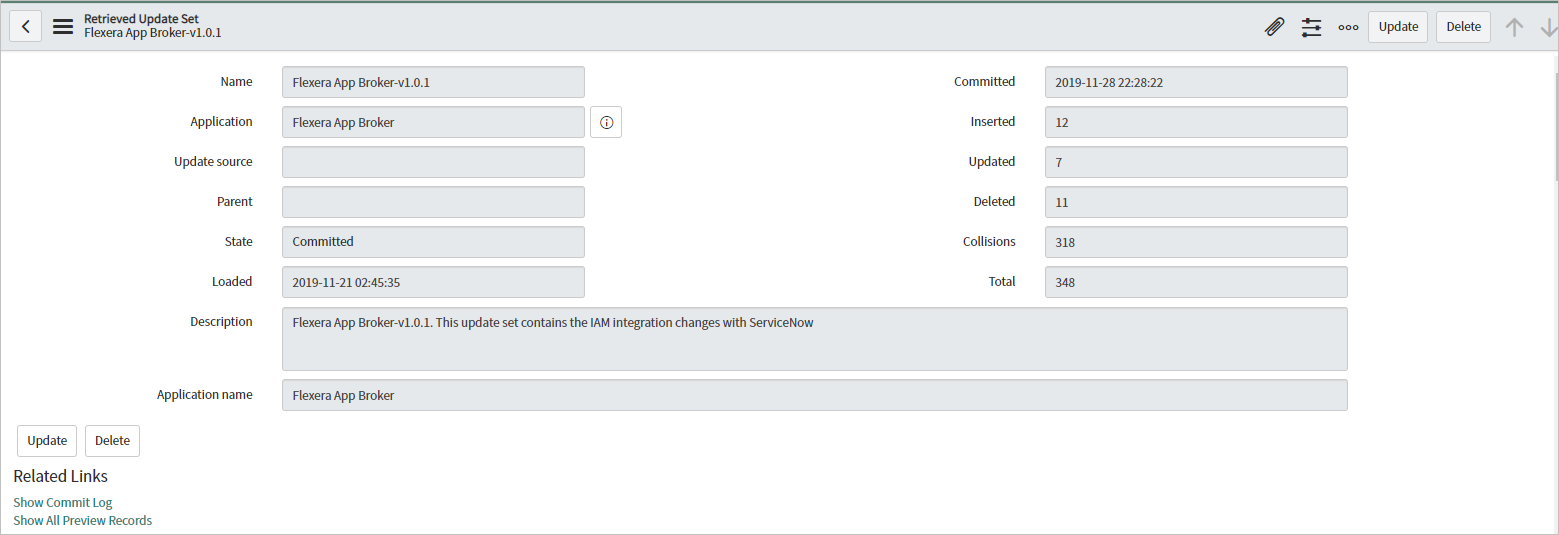
| 7. | Click the name of the update set to open the detailed view. |
| 8. | Click Preview Update Set. After previewing the update set, if there are any errors, they will be listed at the bottom of the screen on the Update Set Preview Problems tab. |
| 9. | To resolve an error, select it, open the Actions on selected rows... menu at the bottom of the screen, and select Accept remote update. |
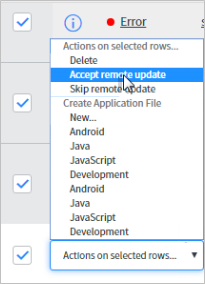
| 10. | Repeat this procedure until all errors are resolved. You can select multiple errors at a time, when all errors are resolved, the Commit Update Set button is enabled. |
| 11. | Click Commit Update Set. As soon as the update set is committed, if you enter Flexera in the ServiceNow search box, and you will see the following new items listed in the menu. |

| 12. | In the top toolbar of ServiceNow, click on the Settings icon: |

| 13. | The System Settings view opens. |
| 14. | Select the Developer tab. The Developer tab opens. |
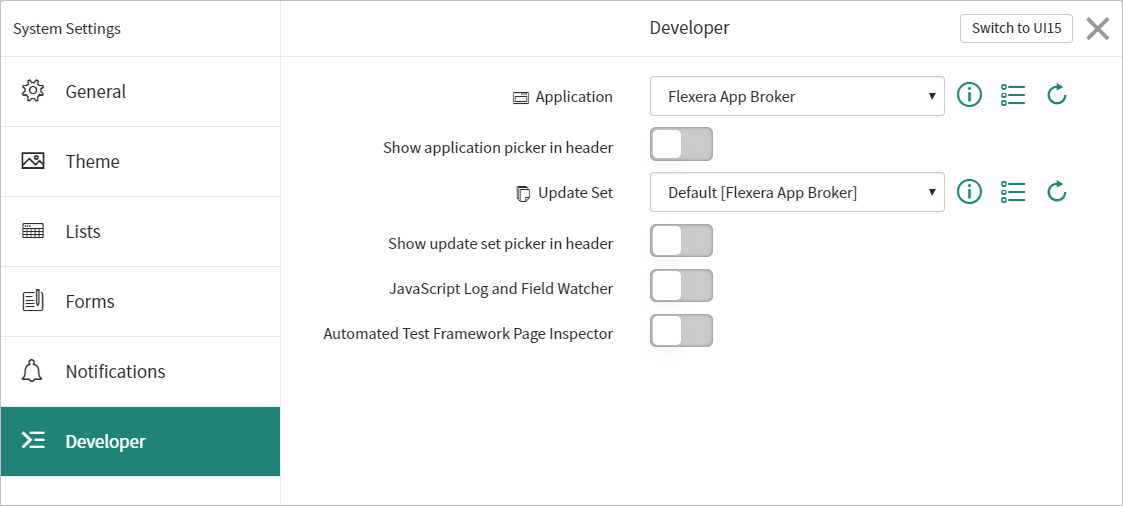
| 15. | Change the value of the Application field from Global to Flexera App Broker and close the view. |
| 16. | Under Flexera App Broker in the menu, click Properties. The Properties view opens. |
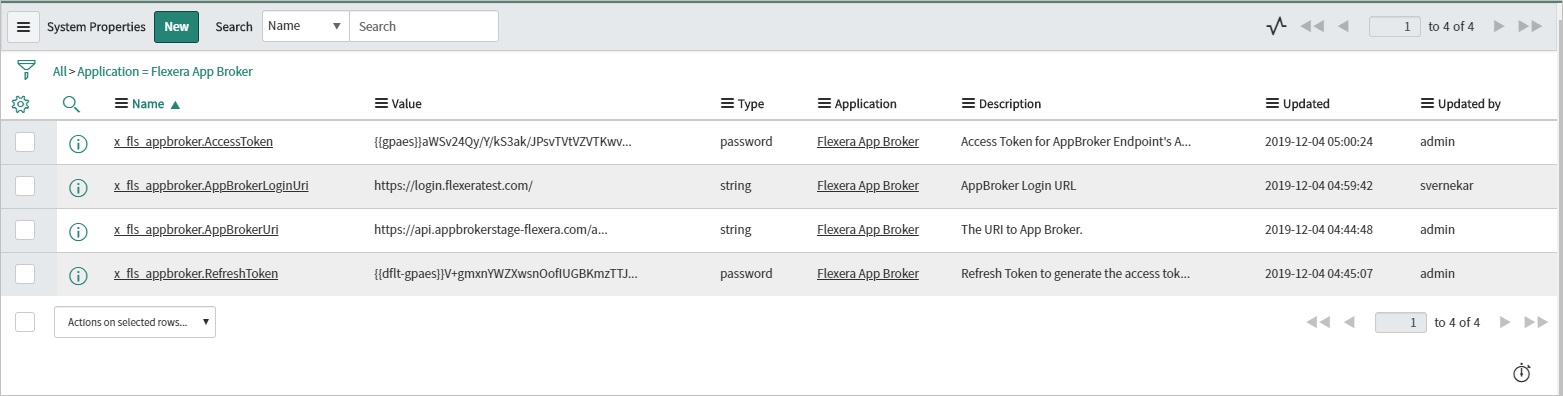
| 17. | To connect ServiceNow to your instance of App Broker, Select x_fls_appbroker.AppBrokerUri. The System Property page opens. |
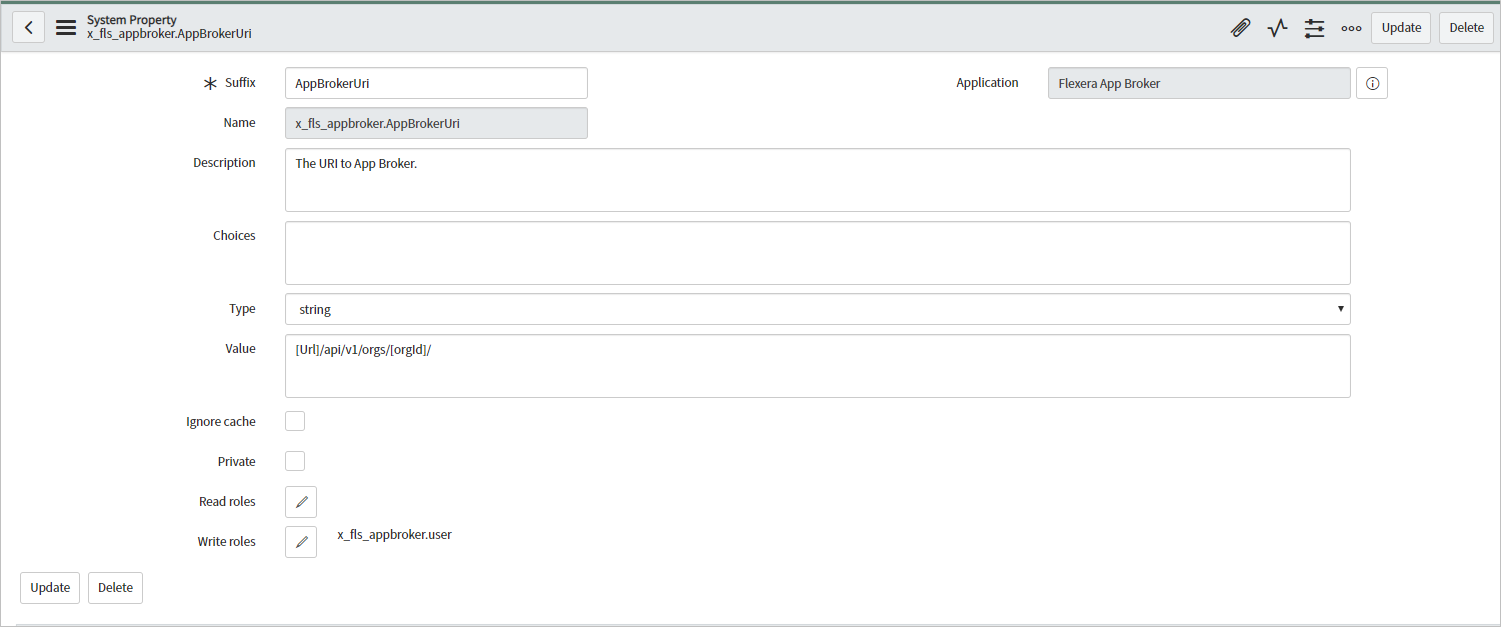
| 18. | In the Value field replace the following value in [Url]/api/v1/orgs/[orgId]/: |
| • | Replace one of the below [Url]: |
| • | To https://api.appbroker-flexera.com/ for App Broker Cloud production or |
| • | To https://api.appbrokerstage-flexera.com/ for App Broker Cloud stage environment |
| • | Replace OrgId: |
| • | With your respective Org Id for production or stage environment, obtained from Flexera. |
| 19. | Click Update. Go back to All Properties view. |
| 20. | Click on x_fls_appbroker.AppBrokerLoginUri. The System Property page opens. |

| 21. | In the Value field, enter https://login.flexera.com/ for App Broker Cloud production or https://login.flexeratest.com/ for App Broker Cloud stage environment obtained from Flexera. |
| 22. | Click Update and go back to All Properties view. |
| 23. | Click on x_fls_appbroker.RefreshToken. The System Property page opens. |

| 24. | In the Value field, enter the generated Refresh token from App Broker Cloud Admin UI, see Generating Refresh Token for API Access. Click Update. |
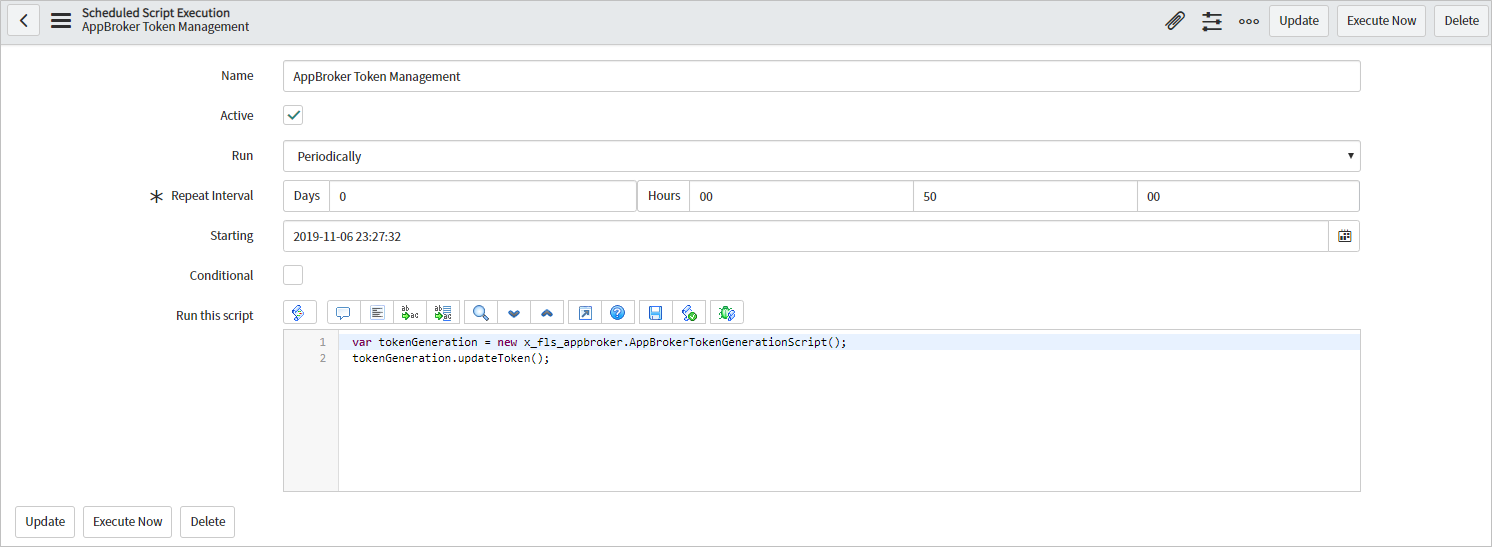
Note • We don’t have to update x_fls_appbroker.AccessToken property as it is updated by App Broker Scheduled Jobs. App Broker Scheduled Jobs are the jobs which are triggered every 50 seconds and used to generate the Access Token for authorization of App Broker API.
To configure the App Broker Scheduled Jobs, follow the below steps:
| 1. | In the search field, search for Scheduled key, click on Scheduled jobs. This opens the Scheduled Jobs view. |
| 2. | Right click on the Name column and click Import XML link. |

| 3. | Click Choose File and browse for Flexera App Broker Scheduled Job.xml. Click upload. |

| 4. | On successful upload of Flexera App Broker Scheduled Job.xml file, AppBroker Token Management scheduled script will get displayed. |
| 5. | Select AppBroker Token Management, the App Broker Token Management view opens. Click Execute Now button to execute the script. |
| 6. | In the Search field, search for REST Message key, click REST Messages. This opens Rest Messages view. |

| 7. | For App Broker – IAM Token Management REST message, perform the following steps: |
| • | Click on the App Broker - IAM Token Management REST Message name to open the detailed view. |

| • | Click on the POST method link, under HTTP Methods section at the bottom. HTTP Method (POST) view opens. |
| • | Click on the variable refreshToken under Variable Substitutions section at the bottom of the screen. |
| • | Enter the refreshToken which is generated in the Admin User Interface, see Generating Refresh Token for API Access. Click Update. |
| • | Click on the Test link under Related Links, this should return 200 state. This ensure the method is working and ready to use. |
Resolved Issues
There is no issue resolved in this release.
Legal Information
Copyright Notice
Copyright © 2019 Flexera.
This publication contains proprietary and confidential information and creative works owned by Flexera Software LLC and its licensors, if any. Any use, copying, publication, distribution, display, modification, or transmission of such publication in whole or in part in any form or by any means without the prior express written permission of Flexera Software LLC is strictly prohibited. Except where expressly provided by Flexera Software LLC in writing, possession of this publication shall not be construed to confer any license or rights under any Flexera Software LLC intellectual property rights, whether by estoppel, implication, or otherwise.
All copies of the technology and related information, if allowed by Flexera Software LLC, must display this notice of copyright and ownership in full.
Intellectual Property
For a list of trademarks and patents that are owned by Flexera Software, see http://www.flexerasoftware.com/intellectual-property. All other brand and product names mentioned in Flexera Software products, product documentation, and marketing materials are the trademarks and registered trademarks of their respective owners.
Restricted Rights Legend
The Software is commercial computer software. If the user or licensee of the Software is an agency, department, or other entity of the United States Government, the use, duplication, reproduction, release, modification, disclosure, or transfer of the Software, or any related documentation of any kind, including technical data and manuals, is restricted by a license agreement or by the terms of this Agreement in accordance with Federal Acquisition Regulation 12.212 for civilian purposes and Defense Federal Acquisition Regulation Supplement 227.7202 for military purposes. The Software was developed fully at private expense. All other use is prohibited.