Entering Casper Settings
App Portal 2020 R1
With App Portal, you can deliver a universal enterprise app store that includes both Windows and OS X desktop applications. You can connect App Portal to a JAMF Casper Suite 9.6.4 server and create catalog items for OS X desktop applications. This gives you license compliance, deployment automation, and control.
Note:To deploy Apple iOS mobile apps, you need to connect to an AirWatch server, as described in Entering AirWatch Settings.
Important:App Portal supports JAMF Casper 9.6.4, On Premises version. Casper on the Cloud is not officially supported. However, you may attempt to integrate with Casper on the Cloud using API calls. For more information, see API Calls Used by App Portal to Integrate with Casper.
Note:In order for App Portal to be successfully integrated with Casper, your Casper account needs to have a specific set of minimum permissions. For more information, see Required Casper Account Permissions.
Note:For information on the API calls used by App Portal when integrating with Casper, see API Calls Used by App Portal to Integrate with Casper.
To connect App Portal to a Casper server, you need to enter settings on the Casper tab of the Site Management > Settings > Deployment view.
| • | Entering Casper Server Details |
| • | Entering Casper XPath Mapping Settings |
| • | Entering Casper Machine Name Configuration Additional Properties |
Entering Casper Server Details
In addition to entering the Casper server connection details, you also need to enter Casper policy information. Casper policies allow you to remotely perform common management tasks on managed computers. For example, you can run scripts, manage accounts, and distribute software using a policy. For App Portal to create a policy and a static group, it needs a template for each of these.
To enter Casper server details, perform the following steps:
To enter Casper server details:
| 1. | Open the Site Management > Settings > Deployment view. |
| 2. | Open the Casper tab. The Casper Server Details are listed. |
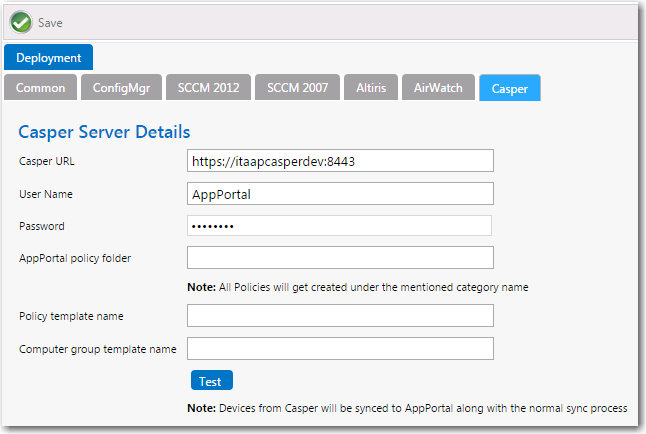
| 3. | In the Casper URL field, enter the URL to your Casper server. |
Note:App Portal and Casper communicate using Casper's JSS API. By default, Casper uses port 8443 for inbound SSL traffic to the JSS. You will need to include the port number in the Casper URL when configuring your settings. If you have modified the inbound SSL port within your JSS configuration, specify your custom port number in the Casper URL.
| 4. | Enter the User Name and Password to your Casper server. |
| 5. | In the App Portal Policy folder field, enter the folder/category in Casper under which the policies created by App Portal will reside. |
| 6. | In the Policy template name field, enter the name of the policy in Casper which can be used as a template. |
| 7. | In the Computer group template name filed, enter the name of the static group in Casper which can be used as a template. |
| 8. | Click Test to test connection settings. If successful, the following message is displayed: |
Casper Server settings are valid.
Note:Casper users (which are based upon an email address) and are synced to App Portal at the same time that the System Center Configuration Manager / Altiris users and are synced. App Portal users are matched with System Center Configuration Manager / Altiris users by having the same email address.
Entering Casper XPath Mapping Settings
The Casper XPath Mapping area of the Casper tab provides a means for you to adapt to changes to the Casper APIs that may occur in future releases of Casper.
App Portal uses these XPaths to access values from the API results sent from Casper. If any of these change in the Casper API in the future, you can make the corresponding necessary changes here.
There is no need to modify these XPath mapping settings. But, If, at some future time Casper changes their XPath mapping settings to something different, you can update these values by performing the following steps.
To enter Casper XPath status mapping settings:
| 1. | Open the Site Management > Settings > Deployment view. |
| 2. | Open the Casper tab. The Casper XPath Mapping settings are listed. |
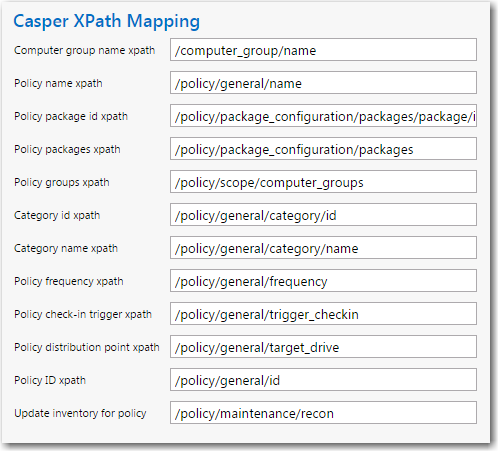
| 3. | Make any edits, as required. |
| 4. | Click Save. |
Entering Casper Machine Name Configuration Additional Properties
The Casper Machine Name Configuration area of the Casper tab provides a means for you to change user computer mappings that App Portal utilizes for Casper. By default, App Portal maps to Casper using email addresses. Changing the mapping lets you map to Casper with UserName Or FullName Or DisplayName. In some environments, the user name has a unique ID which helps uniquely identify each user. If you enter additional properties in the Casper Machine Name Configuration section and a sync is performed, the Macintosh machine name will get appended with the additional properties and the entire string will be treated as a machine name. For example:
| • | If the Macinstoch machine name is MacABC and you have configured an additional property as mac_address then the machine name will be the entire string: MacABC; 0C:4D:E9:CD:EC:C4. |
| • | If you have configured the additional property as serial_number,udid then the machine name will look similar to the following: MacABC; C07NG0W4DWYL; AEB468FF-904B-5D76-8167-392761E942CD. |
To enter additional properties for Casper machine name configuration:
| 1. | Open the Site Management > Settings > Deployment view. |
| 2. | Open the Casper tab. The Casper Machine Name Configuration are listed. |

| 3. | In the Additional properties for device sync field, enter information in the following format: |
serial_number,mac_address,udid
When the above details are configured and a sync is performed, then the Macintosh machine name will get appended with the additional properties and the entire string will be treated as a machine name.
Note:When checking out Casper catalog items, the mapping to Casper must be considered when specifying the machine name. Consider the following steps:
| a. | Select the Enable request to manual list? option for a Casper catalog item. |
| b. | On the resulting Choose Target panel of the Checkout view (available for requesters who have been assigned the Request to Manual list), select the Add machine names or user IDs manually option. |
| c. | On the Checkout screen where you Enter Target /Users, enter the Macintosh name in the format that corresponds to the currently configured mapping to Casper. When additional properties are specified in the Additional properties for device sync field of the Casper Machine Name Configuration section (in the Casper tab of the Site Management > Settings > Deployment view), then the machine name must be entered as the entire string in a format such as MacABC; 0C:4D:E9:CD:EC:C4 or MacABC; C07NG0W4DWYL; AEB468FF-904B-5D76-8167-392761E942CD depending on the additional properties you specified. |
See Also
Enabling the “Create Uninstall Policy” Option for a Casper Package
Required Casper Account Permissions
API Calls Used by App Portal to Integrate with Casper
App Portal / App Broker 2020 R1 Administration GuideAugust 2020 |