Entering Casper Settings at Initial Start Up
App Portal 2020 R1
With App Portal, you can deliver a universal enterprise app store that includes both Windows and OS X desktop applications. You can connect App Portal to a JAMF Casper Suite 9.6.4 server and create catalog items for OS X desktop applications. This gives you license compliance, deployment automation, and control.
To connect App Portal / App Broker to a Casper server, you can, optionally, enter settings on the Casper tab of the Deployment Configuration screen which opens at initial start up after you have uploaded your license file.
Important:In order for App Portal to be successfully integrated with Casper, your Casper account needs to have a specific set of minimum permissions. For more information, see Required Casper Account Permissions.
Note:You can also specify Casper deployment settings at any time on the Casper tab of the Site Management > Settings > Deployment view.
Note:App Portal and Casper communicate using Casper's JSS API. By default, Casper uses port 8443 for inbound SSL traffic to the JSS. You will need to include the port number in the Casper URL when configuring your settings. If you have modified the inbound SSL port within your JSS configuration, specify your custom port number in the Casper URL.
To enter Casper connection settings upon initial start up of App Portal / App Broker, perform the following steps:
To enter Casper connection settings:
| 1. | Perform the steps in Uploading Your App Portal / App Broker License File and click Next. The Deployment Configuration screen opens. |
| 2. | Open the Casper tab. The Casper Server Details are listed. |
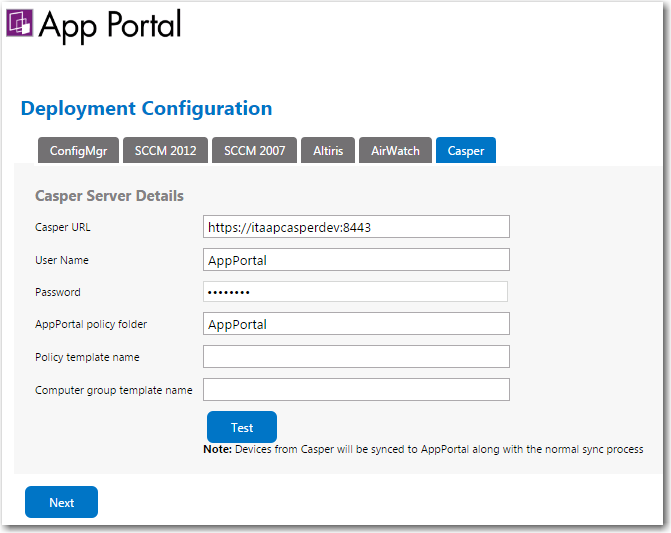
| 3. | In the Casper URL field, enter the URL to your Casper server. |
| 4. | Enter the User Name and Password to your Casper server. |
| 5. | In the App Portal policy folder field, enter the folder/category in Casper under which the policies created by App Portal / App Broker will reside. |
| 6. | In the Policy template name field, enter the name of the policy in Casper which can be used as a template. |
| 7. | In the Computer group template name field, enter the name of the static group in Casper which can be used as a template. |
| 8. | Click Test to test connection settings. |
Note:Casper users (which are based upon an email address) and are synced to App Portal / App Broker at the same time that the System Center Configuration Manager / Altiris users and are synced. App Portal / App Broker users are matched with System Center Configuration Manager / Altiris users by having the same email address.
| 9. | Proceed with setting additional deployment technology settings on the other tabs of the Deployment Configuration screen, if desired. |
| 10. | Click Next to continue. |
| 11. | Proceed with the steps in Specifying Integration Connection Settings. |
See Also
Required Casper Account Permissions
API Calls Used by App Portal to Integrate with Casper
Enabling the “Create Uninstall Policy” Option for a Casper Package
App Portal / App Broker 2020 R1 Administration GuideAugust 2020 |