General Tab
App Portal 2021 R1
On the General tab of the Site Management > Settings > Web Site view, you specify the configuration settings of the App Portal website.
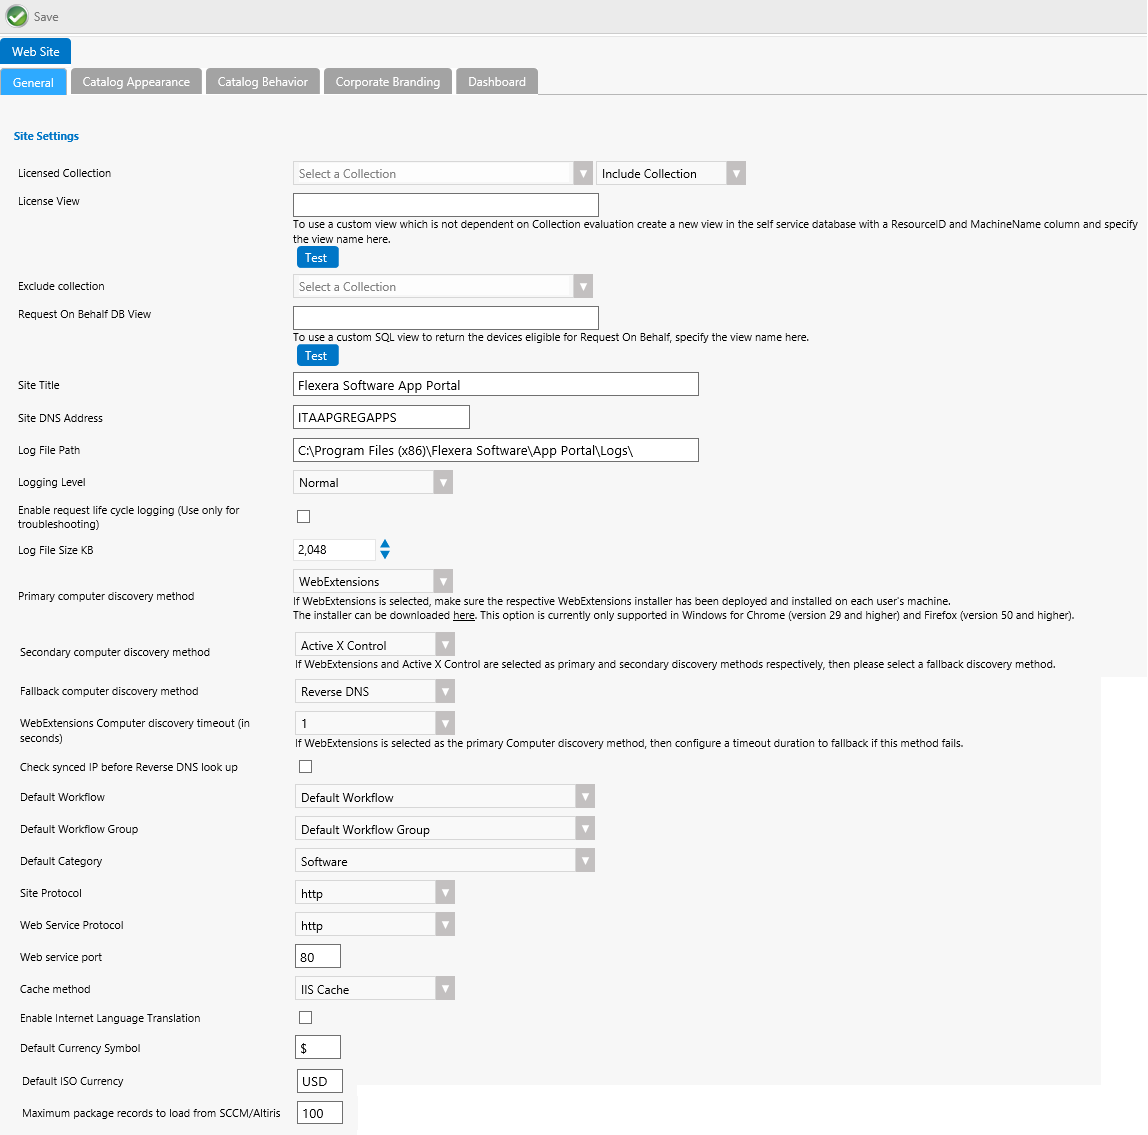
Settings > Web Site View / General Tab
The General tab of the Web Site view includes the following properties:
|
Property |
Description |
|||||||||||||||
|
Licensed Collection |
Use the Select a Collection list to identify a collection to set the scope of licensing. To use a collection to license, select a collection.
For more information, see Difference Between “Licensed Collection and “Exclude Collection”. |
|||||||||||||||
|
License View |
When using collection licensing, it is subject to collection update intervals. If you cannot update the collection at a schedule necessary, you can define a view in the App Portal database that will identify the licensed clients.
Enter the name of the view in the License View field. |
|||||||||||||||
|
Exclude collection |
This is the inverse of the Licensed Collection field Any members of the selected collection will be banned from App Portal activity. Difference Between “Licensed Collection and “Exclude Collection” When you use the Exclude collection list to exclude a collection from App Portal activity, this is not the same as selecting that same collection from the Licensed Collection list along with selecting Exclude Collection because the license count is not altered.
|
|||||||||||||||
|
Request On Behalf DB View |
To use a custom SQL view to display the eligible for Request On Behalf, specify the page name in this field, and then click Test to view the page. |
|||||||||||||||
|
Site Title |
The name of the site title as it appears on the browser title bar. |
|||||||||||||||
|
Site DNS Address |
Specify the DNS address of the site.
|
|||||||||||||||
|
Log File Path |
Specify the path to the log files. If you wish to use a different drive or folder, change the value here. Note:Be sure to include the trailing backslash. |
|||||||||||||||
|
Logging Level |
Specify the default logging level:
|
|||||||||||||||
|
Enable request life cycle logging |
Select this option to create individual log files for each App Portal request that lists all events that have occurred for that application. These log files will be stored in the following location: C:\Program Files (x86)\Flexera Software\App Portal\Logs\RequestLog This feature should only be turned on when performing troubleshooting. |
|||||||||||||||
|
Log File Size KB |
The data storage size for each log file created. |
|||||||||||||||
|
Specify how App Portal will determine the computer name.
If WebExtensions is selected, an administrator must ensure that the respective WebExtensions installer has been deployed and installed on each user’s machine. A link to the installer is provided in the description provided next to the Primary computer discovery method field. The installer is only available to administrators because it requires an install as administrator and also because an administrator will need to enter the correct App Portal web URL as part of the install process. For additional information, refer to Deploying WebExtensions to All Computers in a Network.
|
||||||||||||||||
|
Secondary computer discovery method |
If the primary computer discovery method fails, this secondary discovery method will be used. |
|||||||||||||||
|
Fallback computer discovery method |
If both the primary and secondary computer discovery methods fail, the fallback discovery method will be used. |
|||||||||||||||
|
WebExtensions Computer discovery timeout (in seconds) |
If WebExtensions is the Primary Computer discovery method selected, the administrator can set a timeout period using this option that sets the timeout period to use before reverting to the Secondary or Fallback computer discovery methods. |
|||||||||||||||
|
Check synced IP before Reverse DNS look up |
If this option is selected, App Portal will look into the local table for an IP address match for the machine. If the IP address is not found, App Portal then will perform a reverse DNS look up. Because viewing a local table takes less time than performing a reverse DNS lookup, selecting this option could speed up performance. By default, this option is not selected. |
|||||||||||||||
|
Default Workflow |
If you create a new catalog item and select the Require Approval for Install? option on the Global tab of the New Catalog Item dialog box, but do not add an approval workflow on the Approval Process tab, the approval workflow selected from this Default Workflow list will be used. |
|||||||||||||||
|
Default Approval Group |
Select a approval group to identify a group of approvers that would be used in a case where no approvers for a calculated workflow step could be identified (such as if you specified that a user’s manager is the approver for a workflow step, but that user does not have a manager). |
|||||||||||||||
|
Default Category |
Select the default category for a catalog item. |
|||||||||||||||
|
Site Protocol |
Specify if you want the protocol of the App Portal website to be http or https. |
|||||||||||||||
|
Web Service Protocol |
Specify if you want the protocol of the App Portal web service to be http or https. |
|||||||||||||||
|
Web service port |
If the Web Services are installed on a specific port, enter the port number here. |
|||||||||||||||
|
Cache method |
Specify the cache method to be used on the App Portal website:
|
|||||||||||||||
|
Enable Internet Language Translation |
Select to enable internet language translation on the Communication > Language Text view. |
|||||||||||||||
|
Default Currency Symbol |
Enter the default currency symbol to be used on the App Portal site, such the U.S. dollar sign or the British pound sign. |
|||||||||||||||
|
Default ISO Currency |
Enter the global currency code, from the ISO 4217 Currency Code list, for the currency that you want to use on the App Portal site. For example, enter USD for U.S. dollar, CAD for Canada dollar, or INR for India rupee. Note:The ISO Currency Code list is published by the ISO: International Organization for Standardization (http://www.iso.org). |
|||||||||||||||
|
Maximum package records to load from SCCM/Altiris |
Controls how many records from System Center Configuration Manager or Altiris that are initially queried and displayed on the listing when using the New Catalog Item Wizard. Tip:To search the entire server for a package or application, use the column filters above the listing. |
Deploying WebExtensions to All Computers in a Network
An I.T. Administrator needs to take steps in order to get App Portal WebExtensions successfully deployed to all computers in their network so that you do not have to grant install permissions to your Enterprise users. See the following sections for details about:
| • | Supported Browser Versions |
| • | Deploying Web Extensions in Microsoft Edge and Google Chrome (Windows) |
| • | Deploying WebExtensions in Firefox (Windows) |
The following versions of browsers are supported with the Web Extension discovery method to detect the device name on a client machine:
| • | Google Chrome 63 and above |
| • | Mozilla Firefox 56 |
| • | Microsoft Edge 44 / Microsoft EdgeHTML 18 |
| • | Microsoft Edge Chromium 85 |
Note:If you are using Microsoft Edge, note the following:
| • | The Microsoft Edge browser versions listed above are supported when running any of the following Microsoft Windows versions: – Windows 10 Version 2004 (OS Build 19041) – Windows 10 Version 1909 (OS Build 18363) – Windows 10 Version 1903 (OS Build 18362) |
| • | If there is reinstall of App Portal Web Extension.exe on a client machine, it should be restarted to take effect the web extension for standard user using Microsoft Edge browser. |
Deploying Web Extensions in Microsoft Edge and Google Chrome (Windows)
Important:Before running the App Portal Web Extension setup on Windows 10 versions, an Admin must make sure the following prerequisites settings are configured:
| • | For client machine with Windows 10 version 1909 (OS Build 18363) and Windows 10 Version 1903 (OS Build 18362): Enable side loaded apps by navigating to Settings < Update and Security > For Developers > Enable Sideload Apps. |
| • | For client machine with Windows 10 Version 2004 (OS Build 19041). Enable side loaded apps by navigating to Settings > Update and Security > For Developers > Enable Developer Mode. |
The following instructions show how to deploy App Portal WebExtensions using Google Chrome or Microsoft Edge on a Windows machine. For instructions to deploy using Mozilla Firefox, refer to Deploying WebExtensions in Firefox (Windows).
Administrators that are deploying App Portal WebExtensions to enterprise user machines need to perform following steps
| 1. | To start the App Portal Web Extension installer, launch App Portal Web Extensions.exe setup and run as administrator user. |
The Welcome panel opens.
| 2. | Click Next. |
| 3. | Click Install to begin the installation. |
When the installation is complete, the Completed panel opens.
| 4. | Click Finish. |
An Admin can install the App Portal Web Extension setup silently in the background as shown in the following steps.
Administrators that would like to install the App Portal Web Extension setup silently in the background using the command line need to perform the following steps
| 1. | Launch the command prompt on client machine as administrator user. |
| 2. | Navigate to the directory were the App Portal Webextension.exe setup is copied. |
| 3. | Run the following command-line to install the web extension: |
"App Portal Web Extensions.exe" /s /v/qn
| 4. | Run the following command-line to install the web extension: |
"App Portal Web Extensions.exe" /s /v/qn /x
Deploying WebExtensions in Firefox (Windows)
There are two options to use for an administrator to deploy WebExtensions in Firefox for Windows to all computers in your network:
| • | Option 1—To deploy WebExtensions in Firefox for WIndows, an I.T. administrator needs to create an Active Directory Group Policy that allows for auto-install without giving the user the ability stop it. Mozilla's documentation can be found here: https://developer.mozilla.org/en-US/Add-ons/WebExtensions/Alternative_distribution_options/Add-ons_in_the_enterprise#Firefox_settings. Therefore, within the Active Directory Group Policy, an I.T. administrator needs to set extensions.autoDisableScopes to their desired preference. |
| • | Option 2 (Recommended by Mozilla)—An I.T. administrator needs to deploy Firefox ESR (Extended-Support Release) within their enterprise. This can be downloaded and installed from https://www.mozilla.org/en-US/firefox/organizations/all/ |