Using Retire Campaigns to Remove Applications from Your Enterprise
App Portal 2017
Note • This feature requires that App Portal is connected to FlexNet Manager Suite via the Flexera Service Gateway.
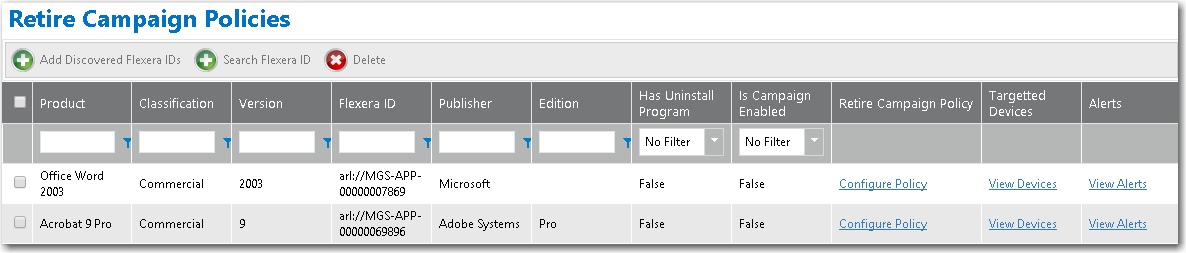
You can create a campaign to automatically retire (uninstall) an application that is installed in your enterprise or an application that could be installed in the future. You create retire campaigns on the Retire Campaign Policies view, which is opened by selecting Compliance Management > Retire Campaign.
To create a retire campaign, perform the following steps.
To create a retire campaign:
|
1.
|
Select Compliance Management > Retire Campaign. The Retire Campaign Policies view opens. |
|
2.
|
Do one of the following: |
|
•
|
To retire an application installed in your enterprise—To create a campaign to retire an application that is installed in your enterprise, click Add Discovered Flexera IDs. The Add FlexeraID From Applications Discovered in FNMS view opens, listing all of the applications that have been discovered by FlexNet Manager Suite as being installed in your enterprise. |
|
•
|
To retire an application that could be installed in the future—To create a campaign to retire an application that could be installed in your enterprise in the future, click Search Flexera ID. The Search for FlexeraID view opens, listing all of the existing applications/versions in the FlexNet Manager Suite database. |
|
3.
|
Locate and select the application(s) that you want to create a retire campaign for and click Add. An individual retire campaign is created for each selected application. |
|
4.
|
Click Back to Campaign to return to the Retire Campaign Policies view. The application that you added is now listed. |
|
5.
|
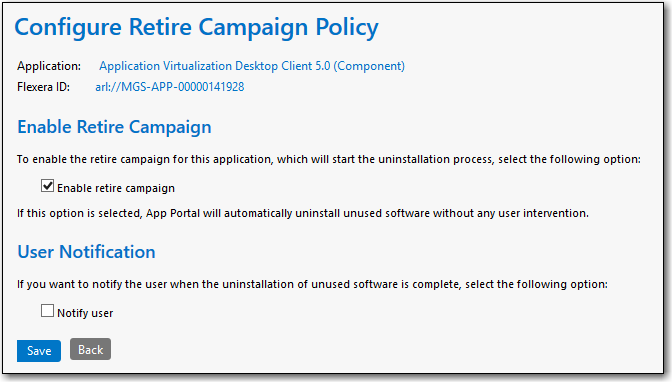
Click Configure Policy in the Retire Campaign Policy column of the application. The Configure Retire Campaign Policy view opens. |
|
6.
|
On this view, select the Enable retire campaign option to enable the retire campaign for this application, which will start the uninstallation process. |
|
7.
|
If you want to notify the user when the uninstallation of the retired software is complete, select the Notify user option. |
|
8.
|
Click Save to return to the Retire Campaign Policies view. |
|
9.
|
To view a list of devices where the selected application is currently installed, click View Devices. The Devices view for retire campaigns opens. |
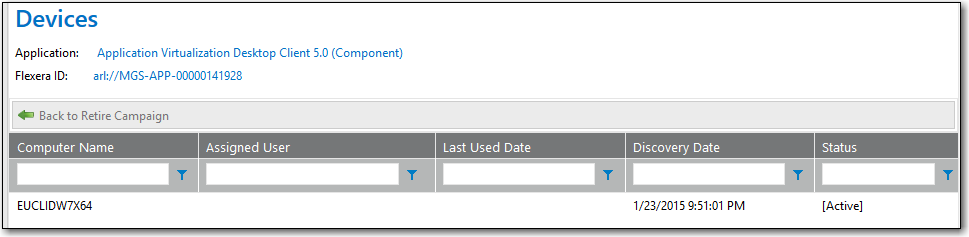
All of the devices where this application is installed are listed, along with the Computer Name, Assigned User, Last Used Date, Discovery Date, and Status.
|
10.
|
Click Back to Retire Campaign to return to the Retire Campaign Policies view. |
|
11.
|
To view a list of alerts that have been generated as part of a retire campaign, click View Alerts. The Alerts view for retire campaigns opens. |
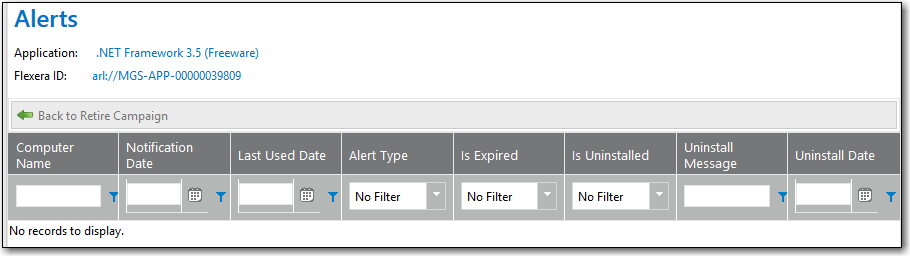
The Computer Name, Notification Date, Last Used Date, Alert Type, Is Expired, Is Uninstalled, Uninstall Message, and Uninstall Date are listed for each alert.
How Uninstallation is Triggered in a Retire Campaign
Once a retire campaign is enabled, the uninstallation process will begin. What happens next depends upon the whether or not the application has an uninstall program associated with it in its deployment technology:
|
•
|
With associated uninstall program—If an uninstall program has been associated with this application in its deployment technology, App Portal will send an uninstall request to the deployment technology. |
|
•
|
Without associated uninstall program—If an uninstall program has not been associated with this application in its deployment technology, App Portal will submit a request for that machine for a general catalog item named Uninstall, which is available out-of-the-box with App Portal. |
See Also
Retire Campaign
Open topic with navigation