App Portal 2017
Before beginning a Clone/Migrate operation, first identify the source destination computers.
To perform a Clone/Migrate operation, perform the following steps.
To perform a Clone/Migrate operation:
| 1. | On the Support Tools tab, click Clone/Migrate. The Clone/Migrate view opens. |
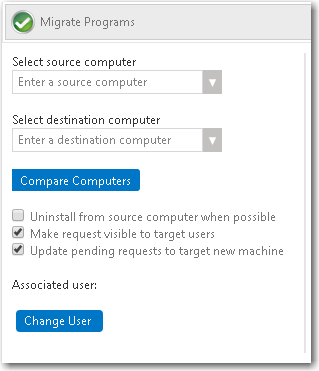
| 2. | From the Select source computer list, select or enter the name of the source computer that will have installed applications evaluated for migration to the destination computer. |
| 3. | From the Select destination computer list, select or enter the name of the destination computer where the selected applications will be installed. |
| 4. | The Associated user field displays the name of the owner of the destination computer, based on the user-to-computer relationship mapping setting that is configured for the environment. If necessary, use the Change User button to update the user association for the destination computer. |
| 5. | Optionally, select the following options: |
| • | After you migrate the applications, if you want them to be uninstalled from the source computer, select the Uninstall from source computer when possible option. When this option is selected, App Portal will schedule the uninstallation of any application that App Portal has an uninstall package for assigned in the catalog item associated with that application. |
| • | If you want the target user to be able to see the request listed on the My Requests page (when the user selects the Clone/Migrate filter under Advanced search), select the Make request visible to target users option. The user will be able to view the status and progress of the request. |

| • | If you want any pending requests that are currently assigned to the source computer to be changed to the target, or destination computer, select the Update pending requests to target new machine option. |
| 6. | Click the Compare Computers button to evaluate the installed applications on the source and destination computers, and display the details available for this Clone/Migrate transaction. In the Clone/Migrate details pane, the following information is listed for each application: |
|
Column |
Details |
|||
|
Applications available migration |
Lists the catalog item title for the application discovered on the source computer. |
|||
|
Cost |
Lists any cost associated with the discovered application. |
|||
|
Recommendation |
Lists icons that provide a recommendation on whether or not the discovered application should be included in the Clone/Migrate process. There are three possible recommendations icons listed: |
|||
|
|
|
|||
|
|
|
|||
|
|
|
|||
|
Information |
Includes additional details regarding the discovered application. This may include general installation or usage information. |
|||
| 7. | In the Clone/Migrate details pane, select the applications that should be included in the Clone/Migrate process. |
| 8. | Review additional configuration items and set them as desired. |
| 9. | When ready to initiate the migration, click the Migrate Programs button. A message appears when the migration has been successfully initiated. |
App Portal / App Broker 2017 Administration Guide18 July 2017 |
Copyright Information | Flexera Software |


