Scheduling Automatic Emailing of Dashboards
Note:
IT Visibility is being upgraded with the introduction of Technology Intelligence Platform beginning in September 2024. Flexera will contact you directly regarding the timeframe of your upgrade. With Technology Intelligence Platform, out-of-the-box IT Visibility dashboards are being replaced with new, enhanced IT Visibility Technology Intelligence Platform reports. For more information, see IT Visibility With Technology Intelligence Platform Reports.
Users can schedule automatic emailing of dashboards. Flexera One then regularly sends the dashboard as an attached PDF file.
See the following subsections on this page:
Configuring Scheduled Emails
To configure scheduled emails:
|
1.
|
Open a Dashboard for which you want to schedule emailing. |
|
2.
|
Click the three dots icon in the top right corner and click Schedule emailing. |
|
3.
|
Fill in the email addresses of recipients who will receive the regular messages. Your email address is always included. You can add recipients: |
|
•
|
From the workspace—Their email addresses are suggested as you write. If users have any filters defined, these filters are applied to the dashboard as well. |
|
•
|
Other recipients—Your Dashboards may contain sensitive data—make sure that the recipients are eligible to see them. |
|
4.
|
(Optional) Customize the email subject and body. By default, the subject includes the name of the dashboard and the date it is sent. |
|
5.
|
Configure the date and time of the first email. |
|
6.
|
Set the repetition scheme and can configure the send the emails daily, weekly, monthly, or at a custom interval. |
From now on, all recipients will receive regular emails that include:
|
•
|
A link to display the dashboard in Flexera One’s Data Explorer—Recipients must log in to see the dashboard. |
|
•
|
An attachment with a PDF file with the dashboard—Recipients can download the file to their hard drive. |
|
•
|
An Unsubscribe link—Recipients can click Unsubscribe to stop receiving the scheduled emails. |
Managing Scheduled Emails
To manage scheduled emails:
|
1.
|
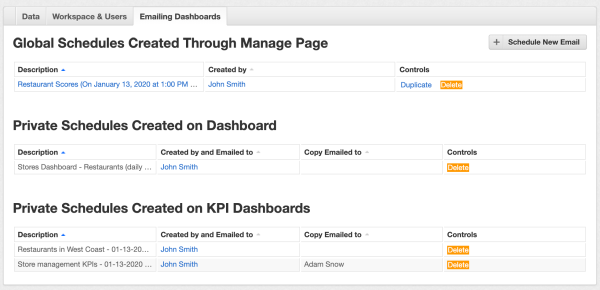
To display all scheduled emails, go to the Manage section on the Emailing Dashboards tab in Data Explorer. |
|
2.
|
To update the schedule, you must delete the current schedule in the Private Schedules Created on Dashboards and create a new one. |

