IT Asset Management (Cloud)
This approach helps to control your team's work focus.
At first, your list of unmanaged applications () may be far too large to work with conveniently. If there are several
operators working with this list, each can have their own filters that give a
personalized list to work on. If you want to reduce the set of available
applications to a common pool for operators to choose from, you can use the
following approach. It is only necessary to do this once, to bring the list under
initial control. As a worked example, imagine that you want everyone to concentrate
on updating all licenses for a forthcoming Microsoft audit. Everything else can be
deferred for the time being.
To create filters for the unmanaged applications list:
-
On the Unmanaged Applications page, change the rows per page setting to
1000, or a number high enough to include all your
unmanaged applications where possible.
This allows you to change as many records at once as possible, reducing your
configuration effort.
-
Create an advanced filter for the inverse of the condition you want to
display (see Creating an Advanced Filter).
For example, to prepare for a Microsoft audit, you may need to focus on
commercial applications published by Microsoft. For the moment, we need to hide
these desirable applications while we focus on moving away all the others. Since
the advanced filter does not allow for starting a filter with "Not", we need a
more complex filter specification to reveal everything
except the
Microsoft commercial applications:
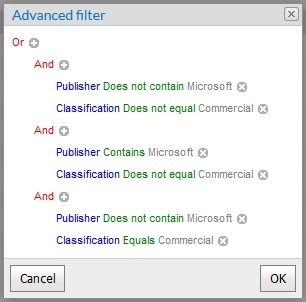
(Publisher Does not contain Microsoft
AND
Classification Does not equal Commercial)

OR

(Publisher Contains Microsoft
AND
Classification Does not equal Commercial)

OR

(Publisher Does not contain Microsoft
AND
Classification Equals Commercial)
In
the
Advanced filter builder, the conditions look like this:

When you click
OK, the
desirable applications are hidden, and the (temporarily) undesirable
applications remain.
-
In the header of the list, click the selection box above the left column.
This selects all the applications displayed in this list. (It does not select
any applications on later pages of the list that are not yet displayed.)
-
Above the list, on the right, select Change status, and
from the list of options, choose Deferred.
After a moment, the selected applications disappear from this list (they
have moved to the separate list of Deferred Applications.) Any
remaining applications that meet the filter specification on the Unmanaged Applications list are
displayed in their place.
-
If necessary, repeat the selection and status change until there are
No results for applications matching your
filter.
-
In the filter row above the Unmanaged Applications list (on the
left), click the x to remove the filter.
The list refreshes and displays only the desirable applications that are
your current focus. Individual operators may now further filter this list (for
example, filtering for particular application names) to suit their individual
tasks; but the overall to-do list is fixed on commercial Microsoft applications.
To bring one of these applications under management, you can:
- Use the Create a license button on this page to
manually license the application; or locate, import, and process
purchases relating to the application.
- Select the licensed application, and use the Change
status button to mark it either
Authorized (when it is permitted in
your enterprise) or Unauthorized (if it is
not permitted, and must be uninstalled before the audit). The change of
status removes the application from this to-do list.
When you have completed this to-do list, you can switch to the list of Deferred Applications, filter to the
next set of applications to work on (such as those with the next focus publisher),
select them all and change their status to Unmanaged.
(Remember to repeat this over multiple pages of the list if necessary.) Those selected
apps are then restored to the Unmanaged Applications to form your next
to-do list.
IT Asset Management (Cloud)
Current
