Workflow Phase Details View
Workflow Manager
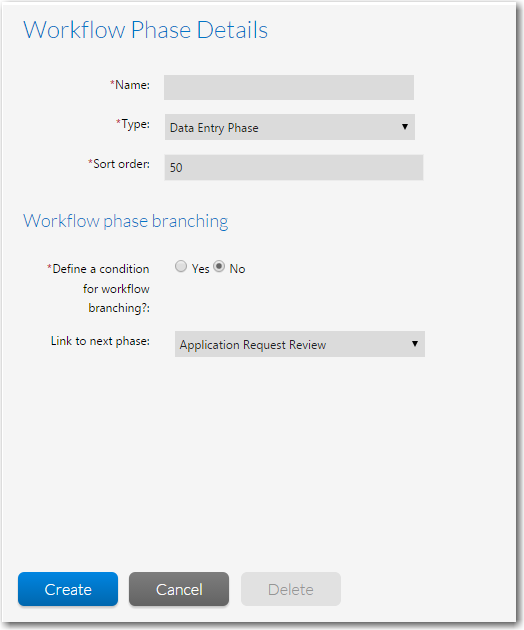
On the Workflow Phase Details view, which opens when you create a new workflow phase or edit an existing workflow phase on the Template Details page, you build the workflow phases of a template.
Workflow Phase Details View
The Workflow Phase Details view consists of the following options:
|
Option |
Description |
|||||||||||||||
|
Workflow Phase Name |
Enter a name to identify this workflow phase. |
|||||||||||||||
|
Phase Type |
Select one of the following options to identify the workflow phase type:
Note:By default, an AdminStudio Workflow phase is automatically assigned to the AdminStudio user named admin@servicer.com. To change this default user to a different user, go to the <appSettings> section of the web.config file on the web server and edit the following line: <add key="ASProjectOwner" value="admin@servicer.com" /> Note:If you are editing a Workflow Phase that is in use, the Phase Type field is disabled. |
|||||||||||||||
|
Sort Order |
Enter a number to determine where this workflow phase will appear in the workflow phase list, with lower numbers appearing higher in the list. |
|||||||||||||||
|
Track for Workflow SLA |
Select this option to instruct Workflow Manager to include the time spent to perform this workflow phase in the SLA calculations for the entire workflow request (shown on the Projects Report). Clear this selection to exclude the time spent on this workflow phase from SLA calculations. SLA (Service Level Agreement) time tracking is used to determine the status of a request (or a single workflow phase) in relationship to its SLA due date as either: On Time, At Risk, Late, Completed on Time, or Completed Late. See Calculating SLA Status for more information. |
|||||||||||||||
|
Track for Workflow Phase SLA |
Select this option and enter a numeric value in the Due Period and Risk Period fields to instruct Workflow Manager to send out an email alert and change the workflow phase’s SLA Status (shown in the Workflow Phase SLA Report) when a duration threshold is reached. Important:It is recommended that this option should be selected only for tasks that are critical for the completion of the workflow for which immediate notification of a delay is important. If this option is not selected, no email alerts will be sent out regarding this workflow phase and it will not be listed on the Workflow Phase SLA Report. Note:SLA (Service Level Agreement) time tracking is used to determine the status of a request (or a single workflow phase) in relationship to its SLA due date as either: On Time, At Risk, Late, Completed on Time, or Completed Late. See Calculating SLA Status for more information. |
|||||||||||||||
|
Due Period |
The elapsed time (in days) after the workflow step becomes the current phase that it should be completed in order to be SLA compliant. If it is not completed by this date, its SLA status would be Late and an email alert would be sent out. This field is enabled if Track for Workflow Phase SLA is also selected. |
|||||||||||||||
|
Risk Period |
The elapsed time (in days) after which this workflow phase should be considered at risk of not being completed on time (corresponds to SLA status of At Risk). This field is enabled if Track for Workflow Phase SLA is also selected. |
|||||||||||||||
|
Define a condition for workflow branching? |
Select one of the following options:
Branch and Merge Phases In a branch phase, the workflow proceeds in two different paths depending upon an item of data that was collected. A merge phase is where a workflow with branch phases merges back together. |
|||||||||||||||
|
Link to next phase |
Select the existing phase that you want to follow this phase in the Workflow. Note:This option is displayed only if the Define a condition for workflow branching? option is set to No. Caution:Even though phases are listed in a specific order in the phase/step tree, they are not automatically linked together. If you create a phase but fail to link it to a preceding phase, it will not be visible in the workflow. Tip:The easiest way to link phases is to create all of the phases first, and then edit each of them to link the phases together. |
|||||||||||||||
|
Select the branching condition |
Select a Data Element to use as the branching condition. If one the following is true, the Select the branching condition list will be empty:
Note:This option is displayed only if the Define a condition for workflow Branching? option is set to Yes. |
|||||||||||||||
|
Condition Value / Next Phase List |
If the Define a condition for workflow branching? option is set to Yes and you have selected a data element from the Select the branching condition list, a table displaying the possible values for that data element is displayed:
|
|||||||||||||||
|
Create / Update |
Click to save your entries. |
|||||||||||||||
|
Delete |
Delete this workflow phase. |