Data Type-Specific Properties
Workflow Manager
The Data Element Details view includes the following properties, depending upon the selected Data Type:
| • | Properties Common to Multiple Data Types |
| • | Text Entry Box Data Type Validation Options |
| • | DB-Driven Type Data Type Options |
| • | Dynamic Pick List Data Type Options |
Properties Common to Multiple Data Types
The following data element options are common to multiple data types:
|
Option |
Displayed for Data Types ... |
Description |
|||||||||
|
Default Value |
Text Entry Box, Text Area, Single Selection, Multiple Selection, Radio Button, Check Box, Date |
To set default values for text fields, selection lists, radio buttons, or dates, use this option:
|
|||||||||
|
Use to define conditions/branching |
Single Selection, Radio Button |
Enables this data element to be specified as controlling a workflow branching condition. When workflow phases are defined, data elements with this option can be selected as the condition of the phase. The default value for this field will be No. Important:This field is only shown if you have selected a Workflow Manager Data Type that supports branching (Single Selection or Radio Button). |
|||||||||
|
Define a condition for automatic rollback? |
Single Selection, Radio Button |
Enables this data element to be specified as controlling the automatic rollback to a specified workflow step, based upon administrator input. The default value for this field will be No. For more information, see Setting Up Conditions to Perform Automatic Rollback to a Workflow Step. Important:This field is only shown if you have selected a Data Type that supports branching (Single Selection or Radio Button) and if Use to define conditions/branching option is set to Yes. |
|||||||||
|
Selection list items |
Single Selection, Multiple Selection, Radio Button, Check Box |
Enter the items in the list control (if you selected Single Selection or Multiple Selection in the Data Type field) |
|||||||||
|
Directory Services |
Directory Service |
If you selected Directory Service as the Data Type, this field appears allowing you to select a Directory Service Attribute (which are defined on the Directory Services Attributes Administration Page) to map to a user in the directory service. If you select the Directory Service data type and no directory service information has been defined, the Add New... link appears. Click Add New... to define directory service information, or select a different data type. See Creating a New Directory Service Connection. |
Text Entry Box Data Type Validation Options
The following additional options are displayed when the Data Type is set to Text Entry Box:
|
Option |
Description |
|||||||||
|
Validation Type |
From the Validation Type list, select one of the following options to specify if you would like to validate the data that is entered into that field:
If you select the Mask or Regular Expression options, the Validation Expression and Validation Message options are displayed. |
|||||||||
|
Validation Expression |
Enter one of the following:
\(\d{3}\)\d{3}-\d{4}
( ) - \ / . $ An example of a mask validation for a United States phone number would be: (###)-(###)-(####) |
|||||||||
|
Validation Message |
Enter the error message text that you would like to display if the users’ entry is not valid. The error will be generated when the user attempts to navigate out of the text field. |
DB-Driven Type Data Type Options
On the Data Element Details view, when the Data Type of a Data Element is set to DB Driven Type, the following additional options are displayed
|
Option |
Description |
||||||
|
External Data Source |
Select a database connection that was defined on the External Data Sources Administration page. See Creating a New Data Source Connection. |
||||||
|
SQL Query |
Define a query to select the columns of the database table that you want to include on the selection list that is displayed to the user as a request is worked on. For example, if you want to display the LastName and JobTitle and EmployeeID of all salespersons in the Midwest region, enter a query that would return those values. Also note the following regarding the SQL Query field:
|
||||||
|
Persisted Column |
Enter the name of the column containing the value you want to store in the database. In the previous example, you would probably want to store the EmployeeID column as the Persisted Column because it uniquely identifies the person that will be selected. |
Dynamic Pick List Data Type Options
On the Data Element Details view, when the Data Type of a Data Element is set to Dynamic Pick List, the following additional options are displayed:
|
Option |
Description |
|
Data Source File |
Select an XML data source file to populate your Dynamic Pick List data element. This field lists of all of the XML source files that have been copied to the following Workflow Manager Web Server location: [Workflow Manager Web Application Root]\DataSourceFiles Important:These XML data source files must adhere to the Microsoft Excel XML spreadsheet schema. To ensure that your XML file is in the correct format, open your XML file in Microsoft Excel, and save it in XML Spreadsheet 2003 (*.xml) format. |
|
Column Value to Submit |
For Dynamic Pick List data elements, select the name of the column in the selected XML data source file that contains the value that you want to pass to Workflow Manager when an item is selected. An XML data source file can have multiple columns, but only one column value is passed to Workflow Manager. By default, the first column in the XML file is selected. If no column names are listed, it means that the XML data source file that you selected either contains no data or was not saved in Microsoft Excel XML Spreadsheet 2003 (*.xml) format. |
Select LinkUrl to prompt the requester to click a link to open a specified Url or UNC path in a new window/dialog box. With this data type you have two options:
| • | Linking to a URL |
| • | Linking to a UNC Path |
When you add a data element with a data type of LinkUrl with the Url option to a workflow template, and associate that data element with a Workflow step, the requester is prompted to click a link, which will open the specified Url in a new dialog box.
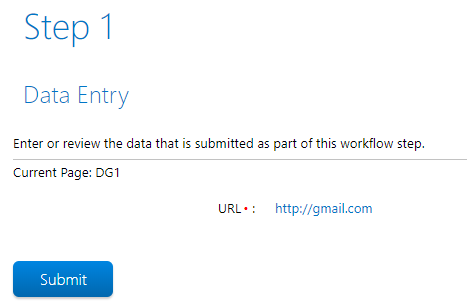
LinkUrl Workflow Step with the URL Option
To create a data element with the LinkUrl data type with the Url option, perform the following steps:
To create a LinkUrl workflow step with the Url option:
| 1. | Open a workflow template on the Template Details page, as described in Creating a New Template. |
| 2. | Add a new data element to a data group, either one collected at initial submission or later in the workflow. |
| 3. | Enter a name for this data element in the Description field. |
| 4. | Set Data type to LinkUrl. |
| 5. | Set Link type to Url and enter a URL in the Link field. For example, enter http://gmail.com. |
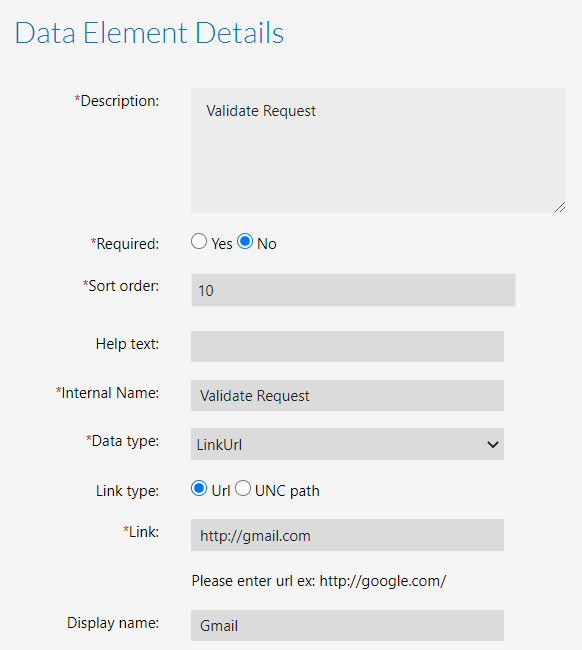
| 6. | Enter the display name in the Display name field. |
Note:When a Display name is not entered, then the specified Url will appear as the Display name.
| 7. | Click the Create button and associate the data group containing that data element to a workflow step. |
When you add a data element with a data type of LinkUrl with the UNC Path option to a workflow template, and associate that data element with a Workflow step, the requester is prompted to click a path and download the shared file.
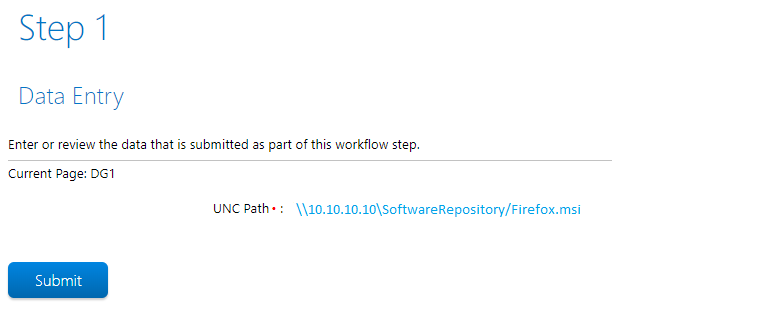
LinkUrl Workflow Step with the UNC Path Option
To create a data element with the LinkUrl data type with the UNC Path option, perform the following steps:
To create a LinkUrl workflow step with the UNC Path option:
| 1. | Open a workflow template on the Template Details page, as described in Creating a New Template. |
| 2. | Add a new data element to a data group, either one collected at initial submission or later in the workflow. |
| 3. | Enter a name for this data element in the Description field. |
| 4. | Set Data type to LinkUrl. |
| 5. | Set Link type to UNC path and enter a path in the Link field. For example, enter \\10.10.10.10\SoftwareRepository\Firefox.msi. |
Note:Folder paths are not supported for the UNC Path.
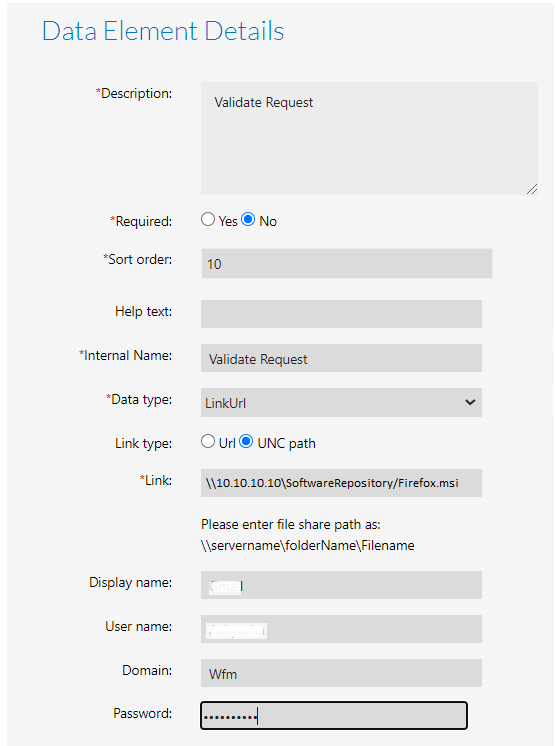
| 6. | Enter the display name in the Display name field. |
Note:When a Display name is not entered, then the specified UNC path will appear as the Display name.
| 7. | Enter the User name, Domain, and Password in the respective fields. |
Note:The User name, Domain, and Password must be provided. If they are not provided, then the requester will not be able to access the shared file in this Workflow step.
| 8. | Click the Create button and associate the data group containing that data element to a workflow step. |
When you add a data element with a data type of User Role to a workflow template, and associate that data element with a Workflow step, then requester is prompted to select any user from the list by clicking on the drop down in the workflow which pulls all the users associated with the selected role.
To create a data element with the User Role data type, perform the following steps:
To create a User Role workflow step:
| 1. | Open a workflow template on the Template Details page, as described in Creating a New Template. |
| 2. | Add a new data element to a data group, either one collected at initial submission or later in the workflow. |
| 3. | Enter a name for this data element in the Description field. |
| 4. | Set Data type to User Role. |
| 5. | Click the Select a role drop down and select the desired role from the list. |
| 6. | After selecting the details, click the Create button and associate the data group containing that data element to a workflow step. |