Setting Advanced Configuration Settings
To set advanced Workflow Manager settings, perform the following steps:
To set advanced configuration settings:
| 1. | Launch the following file on the machine where you installed Workflow Manager: |
C:\AdminStudioWebComponents_v20\Support\Config\Config.exe
The AdminStudio Configuration Wizard Welcome panel opens.
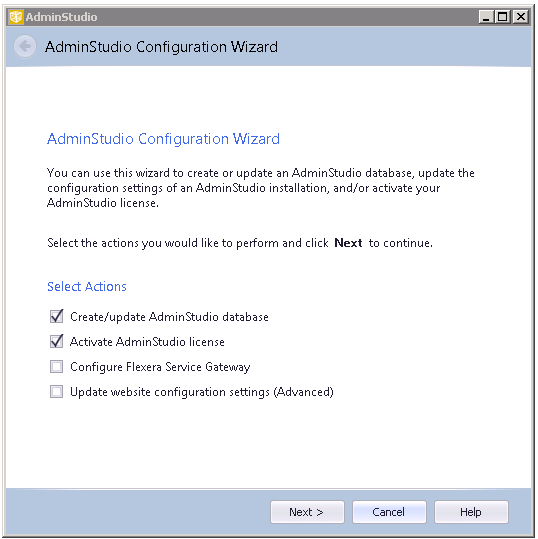
| 2. | Select Update website configuration settings (Advanced) and click Next. The Set Default Connection panel opens, prompting you to enter the default connection information for web site users. |
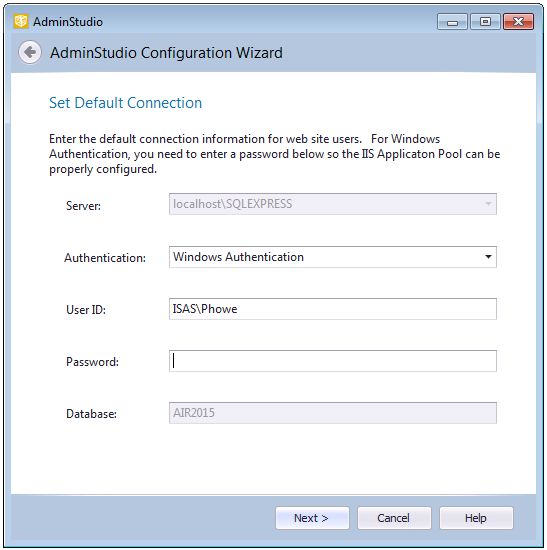
| 3. | Do one of the following based upon whether you are using Windows authentication or server authentication when connecting to the Workflow Manager database: |
| • | Windows Authentication—Enter or edit the User ID and Password that the Web Sites Application Pool will run as in order to access the database. |
| • | SQL Server Authentication—Confirm that the User ID and Password that you entered when you configured the database connection are displayed here. |
| 4. | Click Next. The Configuration Settings: Administrative panel opens. |
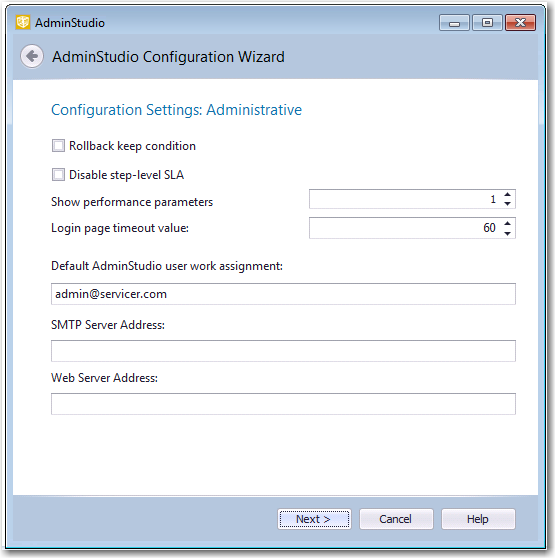
| 5. | Specify the following options: |
|
Property |
Description |
|
Rollback keep condition |
When a workflow request that contains branching is rolled back, the selections of the branching condition will be cleaned up. If this option is selected, the selection will be preserved and the workflow request will move forward through the same branches as it did before the rollback. |
|
If this option is selected, the Track for Workflow SLA option on the Template Details view is not available. That means that all workflow steps will be included in SLA calculations. |
|
|
Show performance parameters |
Select this option to prevent individual user account names to be displayed in summary reports. |
|
Identifies the length of time that you can leave the login page open before it times out. |
|
|
Specify which AdminStudio user is automatically assigned to an AdminStudio project that is created as part of a Workflow Manager phase. |
| 6. | Click Next. The Configuration Settings: Network Share panel opens. |
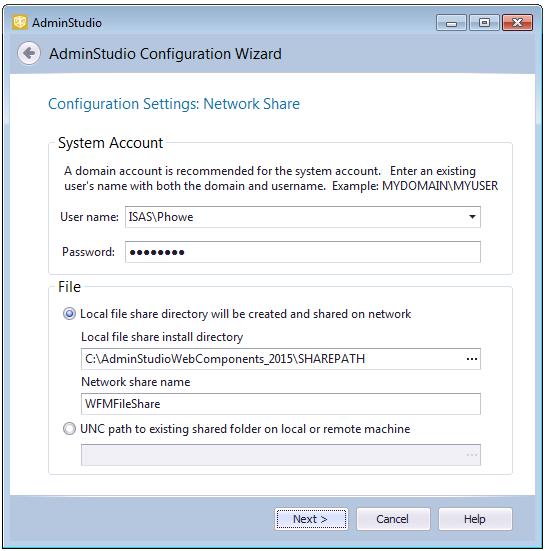
| 7. | Specify the following options: |
|
Property |
Description |
|
User name Password |
Enter a user name and password for the system account. Enter the user name in DOMAIN_NAME\USER_NAME format. |
|
Local file share directory will be created and shared on network |
Select this option if your file share location is on the local machine. |
|
Local file share install directory |
Enter the local file share directory path. |
|
Network share name |
Specify the name of the shared directory when it is viewed from other machines in the network. |
|
UNC path to existing shared folder on local or remote machine |
Select this option if your file share location is in a shared folder on a local or remote machine, and enter the location in UNC path format. |
| 8. | Click Next. The configuration begins and messages are displayed. |
| 9. | When the configuration steps are complete, click Finish to close the wizard. |