Workflow Manager 2014
Use the Workflow tab to track the progress of a workflow request. It lists all the workflow phases in the template that this request was based on.
On the Workflow Progress tab, the progress of each phase is shown:
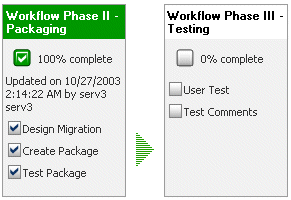
Workflow Progress Tab Example
In this example, note the following:
| • | A grey box represents a workflow phase. |
| • | Each check box represents a workflow step. When a step is completed, a check appears in the check box. |
| • | When a workflow phase is not complete, the name of the phase at the top of its grey box has a white background, one or more of the workflow steps are not completed, and the percentage complete (shown just below the phase name) is less than 100%. |
| • | When a workflow phase is complete, the name of the phase is given a green background, all of the workflow step check boxes are marked as complete, and the message 100% complete appears. |
Data Entry Workflow Steps
The first step of a workflow phase is always a data entry step, but data entry steps can also appear later in the workflow. If the current workflow step is a data entry step, and it is not yet complete, it will have a check box with a red arrow next to it,

Clicking on the name of the data entry step opens a data entry page of the Workflow Progress tab.
The Data Entry page allows you to complete or review any information which must be supplied to complete the workflow request. If the current workflow phase is a data entry phase, the data elements associated with that phase are displayed, and you may update them. If the current workflow phase is a work phase, the data elements associated with the last data entry phase to be completed are shown, and you may review the data entered, but cannot update it.
The names of the data groups associated with the current data entry phase are displayed under the workflow request name, along with a number in the format (n/r). Here:
| • | n = number of data entry fields completed for the current group |
| • | r = number of required data entry fields (marked with a red dot next to their field name) in the current group. |
For example, (2/3) means that there are three required entry fields, and two have been completed.
If there are multiple data groups in the data entry phase, use the Next>> and <<Back buttons to move between them. The final data group will have a Submit button (if you are currently in a data entry phase), which you may click once you have finished entering your information.
Note: If a workflow request is in a work phase, you can use the Next button to scroll through the data entry fields, but you cannot make any edits. This data is locked, and a padlock icon appears over the application name:

See Also
Monitoring the Progress of a Workflow Request
Initiating Work on a Workflow Request
Workflow Manager 2014 Help LibrarySeptember 23, 2014 |
Copyright Information | Contact Us |