Workflow Manager 2015
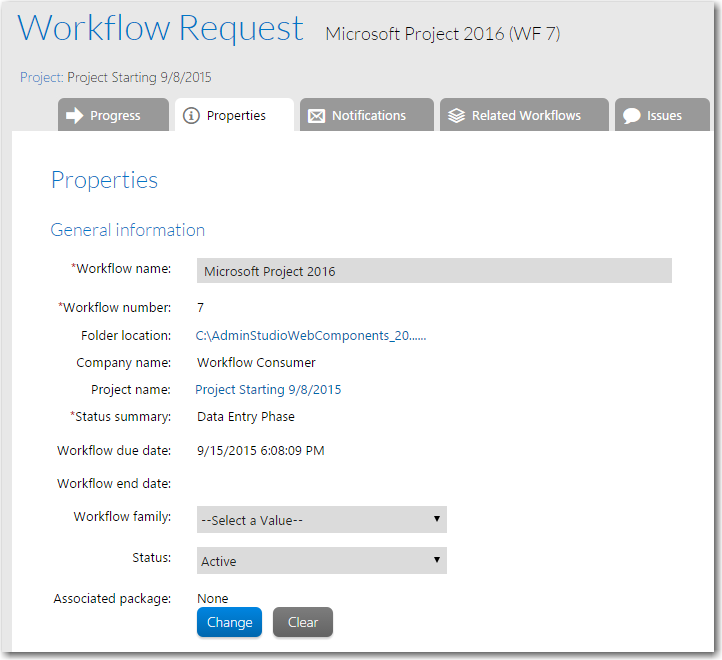
The Properties tab displays general information about the workflow request. Use this tab to:
| • | Edit request details—Review and update the workflow request details, then click Update at the bottom of the tab to commit your changes. See below for a list of properties which you may update. |
| • | Copy a request—Copy the workflow request. See Copying an Existing Workflow Request. |
| • | Delete a request—Delete the workflow request. See Deleting a Workflow Request. |

Workflow Request Page / Properties Tab
The following fields are available on the Properties tab:
|
Option |
Description |
||||||||||||
|
Workflow name |
A short description of the workflow request. |
||||||||||||
|
Workflow number |
(Read-only) A unique numerical identifier for the workflow. This number is generated by Workflow Manager. |
||||||||||||
|
Folder location |
(Read-only) A link to the directory on the Workflow Manager file server, where documents and files associated with this workflow request are uploaded. |
||||||||||||
|
Company name |
(Read-only) The name of the company that the person who submitted this request belongs to. |
||||||||||||
|
Project name |
(Read-only) The name of the project associated with this workflow request. Click the folder name to open the Project Details page for the project. |
||||||||||||
|
Status summary |
(Read Only) Identifies the active workflow phase of this request as being in one of the following four statuses:
|
||||||||||||
|
Workflow due date |
(Read-only) The date that this workflow request should be completed by in order to meet the SLA (Service Level Agreement) requirements of the project. This date is calculated by adding the number of business days specified in the Workflow Due Period field to the date this request was submitted. Note • If you modify the Workflow Due Period field and click the Update button at the bottom of the tab, the Workflow Due Date field will be automatically updated. |
||||||||||||
|
Workflow end date |
The date that the workflow request was completed. This field is editable only if all phases in the workflow have been completed. |
||||||||||||
|
Workflow family |
You can use this field to group workflow requests together, which may assist you when producing reports. You may click Create New to create a new workflow family, or select an existing one from the list. Refer to Managing Workflow Families for further information. Note • If you are a workflow consumer and the company associated with this project was created with the Is a Workflow Family Owner? option selected, the Create New button will not appear. It will be available only when a workflow administrator is submitting a workflow request against the project. See Creating a New Company for more information about this option. |
||||||||||||
|
Status |
Select the status that you want to assign to the workflow request.
|
||||||||||||
|
Associated package |
Click the Change button to associate this workflow request to a package in the AdminStudio Enterprise Server Application Catalog database. When you click Change, the Select Package page opens, listing all of the packages in the Enterprise Server Application Catalog. Select a package in the package tree and click Select Package.
Note • You can also associate a package with a request from the AdminStudio Application Manager interface. |
||||||||||||
|
Exclude weekends? |
(Read Only) When calculating a request’s at risk date and due date (using the values in the Application Due Period and Application at Risk Period fields), this field indicates whether Saturdays and Sundays are being counted as business days. The value of this field is set at the Project level. |
||||||||||||
|
Workflow due period |
Number of days after its submission date that this workflow request should be completed (in order to be in SLA compliance). The value of this field is initially set at the Project level, but can be edited here. |
||||||||||||
|
Workflow at risk period |
Number of days after its submission date that this workflow request will be considered At Risk of not meeting its due date. When a request is At Risk, it is noted in Request and Projects reports, and an “at risk” notification email is sent out if the Send Emails at Application Risk option is selected. The value of this field is set is initially set at the Project level, but can be edited here. |
||||||||||||
|
Send emails at workflow risk |
When “at risk” workflow requests are identified, select whether to send out an email notification of this by selecting Yes or No. |
||||||||||||
|
Comment |
You can document this workflow request by writing comments in this box. Comments entered on the Edit Status Comment dialog box are also displayed here. You open the Edit Status Comment dialog box by clicking Edit Status Comment in the Quick Links menu on the Workflow Request page. |
||||||||||||
|
Copy |
Click to copy this workflow request. See Copying an Existing Workflow Request. |
||||||||||||
|
Save |
Click to save your edits to this workflow request’s properties. |
||||||||||||
|
Delete |
Click to delete this workflow request. |
See Also
Monitoring the Progress of a Workflow Request
Initiating Work on a Workflow Request
Workflow Manager 2015 / AdminStudio Enterprise Server 2015 Help Library10 September 2015 |
Copyright Information | Flexera Software |