 .
. Workflow Manager 2019 / AdminStudio Enterprise Server 2019
This filter constantly updates the list as you adjust the filter settings.
This filter displays a special row immediately under the header row in your list. In this row, you can choose values and tests, after which the list refreshes to show only those records that match your settings. For example, if you set the Consumed column of the All Licenses list to test for Equals 0, the list would show only licenses that were not yet recording consumption through matching installations (and so on).
The header filter is one way to control the filter engine that decides which rows to display. The same engine is also controlled by the simple filter. This means you can see the rules you apply using the header filter also displayed in the simple filter.
To use this filter control:
| 1. | Above the list on the right, click the header filter icon . |
A new row appears immediately below the headers in your list. For each column, the display in this row varies, depending on the kind of information:
| • | If the column displays a fixed set of values, the header filter for this column shows an option list where you can choose a value to match. The options may include the special value All, which is the same as not filtering on this column (since it means that all its possible values are allowed). This is handy for removing a particular choice you had made previously. |
| • | If the column displays either text or numbers, the header filter for this column shows a field to enter/display values, and another blue filter icon that lets you choose what test to apply with the value. |
Tip • The content of the list is refreshed each time you change anything in this header filter.
| 2. | For columns where you can type in values, take these two actions in either order: |
| a. | Type a value into the field provided (the field is not case sensitive). You may finish with the Enter (or Return) key to apply this value (or simply move onto the next step). If you have not yet chosen a test to apply using this value, the default test is used. For text, the default is Contains. For numbers, the default test is Equals. If these defaults suit your purpose, you don't need to do anything further here. |
| b. | To change the test, click the blue filter icon immediately to the right of this data field. An option list appears, showing the various tests you can apply using this value. The current setting has a check mark (tick) beside it. Choose the test you want to use. (The current test is also displayed in the simple filter settings, under the page title.) |
Available tests depend on the kind of information. For example, tests for fields that accept text include Begins with and Contains, while tests for numeric fields include Is less than and Is greater than or equal to.
| 3. | For columns with a fixed set of values, just choose a value from the option list in the header filter row. Remove this choice (when you want to) by choosing All. |
| 4. | You can repeat this process for any additional columns you want to include in your filter. |
Tip • Filtering on the columns in the header filter is always additive (logical AND) — a row of data must satisfy all of the tests you apply before it can be displayed in the list.
| 5. | To clear an individual column test, you can either: |
| • | Click the X icon at the right end of the appropriate condition where it is displayed in the simple filter (under the page title) |
| • | Deleting any value in the header filter row for this column. |
Example
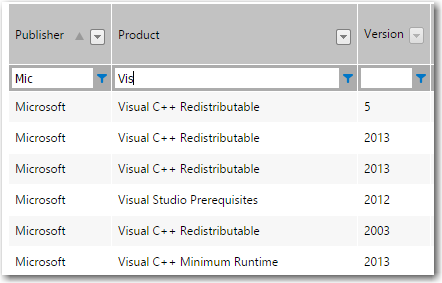
To show all licenses relating to Microsoft Visual Studio:
| • | In Publisher column, choose Begins with Mic |
| • | In Name column, choose Contains Vis. |
The values are visible in the header filter, and your chosen tests and values are visible in the simple filter.
Example of Simple Filter
Workflow Manager 2019 Help LibraryAugust 2019 |
Copyright Information | Flexera |