 . The Field Chooser palette appears, floating over the list. You may drag the palette by its title bar to any convenient location.
Workflow Manager 2019 / AdminStudio Enterprise Server 2019
You can arrange the visibility and order of columns in a list to suit your preferences.
Most lists in the web interface show only a selection of the fields from the underlying database. You can configure these lists to show as many or as few of the available fields as you choose. One reason to change the displayed fields is to perform searches or filtering on the data — searches and header filters are limited to the fields currently displayed in the list.
Your choice of columns to display, and their positions in the list, are both ‘sticky’ (that is, persist when you go to look at a different page and then return to the one you modified). Of course, each person can set these preferences independently (they are maintained for each login account).
| • | Changing the Order of Visible Columns |
| • | Adding a Column to the List |
| • | Removing a Column From the List |
| • | Resetting a List to Default Settings |
Note • You cannot change the width of individual columns. Column width re-sizes dynamically to suit the width of your browser window.
Changing the Order of Visible Columns
To change the order of visible columns, perform the following steps.
To change the order of visible columns:
| 1. | Choose which column you want to move. |
| 2. | Use your mouse to drag that column header left or right along the row of column headers. As you move far enough, a pair of small vertical arrows appear to indicate the current target gap between other columns. |
| 3. | When your preferred spot is highlighted by these arrows, drop the column header you are dragging. The list is redrawn with the column in your new position. You may repeat this process as often as required. The order you set is maintained for this list until you next change it. |
To add a column to the list, perform the following steps.
To add a column to the list:
| 1. | From the set of icons above the right side of the list, click the column chooser icon: . The Field Chooser palette appears, floating over the list. You may drag the palette by its title bar to any convenient location. |
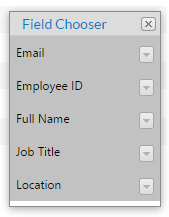
| 2. | In the palette, scroll to locate the desired column header, and drag it out of the palette to the header row on the list. As when you reorder the columns, the current target location for dropping the new column is indicated by two small vertical arrows highlighting the gap between existing column. |
Note • If a database column is not listed in the Field Chooser palette, you cannot display it in a list in the Management view. For some lists, additional columns are available if you wish to prepare a custom report.
| 3. | Repeat for any additional columns you want to add. |
| 4. | When satisfied, you may close the Field chooser palette in either of these ways: |
| • | In the top right corner of the palette, click the X close icon. |
| • | Above the list, click the column chooser icon  again. again. |
Removing a Column From the List
To remove a column from the list, perform the following steps.
To hide a column, removing it from the list:
| 1. | From the set of icons above the right side of the list, click the column chooser icon:  . The Field Chooser palette appears, floating over the list. You may drag the palette by its title bar to any convenient location. . The Field Chooser palette appears, floating over the list. You may drag the palette by its title bar to any convenient location. |
| 2. | Drag the chosen column header from the list and drop it anywhere within the Field Chooser palette. The column disappears from the list, and the column header is inserted in alphabetical order into the Field Chooser palette. |
| 3. | Repeat as required, and then close the palette as described above. |
Resetting a List to Default Settings
To reset a list to default settings, perform the following steps.
To reset a list to its default settings:
To reset a list to its original, factory-supplied configuration (including visibility and ordering of columns), click the restore defaults icon:  .
.
Workflow Manager 2019 Help LibraryAugust 2019 |
Copyright Information | Flexera |