Workflow Manager 2019
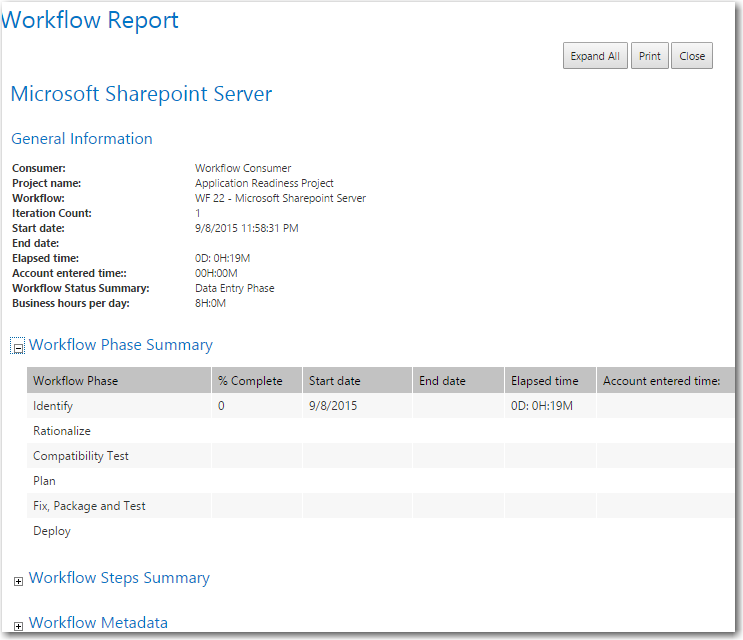
The Workflow Report contains detailed information about a workflow request’s progress, including its history and SLA (Service Level Agreement) status. You can open a Workflow Report for a workflow request by clicking the View Workflow Report link in the Action menu of its Workflow Request page. It opens in a new browser window.
Workflow Report
As well as general information about the workflow request, the Workflow Report also contains other information (related to history of the workflow request, a summary of the data entered in data entry steps, and so on). All these additional sections are initially collapsed, but can be expanded by clicking the + icon next to their heading. You can expand all of the sections at once by clicking the Expand All button at the top of the page, at which point its text changes to Collapse All. Click this button again to collapse all the fields.
The following details are shown on the Workflow Report:
|
Report Section |
Field |
Description |
|
General Information |
Requesting Company |
The name of the company submitting the request. |
|
Project Name |
The name of the project this workflow request is associated with. |
|
|
Project ID |
A unique identifier for the project. |
|
|
Workflow |
The name of the workflow request. |
|
|
Iteration Count |
The number of times steps in this workflow have been repeated. Every time the workflow is rolled back, this count increments by 1. |
|
|
Start Date |
The date this workflow request was first submitted. |
|
|
Due Date |
The date that this workflow request needs to be completed in order to remain SLA (Service Level Agreement) compliant. |
|
|
Risk Date |
The date when this workflow request will be considered to be at risk of not meeting its SLA due date. |
|
|
End Date |
The date the workflow request was completed (blank if still active). |
|
|
Elapsed Time |
The amount of time elapsed since this workflow request was submitted. If the request is complete, the elapsed time shows the total time from the start date to the end date. The value in this field takes into account the length of a work day specified for this project, whether weekends and holidays were excluded, and if the SLA clock was stopped. Note • For more information, see Stopping and Restarting the SLA Clock. |
|
|
Account Entered Time |
The total time spent completing a workflow step, as entered on the Step Validation dialogs. |
|
|
SLA Time |
The total elapsed SLA time. |
|
|
General Information Continued |
Workflow Status Summary |
The type of the currently active phase for the workflow request. |
|
SLA Compliance |
The status of the request. One of: On Time, At Risk, Late, Completed On Time, or Completed Late. |
|
|
Business Hours Per Day |
The length of a standard business day, used to calculated the elapsed time for SLA calculations. |
|
|
Workflow Phase Summary |
This sections contains a grid listing all the phases in the workflow request. The grid has the following fields: |
|
|
Workflow Phase |
The name of the of the workflow phase. |
|
|
% Complete |
How far through this workflow phase the workflow request is. This field (and those following) are blank unless the workflow phase is currently in progress, or has been completed. |
|
|
Start Date |
The date this phase was started. |
|
|
End Date |
The date this phase was completed (blank if it is not yet completed. |
|
|
Elapsed Time |
How long the phase has been active, or the time taken to complete the phase if it is already completed. |
|
|
SLA Time |
The total elapsed SLA time. |
|
|
Account Entered Time |
The time taken to complete this phase, as entered on the Step Validation dialogs. |
|
|
Workflow Steps Summary |
This section contains a grid listing all the steps in this workflow request. The grid has the following fields: |
|
|
Workflow Phase |
The name of the of the workflow phase that the workflow step belongs to. |
|
|
Workflow Step |
The name of the workflow step. |
|
|
End Date |
The date this step was completed (blank if it is not yet completed. |
|
|
Elapsed Time |
How long the step has been active, or the time taken to complete the step if it is already completed. |
|
|
SLA Time |
The total elapsed SLA time. |
|
|
Account Entered Time |
The time taken to complete this step, as entered on a Step Validation dialog. |
|
|
Workflow Metadata |
This section contains one grid for each of the data groups in this workflow, and lists each data element in the group, along with the value supplied for the data element by the people completing the workflow. Each grid has the following fields: |
|
|
Data Element |
The name of the data element. |
|
|
Data Value |
The value entered in the data element. |
|
|
Workflow History |
This section contains a grid listing the activities that have occurred for each workflow phase. An entry is added to this table each time a data collection step is submitted and when a workflow step is completed. Rollback information is also listed in additional grids in this section. If the value of a data element changes, the old and new values are also shown in this grid. The grids in this section contain the following fields: |
|
|
Workflow Phase |
The name of the workflow phase. |
|
|
Workflow Step |
The name of the workflow step. |
|
|
Activity |
The activity that took place. |
|
|
Old Value |
If the value of a data element was changed during this activity, the original value of that element. |
|
|
New Value |
If the value of a data element was changed during this activity, the new value of that element. |
|
|
Issues |
This section contains two grids, an Issue Summary grid, summarizing the total number of issues submitted for this workflow request, and an Issue Details grid, showing more detailed information about each of the raised issues. This Issue Summary grid has the following fields: |
|
|
Issue type |
The type of issue raised (E-mail, Knowledge Base or Critical). |
|
|
Total Issues |
The number of issues raised of the specified type. |
|
|
Total Closed Issues |
The number of issues of this type which were resolved. |
|
|
Total Open Issues |
The number of issues of this type which are still open. |
|
|
Total Time Spent on Closed Issues |
The total time spent resolving closed issues. |
|
|
The Issue Details grid has the following fields: |
||
|
Issue title |
A short description of the issue. |
|
|
Issue Status |
The current state of the issue (New, Responded, or Closed). |
|
|
Issue type |
The type of issue (Knowledge Base, E-mail or Critical). |
|
|
Created By |
The person who raised the issue. |
|
|
Owner |
The person responsible for resolving the issue. |
|
|
Issue due date |
The date the person raising the issue wanted it resolved by. |
|
|
Closed Date |
The date the issue was resolved (blank if still active). |
|
|
Closed By |
The person who resolved the issue. |
|
|
Elapsed Time |
The amount of time taken to resolve the issue. |
|
|
Phase |
The workflow phase active when this issue was closed. |
|
|
Step |
The workflow step active when this issue was closed. |
|
Saving and Printing the Workflow Report
Use the Print button at the top of the page to print the Workflow Report.
Alternatively, you can save the Workflow Report in .mht format by clicking the Save button at the top of the window. The Save Webpage dialog box should open. Enter a name and choose a file location for the report, then click OK.
If you are using Internet Explorer, the ActiveX settings of your browser may prevent you from saving the Workflow Report, and a message similar to the following will be displayed instead of the Save Webpage dialog:
Internet Explorer has blocked this site from using an ActiveX control in an unsafe manner. As a result, this page may not display correctly.
If you receive this error message, perform the following steps to adjust your browser’s ActiveX settings:
To adjust ActiveX browser settings in Internet Explorer:
| 1. | In Internet Explorer, select Internet Options on the Tools menu. The Internet Options dialog box opens. |
| 2. | Select the Security tab. |
| 3. | In the Select a zone to view or change security settings area, select Local intranet. |

| 4. | In the Security level for this zone area, click Custom Level. The Security Settings dialog box opens. |
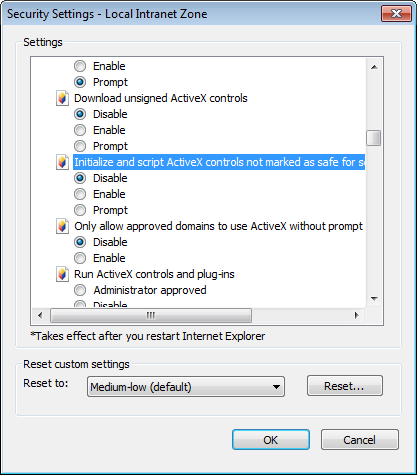
| 5. | Scroll down to the section named Initialize and script ActiveX controls not marked as safe, and select Prompt. |
| 6. | Click OK to close the Security Settings dialog box and click OK to confirm the change. |
| 7. | Click OK to close the Internet Options dialog box. |
| 8. | Quit Internet Explorer and restart it. |
| 9. | Login to Workflow Manager. You will now be permitted to save a Workflow Report using the Save button. |
Workflow Manager 2019 Help LibraryAugust 2019 |
Copyright Information | Flexera |