FlexNet Manager Suite
2022 R2
(On-Premises)
The Business Importer performs parts of the integration work, writing data
from Remedy into the FlexNet Manager Suite database. The Business Importer is installed as part of the Business Adapter Studio, a stand-alone environment
you can use to build business adapters. These 'adapt' the format of data from other
business systems in your computer estate for import into FlexNet Manager Suite,
and are exercised by the Business Importer. You downloaded the installer for
the Business Adapter Studio in Obtaining the Adapter Components. To enable the business
import process, you also configure the reconciliation process to link with the
Business Importer. Since the Atrium Integrator must trigger the Business Importer, the normal architecture is to install the Business Adapter Studio on the Atrium server. In this location, the business adapter for
importing asset records must also be amended to update its access to the compliance database.
To install the Business Importer and link with
Remedy:
-
On the Atrium server, navigate to the downloaded archive, and extract the
Business Adapter Studio folder.
-
Execute Business Adapter Studio\setup.exe.
The installation wizard for Business Adapter Studio opens.
-
Complete the installation wizard using the default values it provides.
-
Use the Business Adapter Studio to update connection details for the asset
business adapter for both output and input:
-
On the Atrium server, launch the newly-installed Business Adapter Studio.
-
Do either of the following:
- Click the Open icon (
 ) in
the tool bar.
) in
the tool bar.
- From the File menu, click
Open....
-
Navigate to the asset business adapter, by default located at
C:\ProgramFiles\Flexera\BMCAtriumAdapter\FNMPImports\FNMPImportDefinition\Asset.xml,
and click Open.
-
In the navigation bar on the left, click the top-most node, labeled
FlexNet Manager Platform Database, to
display the output connection properties for this adapter.
Tip: This node is visible only when the Business
Adapter Studio is running on a server other than an
inventory beacon. (On an inventory beacon, the
Business Adapter Studio takes the
connection details from the inventory beacon, which already
has them recorded.)
-
In the Database Connection panel, select
Use the specific connection information
below, and click the ellipsis (...)
at the right-hand end of the Connection String
field to expose the Data Link Properties dialog.
-
Edit the connection details so that they apply to your compliance database:
- For step 1, enter the SQL Server instance name for your compliance database. Examples:
- IPv4 address: 198.51.100.123
- The database server hostname:
MyFNMSServer
- A non-default database instance:
198.51.100.123\MSInst3
- Non-standard connection port:
198.51.100.123,5678
- Supply the credentials for writing to the compliance database. If you are using an account specific to
your database server, choose Use a specific user name
and password, and complete the account name and
password in the next two fields.
- For Select the database on the server,
use the drop-down to choose your compliance database
(the default name suggested during installation was FNMSCompliance).
- Click Test Connection, and rejoice at
success (or remedy any issues until the connection
succeeds).
-
Click OK to close the dialog.
-
In the left-hand navigation bar, click on the next row that names the
adapter (Asset).
-
In the second panel, Connection and Query
Properties, click the ellipsis
(...) on the right end of the
Connection field to expose the relevant
Data Link Properties dialog for the staging
database.
-
In the Provider tab, select the database type
(typically Microsoft OLE DB Provider for SQL
Server), and click Next.
-
In the same way as before, complete the details in the
Connection tab, but this time for the staging
database, and validate your data with the Test
Connection button.
-
Click OK to close the dialog, and save the
updated adapter (Ctrl+S, or click the diskette
icon in the toolbar, or ).
-
Log in to BMC Remedy Mid-Tier using an account name and password provided by
your BMC Administrator.
The
IT Home page appears.
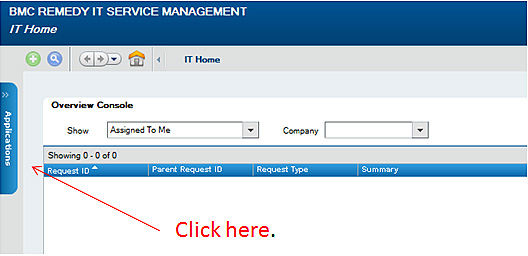
-
Click the Applications tab on the left boundary.
The Applications menu expands.

-
Select Atrium Core, and in the sub-menu select
Atrium Core Console.
The
BMC Atrium Core Console window opens.

-
Click the Application Launcher tab on the left edge,
then select Applications from the menu, and in the
sub-menu select Reconciliation.
The
Reconciliation tab opens.

-
Click the new job icon in the toolbar.
The
Job Editor page appears.

-
In the Name field, provide a name for this job that you
will recognize later.
Suggested value: FNMP Asset Reconciliation.
-
In the Activities group, click
New.
The
Activities group changes to the
Edit Activity area.
-
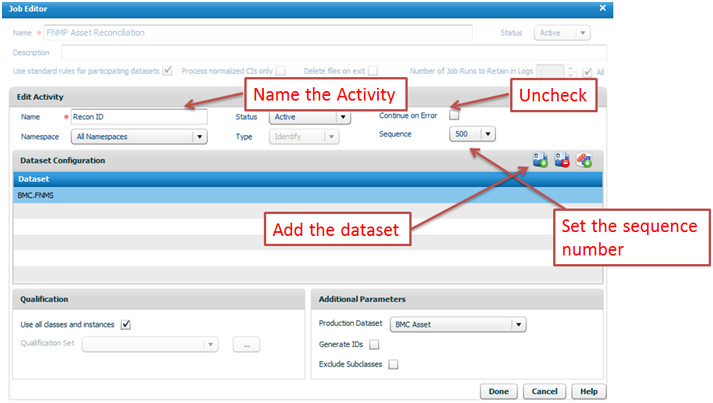
Complete the details for the first (Identify) activity:
-
In the Name field, provide a name you will
recognize later.
Suggested value: Identify.
-
Ensure that the Continue on Error check box is
clear.
Recall that the system is configured to send emails on any errors in
exporting the assets to FlexNet Manager Suite.
-
Set the Sequence number to control ordering of
activities in the job.
Recommendation: Number in hundreds to allow for later changes.
Suggested value: 500.
-
In the Dataset Configuration area, click the
first icon to add a new dataset, and select the one you created for this
exchange.
The suggested value was BMC.FNMS.
-
Click Done to save details of this
activity.
The Activities group reappears, showing
this first activity in the list.
-
Once again, in the Activities group, click
New, and complete the details for a merge
activity:
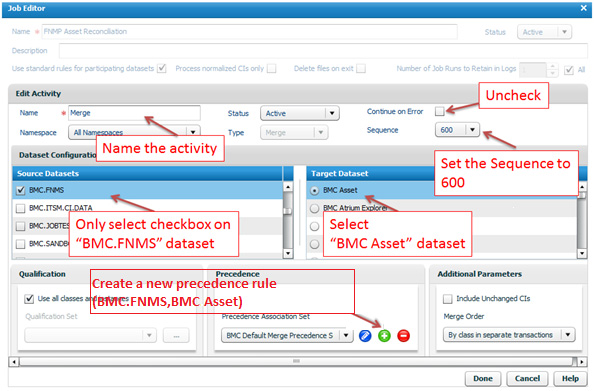
-
Add a Name for the activity.
Suggested value: Merge.
-
Ensure that the Continue on Error check box is
clear.
-
Set the Sequence number to a value higher than
the identification step.
Suggested value: 600.
-
From the list of Source Datasets, select only
the one identified in the previous activity.
The suggested value was BMC.FNMS.
-
From the list under Target Dataset, select the
BMC Asset dataset.
-
In the Precedence group, click the
+ icon to add a new Precedence
Association Set.
Suggested value: BMC.FNMS,BMC Asset.
-
Click Done to save details of this
activity.
The
Activities group reappears, showing
your two activities.

-
In the Schedule group, click
New.
Set the values to suit your business processes, with a suggested frequency
being once every 2-4 weeks.
-
At the bottom of the Job Editor, click
Save to store your job details in the
repository.
FlexNet Manager Suite (On-Premises)
2022 R2