Importing and Configuring an Update Set in ServiceNow
Follow these steps to import and configure an update set in ServiceNow.
To import and configure an update set in ServiceNow:
| 1. | Download the following files from the Flexera Software Product and License Center: |
|
Description |
File Name |
|
App Broker Cloud Update Setup File |
Flexera AppBroker with Request Resubmit.xml |
|
Scheduled Jobs File |
Flexera App Broker Scheduled Job.xml |
| 2. | Launch the ServiceNow instance. |
| 3. | In the Search box, enter Retrieved Update Sets. |
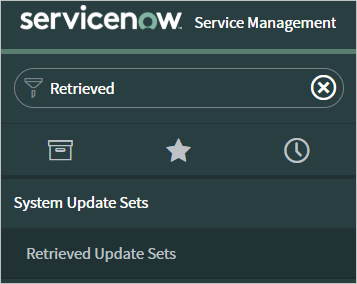
| 4. | In the search results, click Retrieved Update Sets. The Retrieved Update Sets page opens. |

| 5. | Under Related Links, click Import Update Set from XML. The Import XML page opens. |

| 6. | Click Choose File, select the Flexera AppBroker with Request Resubmit.xml and click Upload. When the upload is complete, the file is listed on the Retrieved Update Sets page. |
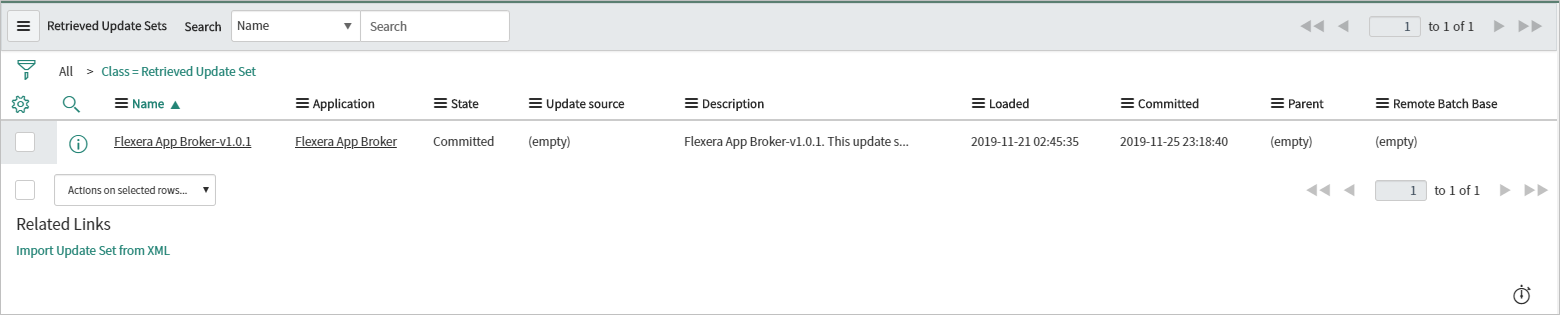
| 7. | Click the name of the update set to open the detailed view. |
| 8. | Click Preview Update Set. After previewing the update set, if there are any errors, they are listed at the bottom of the screen on the Update Set Preview Problems tab. |
| 9. | To resolve an error, select it, open the Actions on selected rows... menu at the bottom of the screen, and select Accept remote update. |
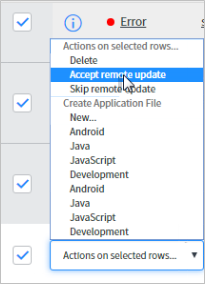
| 10. | Repeat this procedure until all errors are resolved. You can select multiple errors at a time, when all errors are resolved, the Commit Update Set button is enabled. |
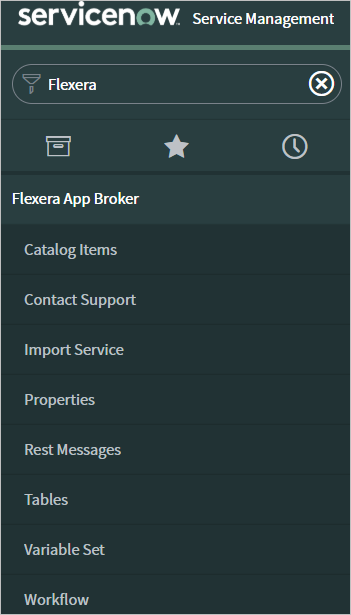
| 11. | Click Commit Update Set. As soon as the update set is committed, if you enter Flexera in the ServiceNow search box, and you see the following new items listed in the menu. |
| 12. | In the top toolbar of ServiceNow, click the Settings icon: |
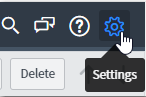
The System Settings view opens.
| 13. | Select the Developer tab. The Developer tab opens. |
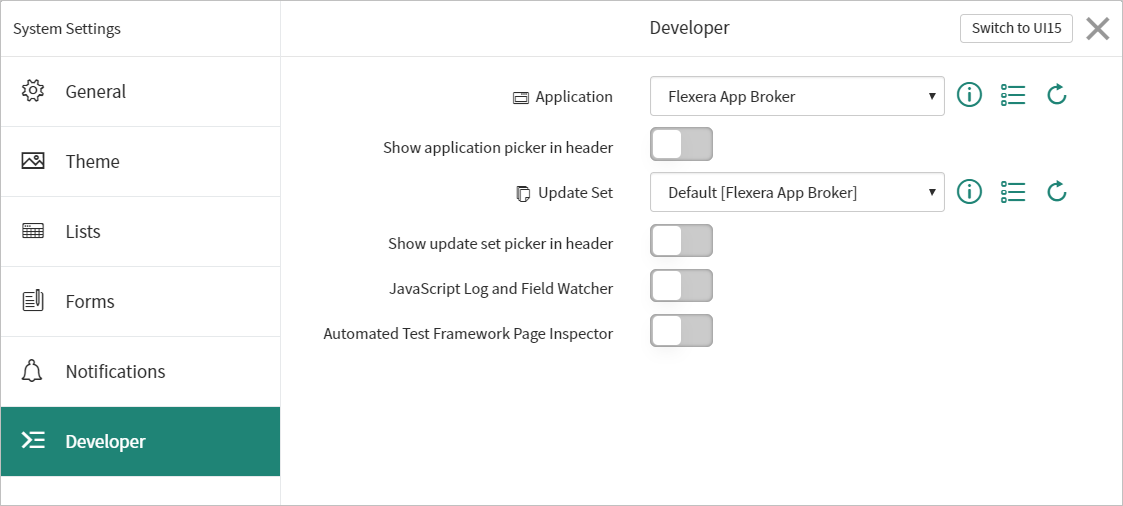
| 14. | Change the value of the Application field from Global to Flexera App Broker and close the view. |
| 15. | Under Flexera App Broker in the menu, click Properties. The Properties view opens. |

| 16. | To connect ServiceNow to your instance of App Broker, select x_fls_appbroker.AppBrokerUri. |
The System Property page opens.
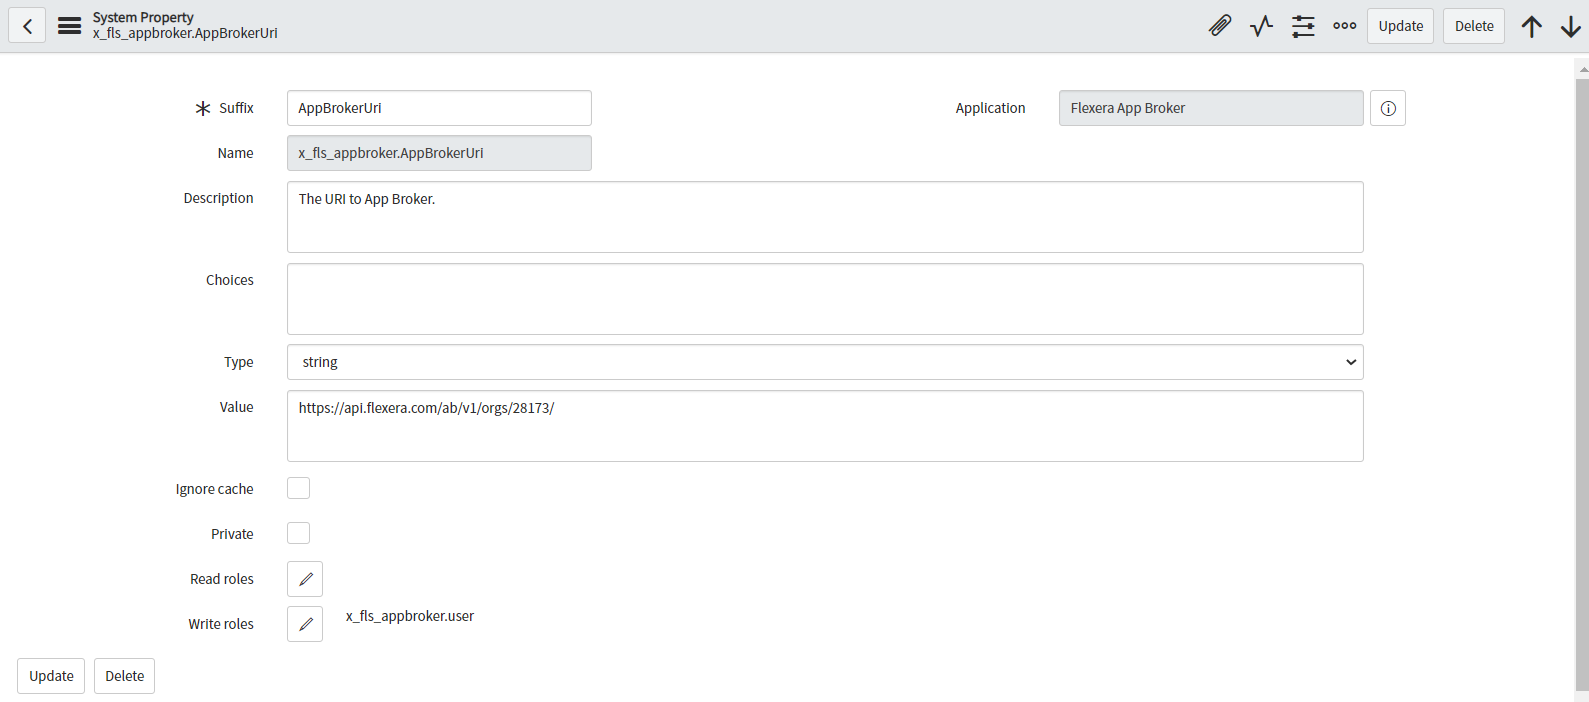
| 17. | In the Value field, edit the following value: [Url]/ab/v1/orgs/[orgId]/: |
| • | Replace [Url] with https://api.flexera.com/ |
| • | Replace [orgId] with your respective Organization ID, obtained from Flexera. |
| 18. | Click Update. |
Go back to the All Properties view.
| 19. | Click x_fls_appbroker.AppBrokerLoginUri. |
The System Property page opens.

| 20. | In the Value field, enter https://login.flexera.com/ for App Broker Cloud obtained from Flexera. |
| 21. | Click Update. |
The All Properties view opens.
| 22. | Click x_fls_appbroker.RefreshToken. |
The System Property page opens.
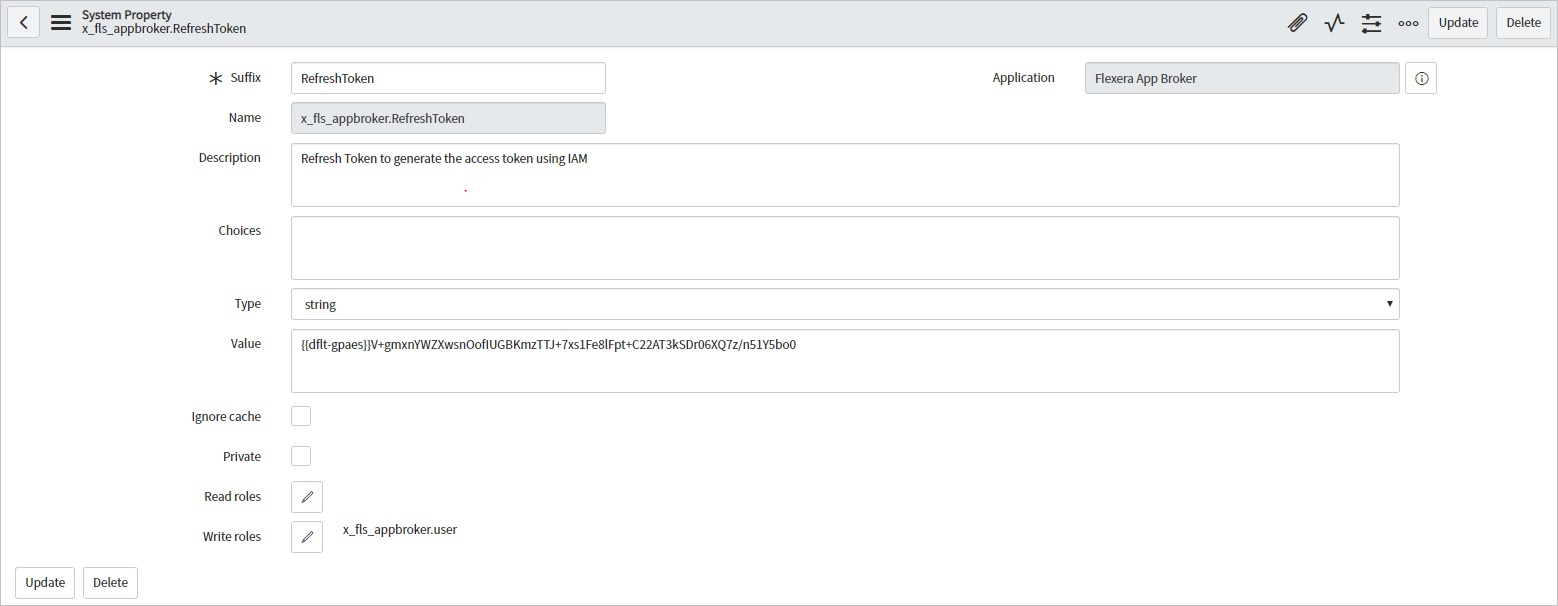
| 23. | In the Value field, enter the generated Refresh token from App Broker Cloud Administration user interface, as described in Generating a Refresh Token for API Access. |
| 24. | Click Update. |
The All Properties view opens.
| 25. | Click x_fls_appbroker.CustomStepRetryCount. This property is used to configure the workflow step if it fails. If the same step fails for a specified number of times before the request resubmit will stop and end the workflow. |
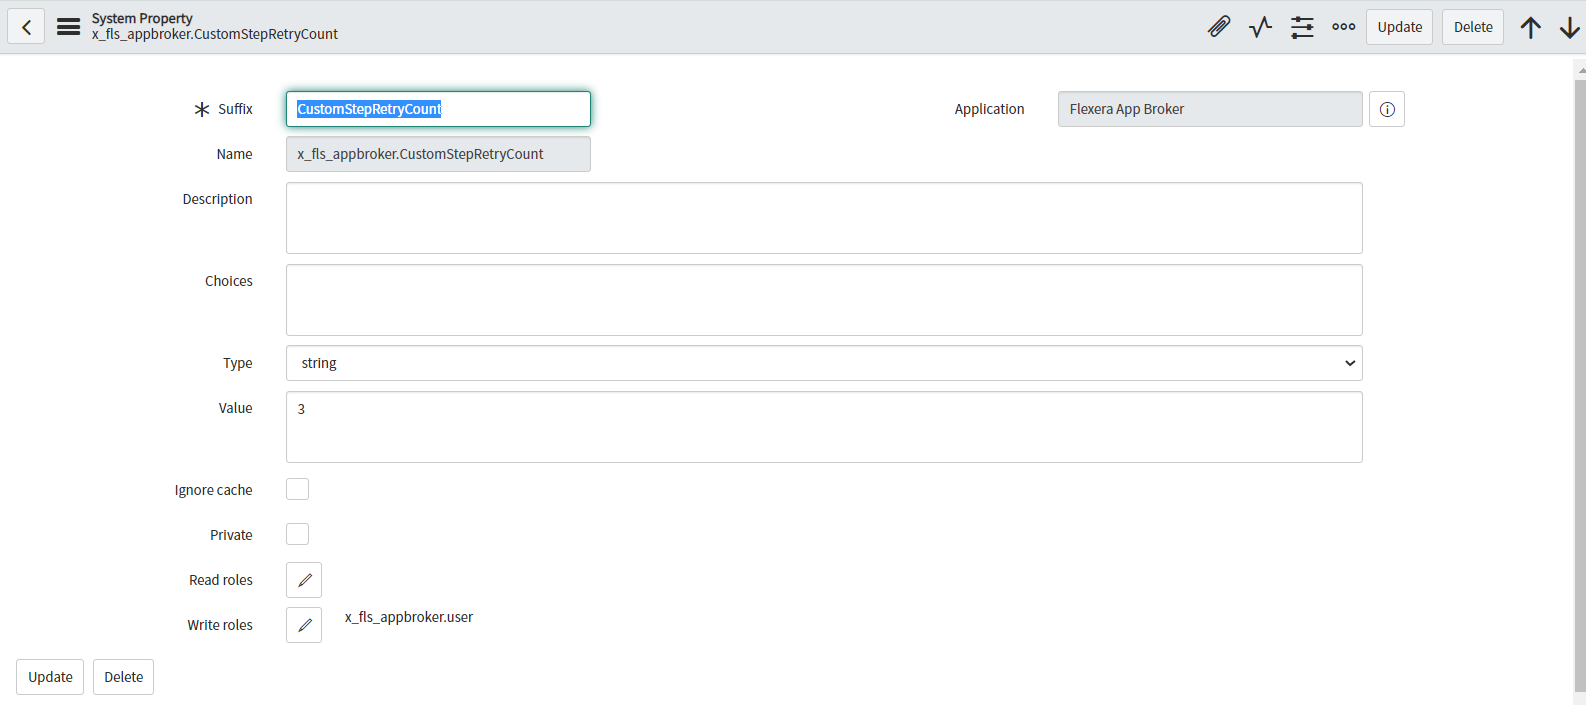
In the Value field, enter the desired retry count value. Click Update.
Note:You do not have to update the x_fls_appbroker.AccessToken property, because it is updated by App Broker Scheduled Jobs. These scheduled jobs are the jobs which are triggered every 50 seconds and are used to generate the access token for authorization of the App Broker API.
Configuring App Broker Scheduled Jobs
To configure App Broker Scheduled Jobs, perform the following steps.
To configure App Broker scheduled jobs:
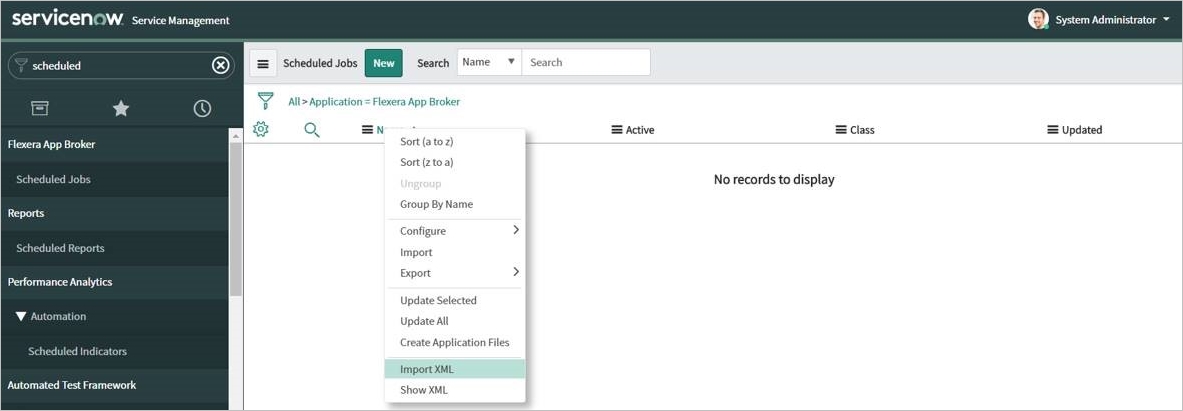
| 1. | In the Search box, enter Scheduled key, and click Scheduled Jobs in the search results. |
The Scheduled Jobs view opens.
| 2. | Right-click the Name column and click Import XML. |
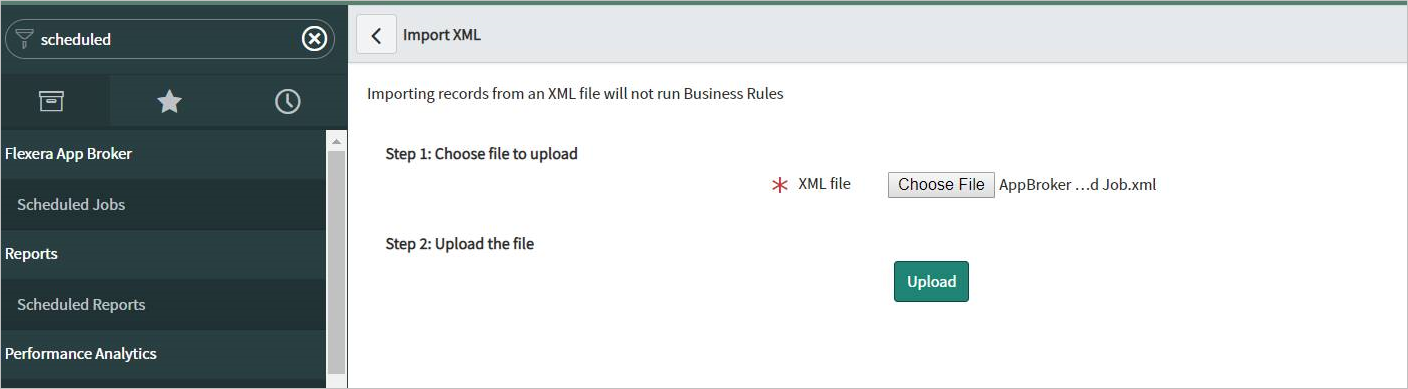
| 3. | Click Choose File and browse for Flexera App Broker Scheduled Job.xml, and click Upload. |
| 4. | After the successful upload of the Flexera App Broker Scheduled Job.xml file, the AppBroker Token Management scheduled script is displayed. |
| 5. | Select AppBroker Token Management. |
The App Broker Token Management view opens.
| 6. | Click the Execute Now button to execute the script. |

| 7. | In the Search field, enter REST Message key, and click REST Messages in the search results. The Rest Messages view opens. |

| 8. | For the App Broker – IAM Token Management REST message, perform the following steps: |
| a. | Click App Broker - IAM Token Management REST message to open the detailed view. |

| b. | In the HTTP Methods section at the bottom of the screen, click the POST method link. |
The HTTP Method (POST) view opens.
| c. | In the Variable Substitutions section at the bottom of the screen, click the refresh token variable. |
| d. | Enter the refresh token which was generated in the Administration user interface, as described in Generating a Refresh Token for API Access, and click Update. |
| e. | Under Related Links, click the Test link. This should return a 200 state, which means that the method is working and ready to use. |
App Broker Cloud Release NotesOctober 2020 |