Catalog Behavior Tab
App Portal 2020 R1
On the Catalog Behavior tab of the Web Site view, you specify the behavior settings of the App Portal catalog. The Catalog Behavior tab includes two sets of properties:
| • | My Requests Options |
| • | Behaviors |
Browse Catalog Options
In the Browse Catalog Options section of the Catalog Behavior tab, you specify settings to govern how catalog items are displayed on the Browse Catalog tab and the mobile UI.

Settings > Web Site View / Catalog Behavior Tab / Browse Catalog Options
The Browse Catalog Options area of the Catalog Behavior tab of the Web Site view includes the following properties:
|
Property |
Description |
||||||||||||
|
Number of catalog items to show for Most Popular |
Number of catalog items to be displayed in the Most Popular grouping on the Browse Catalog tab. |
||||||||||||
|
Mobile UI browse catalog page size |
Number of catalog items that will be loaded into the App Portal mobile site at a time. After the user scrolls through the specified number of items, another set of items will be loaded. |
||||||||||||
|
Display “Show Descriptions” option |
Select this option to display the Description heading when viewing the catalog items in list view on the Browse Catalog tab. |
||||||||||||
|
Show installed apps |
Select this option to list, on the Browse Catalog tab, catalog items that have already been installed on the user’s device. If this option is not selected, installed applications will not be listed. |
||||||||||||
|
Enable express checkout |
Click to enable express checkout on catalog items, so that an Install Now button is in addition to the Add to Cart button. For more information, see Enabling Express Checkout: Install Now Button. |
||||||||||||
|
Ignore Include enforcements if any Excluded enforcement is not satisfied |
This option determines how App Portal should evaluate catalog item visibility when you have multiple conditions attached to a catalog item. If the machine/user has at least one Exclude condition being true, then this option determines whether or not the catalog item is displayed:
Important:If the machine/user have an associated Exclude condition, then this option does not play a role in determining whether or not to display the catalog item. |
In the My Requests Options section of the Catalog Behavior tab, you specify behavior settings relating to App Portal requests.
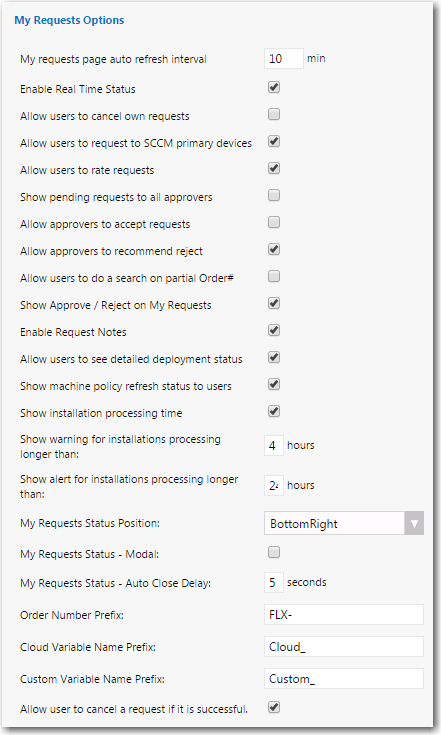
Settings > Web Site View / Catalog Behavior Tab / My Requests Options
The My Requests Options area of the Catalog Behavior tab of the Web Site view includes the following properties:
|
Property |
Description |
|
My requests page auto refresh interval |
Specifies the duration that the My Requests page refreshes for users. Note:Only users in roles will have the auto-refresh enabled. |
|
Enable Real Time Status |
When enabled, App Portal will check System Center Configuration Manager for the most recent status of a request if it is in progress. When disabled, the last status received from the bulk status update process (default is 5 minutes) will be used. |
|
Allow users to cancel own requests |
When enabled a user can cancel their requests at any stage of the request process. When disabled a user cannot cancel the request after it has been submitted to System Center Configuration Manager for delivery. |
|
Allow users to request to SCCM primary |
By default, a user can request software to their current device that they are visiting the portal from. Selecting this option will also allow the user to request to all their primary according to the User / Computer relationship setting on the General tab of Site Management > Settings. |
|
Allow users to rate requests |
Select to enable a rating system that allows users to give a rating and textual feedback after an application has been successfully installed. The rating will be visible for others to see as they browse the catalog. The ability to rate an item is designated by a yellow star in the Actions column after installation. |
|
Show pending requests to all approvers |
When enabled, an approver will see all the requests for which they are an approver regardless if it is their turn to approve. The checkbox will not be displayed if it is not their turn to approve. When disabled, the approver will only see the request when it is their turn to approve the request. |
|
Allow approvers to accept requests |
If this option is selected, accepting a request marks an item as acknowledged by the approver. The App Portal user interface will update to indicate which approver (from a pool of approvers) has accepted the request so that the rest of the pool does not need to take any action. Accepting a request causes approval reminder emails to stop being sent to other approvers in the pool. |
|
Allow approvers to recommend reject |
If this option is selected, recommending rejection marks your objection to approval but does not stop the advancement of the approval process to the next level. If you recommend rejection and are the last approver in the approval process, then the item is rejected. |
|
Allow users to do a search on partial Order # |
Select this option to enable users to enter a partial order number in the search field. If this option is not selected, users will have to enter the full order number, including the prefix (such as FLX-235), in order to successfully search by order number. |
|
Show Approve / Reject on My Requests |
Select this option to display the Approve and Reject buttons on the My Requests tab. When this option is not selected, the approvers have to open the Approve / Reject tab and click on the request name to approve or reject the request. This option is often not selected when you use mandatory approver questionnaires where the approver will always have to open the request details to review and answer questions. |
|
Enable Request Notes |
Enable the addition of notes to existing requests. When this option is selected, the following icon will be displayed on the My Requests tab next to each request:
|
|
Allow users to see detailed deployment status |
Select this option to enable users to view detailed deployment status information from System Center Configuration Manager / Altiris on the My Requests tab. |
|
Show machine policy refresh status to users |
Select this option to display a small icon next to the installation status icon under the status column on the My Requests tab to indicate whether the machine policy refresh was successful. If this option is not selected, only those with the Catalog Security role of Manage All Requests will see this status icon. |
|
Show installation process time |
Select this option to display a timer, clock icon under the Info column on the My Requests tab to indicate the time that has elapsed since the installation request was issued to System Center Configuration Manager. When this option is not selected, only those with the Catalog Security role of Manage All Requests will see this status icon. |
|
Show warning for installations processing longer than x hours |
Display a warning to the user if an application installation takes longer than the number of hours specified. |
|
Show alert for installations processing longer than x hours |
Display an alert to the user if an application installation takes longer than the number of hours specified. |
|
My Requests Status Position |
When an item is approved, rejected, etc., a status pop-up opens, by default, in the bottom right of the screen. To change the position of this status pop-up, select another location from this dropdown list. |
|
My Requests Status - Modal |
Select this option to specify that when a status pop-up opens, it needs to be acknowledged by the user and manually closed. If this option is not selected, the status pop-up will remain open for the amount of seconds specified in the My Requests Status - Auto Close Delay field and will then automatically close. |
|
My Requests Status - Auto Close Delay |
Specify the length of time, in seconds, that a status pop-up will remain open on the screen. This option is not used when the My Requests Status - Modal option is selected. |
|
Order Number Prefix |
Enter the prefix that will appear prior to all request numbers. For example, if you entered RJX-, then request numbers would be RJX-1003, RJX-1004, etc. |
|
Cloud Variable Name Prefix |
The default value is Cloud_. |
|
Custom Variable Name Prefix |
The default value is Custom_. |
|
Allow user to cancel a request if it is successful |
Select this option to allow a user to cancel a request even after it has been successfully completed. If this option is not selected, cancellation of canceled requests will not be permitted. |

In the Behaviors section of the Catalog Behavior tab of the Site Management > Settings > Web Site view, you can set options related to general website functionality.
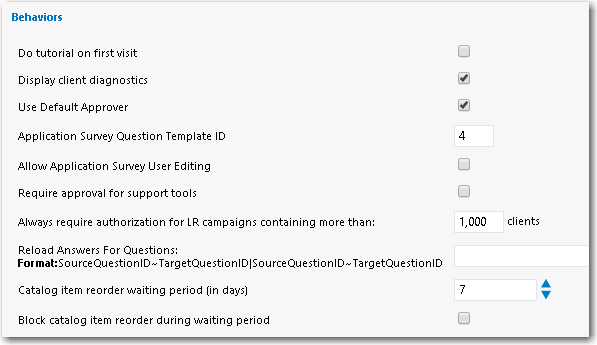
Settings > Web Site View / Catalog Behavior Tab / Behaviors
The Behaviors area of the Catalog Behavior tab of the Web Site view includes the following properties:
|
Property |
Description |
|||||||||
|
Do tutorial on first visit |
When enabled, the user will be redirected to the Help tab and open the UserTutorial.htm file specified in Web\Help\UserTutorial.htm. Content can be entered here to train the user on their first visit. Content can include a Flash tutorial or similar training information. |
|||||||||
|
Display client diagnostics |
Displays an informational page as necessary if there would be an expected problem deploying software to the visiting computer. |
|||||||||
|
Use Default Approver |
When enabled App Portal will use the approver specified in the Email Settings > Default Approver. This approver is used when an approver cannot be determined or if approval is specified but no approver is defined. If you do not want to allow the request to complete if an approver could not be found, deselect this option and the user will receive a notification indicating that the request cannot continue. |
|||||||||
|
Application Survey Question Template ID |
When the Display Application Survey Tab option is selected on the Site Management > Settings > Web Site > Catalog Appearance tab, this field sets the question template that is displayed on the Application Survey screen. |
|||||||||
|
Allow Application Survey User Editing |
Select this option to enable users to edit the list of applications displayed on the Application Survey screen. If this option is not selected, all items in the list are selected and users cannot edit them. |
|||||||||
|
Require approval for support tools |
When enabled, requests submitted using Support Tools will be subjected to the approval process specified, if any. |
|||||||||
|
Always require authorization for LR campaigns containing more than x clients |
This setting helps prevent unwanted emails being generated from license reclamation campaigns by accident. Should there be more than the specified number of computers identified for license reclamation in any single campaign, the campaign will require manual authorization of the reclamation records by choosing Authorize All under the license reclamation actions menu of a specific campaign. Specify the number of clients which has to be exceeded to trigger manual authorization. The default value is 1000. |
|||||||||
|
Reload Answers for Questions |
If you have a set of questions where the list of available answers in one drop down list is dependent upon what was selected in a previous question, select this option to reload the questions after a selection is made. For example, if you had a set of three questions:
The States that you want to list in the second question depends upon the Country that was selected in the first question. And the Cities that you want to list in the second question depends upon which State was selected. If this option is selected, when a selection is made, the target questions are reloaded. |
|||||||||
|
Catalog item reorder waiting period (in days) Block catalog item reorder during waiting period |
In the Catalog item reorder waiting period (in days) field, enter the number of days a requester must wait before submitting a second request for the same catalog item. By default, this value is 7 days. If a requester attempts to submit a second request for the same catalog item within the specified time frame, one of the following will occur, depending upon whether or not the Block catalog item reorder during waiting period option is also selected:
|
App Portal / App Broker 2020 R1 Administration GuideAugust 2020 |