Workflow Manager 2015
On the Properties tab of the Workflow Step Details view, which opens when you create a new workflow step or edit an existing workflow step on the Template Details page, you build the workflow steps of a workflow phase.
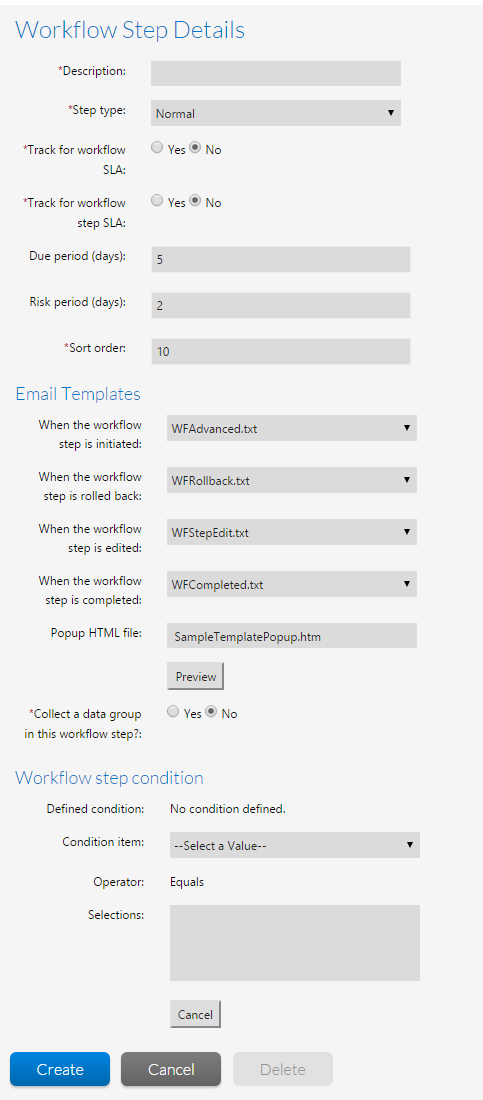
Workflow Step Details View
The Workflow Step Details view consists of the following options:
|
Option |
Description |
|||||||||||||||||||||||||||||||||||||||
|
Workflow Step description |
Enter a label to identify this workflow step. |
|||||||||||||||||||||||||||||||||||||||
|
Step Type |
Select one of the following step types:
For detailed information on each of these step types, see Workflow Step Types. |
|||||||||||||||||||||||||||||||||||||||
|
Track for Workflow SLA |
Select this option to instruct Workflow Manager to include the time spent to perform this workflow step in the SLA calculations for the entire workflow request (shown on the Projects Report). Clear this selection to exclude the time spent on this workflow step from SLA calculations. For example, if a workflow phase included a workflow step such as “Receive Customer Approval”—which does require any work to be performed by the administrator— you may want to clear this option so that the time spent waiting for approval would not be included in SLA calculations for this workflow request. Note • SLA (Service Level Agreement) time tracking is used to determine the status of a request (or a single workflow step) in relationship to its SLA due date as either: On Time, At Risk, Late, Completed on Time, or Completed Late. See Calculating SLA Status for more information. |
|||||||||||||||||||||||||||||||||||||||
|
Track for Workflow Step SLA |
Select this option and enter a numeric value in the Due Period and Risk Period fields to instruct Workflow Manager to send out an email alert and change the workflow step’s SLA Status (shown in the Workflow Steps SLA Report) when a duration threshold is reached. Important • It is recommended that this option should be selected only for tasks that are critical for the completion of the workflow for which immediate notification of a delay is important. If this option is not selected, no email alerts will be sent out regarding this workflow step and it will not be listed on the Workflow Steps SLA Report. Note • SLA (Service Level Agreement) time tracking is used to determine the status of a request (or a single workflow step) in relationship to its SLA due date as either: On Time, At Risk, Late, Completed on Time, or Completed Late. See Calculating SLA Status for more information. |
|||||||||||||||||||||||||||||||||||||||
|
Due Period |
The elapsed time (in days) after the workflow step becomes the current step that it should be completed in order to be SLA compliant. If it is not completed by this date, its SLA status would be Late and an email alert would be sent out. This field is enabled if Track for Workflow Step SLA is also selected. |
|||||||||||||||||||||||||||||||||||||||
|
Risk Period |
The elapsed time (in days) after which this workflow step should be considered at risk of not being completed on time (corresponds to SLA status of At Risk). This field is enabled if Track for Workflow Step SLA is also selected. |
|||||||||||||||||||||||||||||||||||||||
|
Sort Order |
Enter a number to determine where this workflow step will appear in the workflow step list, with lower numbers appearing higher in the list. |
|||||||||||||||||||||||||||||||||||||||
|
Popup HTML File |
If you selected Normal as Step Type, enter the name of the HTML file that you want the Step Validation dialog box to display. Click Preview to view the specified HTML file. |
|||||||||||||||||||||||||||||||||||||||
|
Email Templates |
Select the email template to use when this workflow step is Initiated, rolled back, edited, or completed. For more information on email templates, see Managing Email Notifications. |
|||||||||||||||||||||||||||||||||||||||
|
Collect a data group in this workflow step? |
If you want to collect a data group in this workflow step, select Yes and select a data group name from the Select the Data Group list. Important • If you have not created a Data Group with the When collected? option set to Later in the workflow, the Select the Data Group list will be empty. |
Workflow Manager 2015 / AdminStudio Enterprise Server 2015 Help Library10 September 2015 |
Copyright Information | Flexera Software |