Completing a Workflow Step
Workflow Manager 6.5
When you have finished working on a workflow step and want to mark it as complete, perform the following steps.
To complete a workflow request workflow step:
Important: Instead of requiring workflow administrators to open the Workflow Progress page and locate the current workflow step, you can set up Workflow Manager so that clicking the provided link in the workflow step notification email will open the current workflow task. See Enabling the Ability to Open the Current Workflow Task Directly from Notification Email.
|
2.
|
To complete the step, click on its hyperlinked name. One of the following happens, depending on the step type: |
|
•
|
Data Entry—You are prompted to submit data. Refer to Web Service Results Dialog Box for information about entering data using a data element of type Web Service Call. |
|
•
|
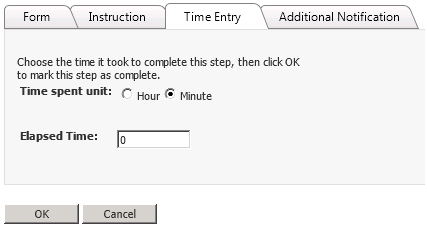
Normal—You are prompted to enter the total time spent to complete this workflow step. If you do not enter anything, zero minutes will be recorded. |
Note: You can also advance a Normal workflow step by clicking on a link in a notification email; you are not required to open the Workflow Progress page. For more information, see Advancing a “Normal” Workflow Step Directly From a Notification Email.
|
•
|
Update History—You are prompted to enter information to document this workflow phase. |
|
•
|
Work Assignment—The Assignment Details page opens, and you are prompted to assign people from your administrator company to roles associated with this workflow request. |
|
•
|
Script Execution—An operator-specified executable file is launched. |
|
•
|
Custom Web Page—An operator-specified URL address is opened in a new browser window. |
|
•
|
Automated Import—A user-specified URL address is opened in a new browser window and Workflow Manager runs a user-supplied IPlugin assembly that will programmatically import a package that was uploaded in a previous workflow step into the Application Catalog. After the IPlugin assembly completes, data will be sent back to Workflow Manager that will automatically mark this step complete and advance the workflow. |
|
•
|
Automated Validation—A user-specified URL address is opened in a new browser window and Workflow Manager runs a user-supplied IPlugin assembly that will programmatically validate a package that was imported into the Application Catalog in a previous workflow step. After the IPlugin assembly completes, data will be sent back to Workflow Manager that will automatically mark this step complete and advance the workflow. |
|
•
|
Automated Conflict Analysis—A user-specified URL address is opened in a new browser window and Workflow Manager runs a user-supplied IPlugin assembly that will programmatically perform conflict analysis on a package that was imported into the Application Catalog in a previous workflow step. After the IPlugin assembly completes, data will be sent back to Workflow Manager that will automatically mark this step complete and advance the workflow. |
|
•
|
Allocate Software License—You are prompted to click an Allocate button to allocate a computer or end-user (as specified in an earlier step) to a software license. |
|
•
|
Deallocate Software License—You are prompted to click a Deallocate button to deallocate a computer or end-user from a software license. |
|
•
|
Custom Automated Task—Allows you to run your own custom code using the iPlugin infrastructure and advance the workflow to the next step, all without manual intervention. See Defining a Custom Automated Task Workflow Step for detailed information. |
|
3.
|
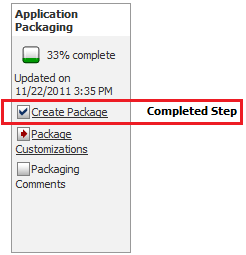
Once completed, the workflow step is displayed with a checked check box. |
See Also
Defining an Allocate Software License Workflow Step
Defining a Deallocate Software License Workflow Step
Web Service Results Dialog Box
Rolling Back to a Previous Workflow Step
Updating a Workflow Request
Open topic with navigation