Downloading and Installing the Flexera One App
Important:Prior to installing the Flexera One ServiceNow app, contact your Flexera account representative or Flexera Support to obtain the latest hotfixes.
Follow the instructions below to install the Flexera One ServiceNow app and subsequently verify the installation of the app.
| • | Installing the Flexera One ServiceNow App |
| • | Verifying the Installation |
Once Flexera One app has been successfully installed into the ServiceNow instance, you can leverage its functionality and start using the application by completing the steps required to configure the table indexing, integration, import, scheduled jobs, and external connections.
Installing the Flexera One ServiceNow App
Note:Review the plugin dependencies required for this app and ensure those plugins are installed prior to installing the Flexera One ServiceNow app. You can find a list of required plugins in Application Dependencies.
The instructions below explain how to download and install the Flexera One app. Once installed, verify the installation following the instructions in the next section: Verifying the Installation.
To install the Flexera One application from the ServiceNow Store
| 1. | Log into the ServiceNow Store with your ServiceNow HI credentials. |
| 2. | In the Search box, enter Flexera One. |
Application information appears in the search results.
| 3. | From the search results, click Flexera One. |
Information about the application is displayed.
| 4. | In the right pane of the application window, view the Compatibility section to ensure that the integration application is compatible with the version of ServiceNow that you require. |
| 5. | In the right pane of the application window, click the Get button. |
A notice appears.
| 6. | At the bottom of the notice, click Continue. |
| 7. | On the Purchase of Flexera One page, choose Make available on specific instances and click the Select. |
A Select Instances dialog appears.
| 8. | In the Available Instances pane, double-click the instance that you want the application to be available on and click OK. |
| 9. | Select the I accept check box (to accept terms of use and subscription terms and conditions) and click Get. |
| 10. | Log into the ServiceNow instance for which you selected (above) in Make available on specific instances. |
| 11. | Navigate to System Applications > All and click Available to you. |
| 12. | Click the Flexera One icon to open it. |
| 13. | Click Install. |
The application now appears in the ServiceNow menu, displayed in the left-hand navigation panel as Flexera One.
There are two places where you can check if the plugin was successfully installed and activated.
| • | sys_progress_worker |
| • | sys_plugin_log |
In addition, you can check the Upgrade History for any skipped changes.
Checking sys_progress_worker and sys_plugin_log
Follow the instruction sets below to verify installation.
To check sys_progress_worker:
| 1. | Log in to your ServiceNow instance. |
| 2. | From the Navigation menu, navigate to progress workers (System Diagnostics > Progress Workers). |
| 3. | Search for the name of the plugin in the Name field in the form. |
If the plugin activation was successful it shows SUCCESS. If the plugin was not activated properly it shows ERROR.
To check the sys_plugin_log table:
| 1. | Log in to your ServiceNow instance. |
| 2. | From the Navigation menu, navigate to the sys_plugin_log table. |
| 3. | Search for Navigator > sys_plugin_log.list. |
| 4. | Search for the name of the plugin in the Name field in the form. |
If the plugin activation was successful it shows SUCCESS. If the plugin was not activated properly it shows FAILURE.
Checking Upgrade History
After installing the application, check the Upgrade History to identify any skipped changes.
To check Upgrade History:
| 1. | Log in to your ServiceNow instance. |
| 2. | From the Navigation menu, navigate to the Upgrade History table. |
| 3. | Search for Navigator > System Diagnostics > Upgrade history. |
| 4. | Open the record that contains Flexera scope app application. |
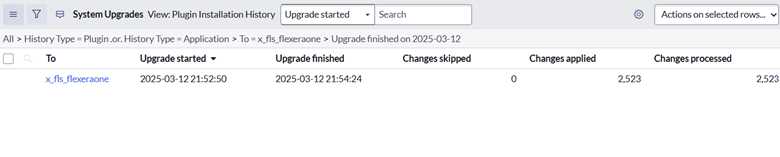
| 5. | In that record, check if there are any skipped records. |
If there are skipped records, review the records and revert it back to the base system. Specifically, if choices, property, index, dictionary, or Transform map modification were skipped, you must revert it back to the base system.
During review, apart from above, if you find any other changes that were skipped review them thoroughly. If required connect with Flexera technical support.
Once verified, you are ready to move on to the post-installation setup and configuration steps in Configuring the Flexera One-ServiceNow Integration.