Using a Database Connection as a Data Source
Data Platform
To configure a database connection:
|
1.
|
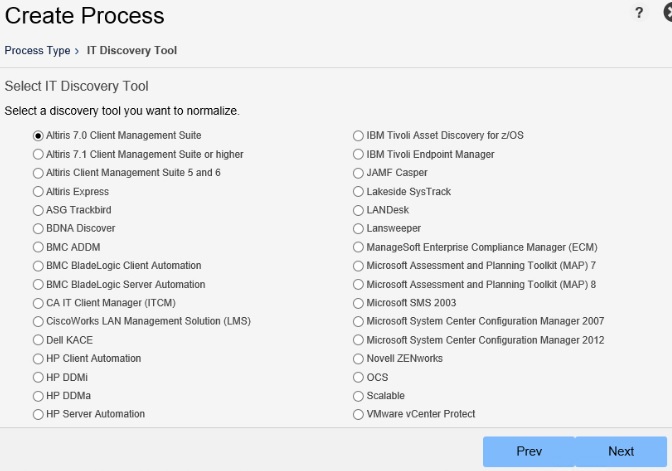
Click Create Process, located in the upper-right section of the Administration Console. Click the IT Discovery Tool radio button. |
|
3.
|
Select the IT Discovery tool that you want to normalize. The discovery tools are listed in alphabetical order and may require scrolling the window to see the entire list. |
Note:Data Platform highly recommends that the database user account used to extract data from a data source is a read-only account.
Note:These instructions do not apply to either the ServiceNow or Other: Normalize Zip file data sources. Instructions for those data source options are provided in Using ServiceNow as a Data Source and Using a Normalize Zip File as a Data Source
Selecting an IT Discovery Tool—Database Connection
|
4.
|
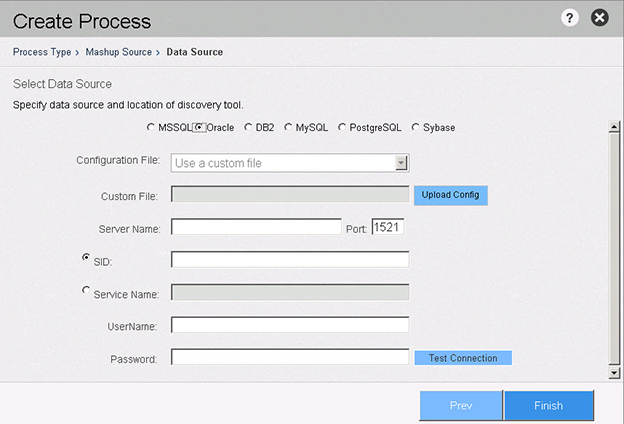
Click Next. The Select Data Source screen opens. |
|
6.
|
Select a configuration file (or use a customized configuration file), for the discovery tool you are adding. |
|
7.
|
If you are using a Normalize 4.x customized configuration extractor file, you must convert the file to a Data Platform format. |
|
8.
|
Enter configuration values for the discovery tool’s data source and location. |
Note:The specific fields that display on the screen will vary, depending on the database connection previously selected. See (MSSQL), (Oracle), (DB2), IT Discovery Tool Data Source—MySQL (MySQL), IT Discovery Tool Data Source—PostgreSQL (PostgreSQL), or IT Discovery Tool Data Source—Sybase (Sybase) for details about each of the database configuration fields.
|
9.
|
Click Test Connection to verify the connection. |
|
10.
|
Complete one of the following options: |
|
•
|
To configure the Process Settings later: Click Finish to add the process to the Administration Console. You can complete the additional process settings at a later time. |
Note:Data Platform supports SSL encryption of database connections for MSSQL, MySQL, and PostgreSQL.
IT Discovery Tool Data Source—MSSQL

|
•
|
Server Name—Enter the name of the database server. |
|
•
|
Database—Enter the name of the database. |
|
•
|
Use Windows Authentication—Click the checkbox to enable Windows authentication. |
|
•
|
User Name—Enter the authentication domain/username that enables access to the database. |
|
•
|
Password—Enter the password that enables access to the database. |
|
•
|
Use SSL—Click the checkbox to enable SSL encryption for the database connection. |
IT Discovery Tool Data Source—Oracle
|
•
|
Server Name—Enter the name of the database server. |
|
•
|
Port—Enter the port used to connect to the database. |
|
•
|
SID—Click this radio button to enable use of the System Identifier (SID) that identifies the database instance, and then enter the system identifier (database name + instance number; e.g. database3). |
|
•
|
Service Name—Click this radio button to enable use of a ‘connector’ to one or more instances of the database, and then enter the Service Name (e.g., sales.us.example.com). |
|
•
|
User Name—Enter the username that enables access to the database. |
|
•
|
Password—Enter the password that enables access to the database. |
IT Discovery Tool Data Source—DB2

|
•
|
Server Name—Enter the name of the database server. |
|
•
|
Port—Enter the port used to connect to the database. |
|
•
|
Database—Enter the name of the database. |
|
•
|
User Name—Enter the username that enables access to the database. |
|
•
|
Password—Enter the password that enables access to the database. |