Creating Data Groups
Workflow Manager 2020
The questions that are asked in order to gather information during a workflow are defined as data elements in one or more template data groups. Each data group represents one screen of questions presented while a workflow is being completed.

Diagram Demonstrating Data Groups and Data Elements
A template must include at least one data group that is collected upon initial submission of a workflow request, but it can also contain additional data groups, collected later in the workflow.
When you define a data group, you specify when it will be displayed by setting the When collected? option to one of the following:
| • | At initial submission—The data group will be collected when the workflow request is first submitted. |
| • | Later in the workflow—The data group will be available to be collected during any workflow step you define in any of the phases of this workflow. |

“When collected?” Option
To define a new data group, do the following:
| • | Create a new, empty data group, as described in Creating a New Data Group. |
| • | Define the data elements to be displayed in your data group, as described in Defining Data Elements. |
When a workflow request is submitted, each data group is displayed as a new screen of questions, with each question being represented by a data element. All data elements must belong to a data group.
To create a data group:
| 1. | First, create a blank template, as described in Initiating the Template. |
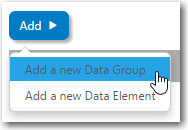
| 2. | Before you can define the first phase of this workflow, you need to create a data group that defines the data a workflow consumer will be asked for after they first submit a workflow request. You may also want to define extra data groups to collect data later in the workflow. To create a data group, open the Data Groups > Group Details tab of the Template Details page and click Add > Add a new Data Group. |
The Data Group Details view opens.
Tip:Because this is the first data group in the template, the Data Group Details view is open by default.
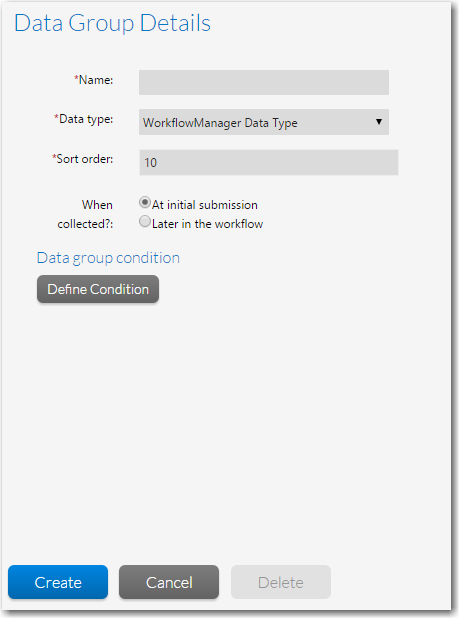
| 3. | In the Name field, enter a name to identify this group of questions. |
| 4. | From the Data type list, select one of the following: |
|
Data Type |
Description |
|||||||||
|
Workflow Manager Data Type |
If this is a standard data group, meaning that you are going to define its data elements in Workflow Manager, select this option. |
|||||||||
|
AdminStudio Data Type |
Select to create a data group whose data elements are automatically created and populated by the fields defined in the currently selected AdminStudio Extended Attributes description file.
Default Data Elements created under Adminstudio Data Type cannot be modified. To modify, change Data Type from Adminstudio Data Type to Workflow Manager Data Type. Therefore, then you can edit or delete any data element throughout the workflow process. Note:The default Extended Attributes Description File is: C:\AdminStudio Shared\EA_Default.xml. |
| 5. | If you will have more than one data group defined in a single step, use the Sort Order field to define the order in which they will be presented to the workflow consumer. Screens are displayed from lowest Sort Order number to highest. |
| 6. | Set the When collected? option to either At initial submission, if you want this data group to be presented to the consumer after they first submit their workflow, or Later in the workflow, if you want to select the step where it should be displayed. |
Tip:If this is the first data group you are creating, the When collected? field will be read-only and set to At initial submission.
| 7. | The Data group condition area is used to conditionally hide or display a data group based upon consumer input. See Setting Up Conditional Display of Data Groups, Data Elements, or Workflow Steps. |
| 8. | Click the Create button to add the data group to the Data tree. |
| 9. | You are now ready to add data elements to your group. Proceed with Defining Data Elements. |
By default, a new data group is created without any data elements, or questions. You will need to add at least one data element for the template to be usable.
To define data elements:
| 1. | Each question on a data collection screen of a workflow is represented by a data element. To add a data element to a data group, select a data group in the tree and then click Add > Add a new Data Element. |

The Data Element Details view opens.

| 2. | Enter the text of the question in the Description field. |
| 3. | Set the Required field to Yes or No to indicate whether the requested data must be provided before this data group can be submitted. |
| 4. | In the Sort Order field, enter a number to specify the order that this question will be presented to the consumer (like data groups, data elements are displayed from lowest Sort Order number to the highest). |
| 5. | Optionally, enter a message in the Help Text field. This will cause a help icon to appear to the right of the field when it is displayed in a workflow, and the text you enter will be visible when the consumer hovers over that icon. |

| 6. | In the Internal Name field, enter an permanent name for this data element. The Internal Name value should be used to refer to this data element when writing custom reports. |
Note:If you reference a data element in a custom report using the Internal Name—instead of its Description or GUID (DataMinorItemID)—that report will continue to work even if the Description of this data element changes or if the template is copied.
Note:The value entered into the Internal Name field is stored in the DataMinorItemInternalDesc column of the AMS_DataMinorItemTpl table.
| 7. | From the Data Type list box, select the type of data entry field you want to add. You have the following options: |
|
Data Type |
Description |
|||||||||||||||
|
A single-line, editable text box. To validate the data that a consumer enters into this field, set the Validation Type option to Mask or Regular Expression. When you do this, two additional fields appear for you to fill in: Validation Expression and Validation Message. Refer to Text Entry Box Data Type Validation Options for more information about setting up text validation. |
||||||||||||||||
|
Text Area |
A multi-line, scrollable, and editable text box. |
|||||||||||||||
|
A drop-down list, prompting the consumer to select one value from a list of values. When this option is selected, the Selection list items field appears and you may enter your list values, one per line. Important:Because a consumer can only select one value, Single Selection fields can be used to control workflow branching. |
||||||||||||||||
|
A list in which the consumer is permitted to select more than one value. When this option is selected, the Selection list items field appears and you may enter your list values, one value per line. |
||||||||||||||||
|
One or more check boxes, which may be selected or cleared to turn an option on or off. When this option is chosen, the Selection list items field appears and you enter labels for your check boxes, one label per line. |
||||||||||||||||
|
A group of radio buttons, used to select one option from a group of mutually exclusive options. When this option is selected, the Selection list items field appears and you may enter labels for each radio button in the group, one label per line. Important:Because a consumer can only select one value, Radio Button fields can be used to control branching. |
||||||||||||||||
|
Date |
A text box where the consumer is only permitted to either enter a date in a specified format (such as MM/DD/YYYY), or select a date by clicking on the field’s associated calendar icon. |
|||||||||||||||
|
A field allowing a consumer to upload documentation, an application or a dependency file, respectively, to a specific location on the Workflow Manager file server. |
||||||||||||||||
|
A field, available only after the initial data entry step, allowing the consumer to upload files which are stored in the Workflow Manager downloadable files directory. Files uploaded using this field are listed on the Downloadable Files tab for the given workflow request. |
||||||||||||||||
|
If you choose this option, the data element will be mapped to an attribute in a directory service. When this field is presented to a consumer, its value will be pre-populated by the value of that consumer’s associated directory service attribute (if the consumer’s account was imported from a directory service). When Directory Service is selected in the Data Type field, two additional fields appear: the Directory Services list, where you pick the directory service that contains the attribute that you want to use, and the Data Element list, where you select the attribute that you want to map to. Tip:If you have not yet defined any directory service attributes, you will instead see an Add New hyperlink. Click this to go to the Directory Services Attributes Administration page, where you may define some new attributes. See Managing Directory Services Attributes for more information. |
||||||||||||||||
|
A selection list which is populated with values from an operator-supplied XML file. When this option is selected, the Data Source File field appears, and you can specify the XML file that you want to use. After you select this file, choose the column in the XML file whose value will be passed to Workflow Manager from the Column Value to Submit field. By default, the first column is selected. When a data element with a data type of Dynamic Pick List is displayed in a workflow request, the consumer is prompted to click a link to make a selection. When the consumer clicks the Click to Select link, the Dynamic Pick List dialog box opens, listing the data defined in the selected XML file. After the consumer selects one or more items in the list and clicks OK, the selected values populate the field, with distinct values separated by pipes. See Dynamic Pick List Data Type Options for more information. |
||||||||||||||||
|
Select this option to populate a single-selection list with real time data values obtained from an associated SQL Server or Oracle database. When you select DB Driven Type from the Data Type list, three new fields appear:
Tip:If you have not yet defined any connections to an external database, you will instead see an Add New hyperlink. Click this to go to the Add External Data Source page, where you may create a new database connection. See Managing External Data Sources for more information. |
||||||||||||||||
|
Web Service Call |
Select this option to populate a combo box or grid with data values obtained using a web service call. When you select Web Service Call from the Data Type list, up to five new fields appear:
Tip:The first field returned by the web method will be used to uniquely identify each record presented in either the grid or the combo box. Ensure the data in this field is unique. |
|||||||||||||||
|
LinkUrl |
Select LinkUrl to prompt the requester to click a link to open a specified Url or UNC path in a new window/dialog box. With this data type you have two options:
Note:When a Display name is not entered, then the specified Url or UNC path will appear as the Display name. Note:For more information, see LinkUrl Data Type Options. |
|||||||||||||||
|
User Role |
When you select User Role option, you are prompting requester to select the desired role from the Select a role drop down in a Workflow template. Note:For more information, see User Role Data Type Options. |
| 8. | If you selected Single Selection or Radio Button, set the Use to define conditions/branching option to Yes or No, to determine whether the value specified for this data element will affect the course of the workflow. For information on conditional branching and the conditional display of data groups, data elements, and workflow steps, see Creating Templates That Use Conditions. |
| 9. | If you selected Single Selection, Multiple Selection, Check Box, or Radio Button, enter the labels or list values for these controls in the Selection list items box. Place each item on a single line, such as: |
Microsoft Windows XP
Macintosh OSX
UNIX
| 10. | If you selected Text Entry Box, Text Area, Single Selection, Multiple Selection, Check Box, or Radio Button, enter or select a default value for the field into or from the Default value field, if required. |
| 11. | If you selected Dynamic Pick List, choose the XML data source for your pick list from the Data Source File field. This field lists of all of the XML source files that have been copied to the C:\AdminStudioWebComponents_2020\wwwroot\DataSourceFiles location on your Workflow Manager web server. |
Important:These XML data source files must adhere to the Microsoft Excel XML spreadsheet schema. To ensure that your XML file is in the correct format, open your XML file in Microsoft Excel, and save it in XML Spreadsheet 2003 (*.xml) format.
| 12. | If you selected Dynamic Pick List, select the name of the column in your XML data source file which contains the value you want to pass to Workflow Manager when an item is selected from the Column Value to Submit list. |
An XML data source file can have multiple columns, but only one column value is passed to Workflow Manager. By default, the first column in the XML file is selected. If no column names are listed in this field, it means that the selected XML data source file either contains no data or was not saved in Microsoft Excel XML Spreadsheet 2003 (*.xml) format.
| 13. | If you selected DB Driven Type, fill in the External Data Source, SQL Query, and Persisted Column fields, as described in the table above. |
| 14. | If you selected Text Entry Box, the Validation Type field appears. To validate the data that a consumer enters into this text box, set this Validation Type field to either Mask or Regular Expression. When you do this, two additional options appear: Validation Expression and Validation Message. See Text Entry Box Data Type Validation Options for more information about filling out these fields. |
| 15. | If you selected Directory Service, use the Directory Service field to select the directory service from which you want to import an attribute from, and then choose the attribute from the Attribute field. Directory service attributes are configured in Workflow Manager on the Directory Service Attributes Administration page. See Directory Services Attributes Administration Page for more information. |
| 16. | The Data Element Condition area is used to conditionally hide or display a data element based upon consumer input. See Setting Up Conditional Display of Data Groups, Data Elements, or Workflow Steps for more information. |
| 17. | Finally, click the Create button to add the data element to the Data Group tree. |
| 18. | Repeat the above steps to add more data elements to the data group. |
| 19. | Repeat the steps outlined in Creating a New Data Group if you want to add more data groups. |
| 20. | Once you have created your data groups and data elements, proceed with Creating the First Workflow Phase. |
See Also