Creating the First Workflow Phase
Workflow Manager 2020
The first workflow step of the first workflow phase in a template is a data collection phase, and the questions asked of the person submitting the workflow are defined using a data group. Each template must have at least one such data group associated with it (as described in Creating Data Groups). To integrate your data group with the first workflow step, you must create a workflow phase of type Data Entry Phase, as described below.
To create the first workflow phase of a template:
| 1. | Complete the steps described in Initiating the Template and Creating Data Groups, and then open that template in the Template Details page. |
| 2. | Open the Workflow Phases > Phase Details tab. |
| 3. | Click Add > Add a new Workflow Phase. |

The Workflow Phase Details view opens.
Tip:Because this is the first workflow phase in the template, the Workflow Phase Details view is open by default.
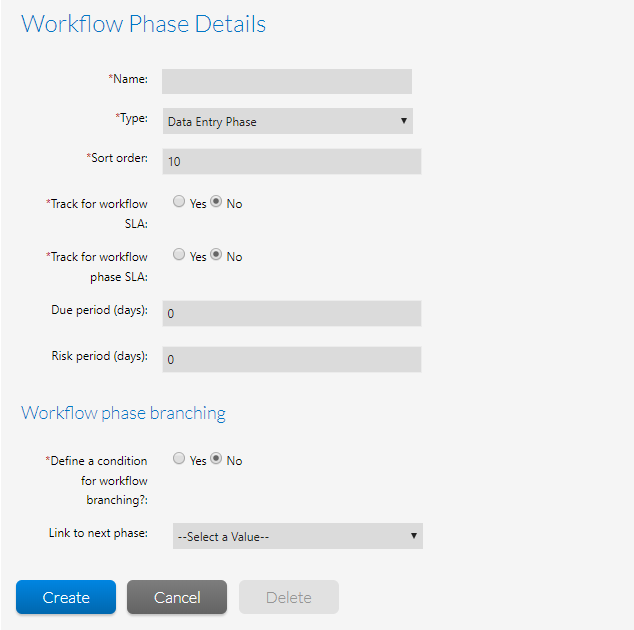
| 4. | In the Name field, enter a name to identify this phase. |
| 5. | Select Data Entry Phase from the Phase Type list. |
Tip:Since this is the first phase, Data Entry/Edit should be the only available option.
| 6. | If you want to exclude the time it takes to complete this data entry workflow step from the workflow request’s SLA (Service Level Agreement) calculations, clear the Track for workflow SLA option. If this option is selected, the time is tracked from the moment the request is submitted. |
| 7. | If you want to instruct Workflow Manager to send out an email alert and change the workflow step’s SLA Status when a duration threshold is reached, select the Track for workflow phase SLA option and enter a value in the Due period and Risk period fields. |
Note:For more information on SLA tracking of a workflow phase, see SLA Settings on a Workflow Phase.
| 8. | Click the Create button. The workflow phase name is added to the Workflow Phase tree. |
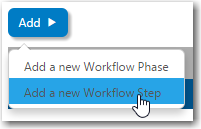
| 9. | Your next task is to create a workflow step to associate with your data group. To do this, click Add > Add a new Workflow Step. |
The Workflow Step Details view opens.
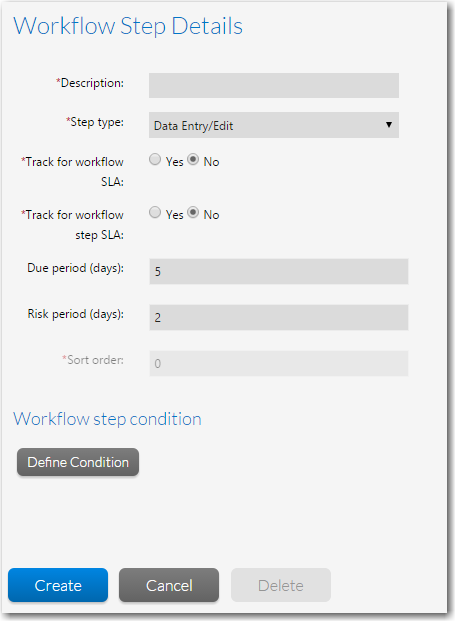
| 10. | Enter a name for your workflow step in the Description field. |
| 11. | Select Data Entry/Edit from the Step type list. |
Tip:Since this is the first phase and first workflow step, Data Entry/Edit should be the only available option.
| 12. | If you want to exclude the time it takes to complete this data entry workflow step from the workflow request’s SLA (Service Level Agreement) calculations, clear the Track for workflow SLA option. If this option is selected, the time is tracked from the moment the request is submitted. |
| 13. | If you want to instruct Workflow Manager to send out an email alert and change the workflow step’s SLA Status when a duration threshold is reached, select the Track for workflow step SLA option and enter a value in the Due period and Risk period fields. |
Note:For more information on SLA tracking of a workflow step, see SLA Settings on a Workflow Step.
| 14. | Click Create. The new workflow step is now listed as a child of your workflow phase in the Workflow Phase tree. |
| 15. | To add additional workflow steps to this workflow phase, or to add more workflow phases, proceed with Creating Subsequent Workflow Phases. |
See Also