Creating Subsequent Workflow Phases
Workflow Manager 2020
The first workflow phase in a template must have a type of Data Entry Phase, but subsequent phases present you with more options. Follow the instructions below to create subsequent workflow phases. Also look below to find out how to add additional workflow steps to a workflow phase (including the first workflow phase, described in Creating the First Workflow Phase).
To create subsequent workflow phases:
| 1. | Complete the steps described in Initiating the Template, Creating Data Groups, and Creating the First Workflow Phase, and then open that template in the Template Details page. |
| 2. | Open the Workflow Phases > Phase Details tab. |
| 3. | To add an additional workflow phase, click Add > Add a new Workflow Phase. The Workflow Phase Details view opens. |
| 4. | Identify your workflow phase by entering a name In the Name field. |
| 5. | Select one of the following from the Phase type list. |
| • | Data Entry Phase—The workflow consumer will be required to provide information during this phase |
| • | Work Phase—A standard phase with no restrictions. |
| • | Customer Acceptance Phase—Consumer approval must be provided for this phase to be completed. |
| • | Last Phase—A phase including administrative tasks which must be performed after the project is completed. |
| • | AdminStudio Phase—Phase is performed in its entirety as an AdminStudio Project. If you select this option, the AdminStudio WF list appears, and you select the AdminStudio Workflow that you want to use. |
| 6. | Enter a number in the Sort Order field to specify in what order your workflow phase will be displayed. Workflow phases are presented to the consumer from lowest Sort Order number to highest. |
| 7. | If you want to exclude the time it takes to complete this data entry workflow phase from the workflow request’s overall SLA (Service Level Agreement) calculations (shown on the Projects Report), clear the Track for workflow SLA option. For example, if this workflow phase was one which asks a consumer to approve completed work, you may want to clear this option, so that the time you spend waiting for the consumer to get back to your administrators is not included in the SLA calculations for this request. |
If this option is selected, the time is tracked from the moment the request is submitted.
| 8. | If you want to instruct Workflow Manager to send out an email alert and change the workflow phase’s SLA Status shown in the Workflow Phase SLA Report) when a duration threshold is reached, select the Track for workflow phase SLA option and enter a value in the Due period and Risk period fields. |
Note:For more information on SLA tracking of a workflow phase, see SLA Settings on a Workflow Phase.
| 9. | Leave the Define a condition for workflow branching? option set to No. |
Note:For information on defining conditional workflow branching, see Setting Up Conditional Branching of Workflow Phases.
| 10. | If you are creating your phases out of order, and have already created the workflow phase which you want to display after this new phase, select that follow-on phase from the Link to next phase list. Otherwise, leave the default option of ---Select a Value---. |
| 11. | Click the Create button to add your new workflow phase to the Workflow Phase tree. |
| 12. | You must now add at least one step to this new workflow phase. Click click Add > Add a new Workflow Step. The Workflow Step Details view opens. |
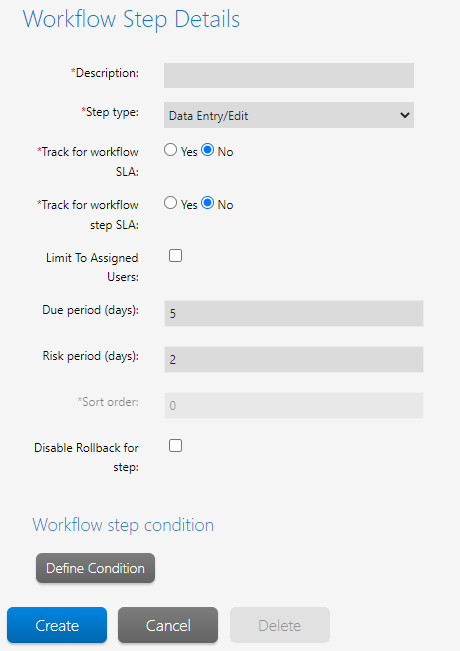
| 13. | Enter a name for your step in the Description field. |
| 14. | From the Step type list, select one of the following options: |
|
Option |
Description |
|||||||||
|
Normal |
After completing a workflow step of this type, the workflow administrator will be prompted to record the amount of time the step took in the Step Validation dialog. This dialog will display the HTML file you specify in the Popup HTML File field, which can be customized with whatever message you wish to show, along with fields to record how long it took to complete the step. |
|||||||||
|
Update History |
To complete this step, the workflow administrator will need to enter a comment in the Update History dialog box. This step is typically used as the last on a workflow phase, to document the completion of the phase. |
|||||||||
|
Work Assignment |
This step prompts the workflow administrator to assign users to roles associated with this workflow request. For more information, see Assigning Users to Workflow Requests. |
|||||||||
|
Script Execution |
When a workflow administrator clicks the name of this workflow step on the Workflow Request page, an operator-specified executable file is launched. This executable could be a batch file, an .exe file, a VB Script file, or any other type of executable that will run on the Workflow Manager server. Selecting this option causes, the Script Path combo box to appear, which lists all script files that have been uploaded to the Workflow Manager script location. On a typical install, this would be C:\AdminStudioWebComponents_2020\\wwwroot\ScriptFiles. If there are no appropriate executable files in this directory, you will be prompted to upload one. Note:When a Script Execution workflow step is initiated, Workflow Manager launches the executable and advances the workflow. The person running the step is not prompted to enter any comments, and nothing is logged in the Workflow Manager database. |
|||||||||
|
Custom Web Page |
When a workflow administrator or consumer clicks the name of this workflow step name on the Workflow Request page, Workflow Manager will open a new browser window, displaying an operator-specified URL address. Once the person completing the workflow provides or processes information using this page, data will be sent back to Workflow Manager and it will automatically mark this step as complete. When you create your custom web page, you are responsible for ensuring that it implements the methods necessary to pass data back to Workflow Manager:
See Configuring a Custom Web Page for detailed instructions. If you select this option from the Step Type field, a Custom Site URL text field appears where you may enter the URL of your web page. The URL must be absolute (that is, must begin with http:// or https://). By default, Custom Site URL is set to a custom web page that is shipped with Workflow Manager: http://<yourWorkflowManagerWebServer>/CustomWorkflow/TestCustomWorkflow.aspx Use this page for testing prior to entering the URL of your own custom web page. Important:By default, the value of the Custom Site URL field begins with either localhost or an IP address. In order for this workflow step to work, this value must be modified to point to your Workflow Manager server. |
|||||||||
|
Allocate Software License |
This step will allocate a computer or end-user to a software license in FlexNet Manager Suite. Important:In order for this step to work correctly, it is important that your workflow template also contains Web Service Call data elements which return end-user, computer and software license for the workflow consumer to select. These elements must be named and configured the same way as in the default Software Request global template installed with Workflow Manager. You might find it helpful to copy the Software Request global template and modify it, if you want to use the Allocate Software License step in your own templates. |
|||||||||
|
Deallocate Software License |
This step will deallocate a computer or end-user from a software license in FlexNet Manager Suite. Important:In order for this step to work correctly, it is important that your workflow template also contains a Web Service Call data element which returns unused software license allocations for the workflow consumer to select. This element must be named and configured the same way as in the default Software Removal global template installed with Workflow Manager. You might find it helpful to copy the Software Removal global template and modify it, if you want to use the Deallocate Software License step in your own templates. |
|||||||||
|
Automated Import |
When a user clicks this workflow step name on the Workflow Request page, Workflow Manager will run a user-supplied IPlugin assembly that will programmatically import a package that was uploaded in a previous workflow step into the AdminStudio Application Catalog. After the IPlugin assembly completes, data will be sent back to Workflow Manager that will automatically mark this step complete and advance the workflow. For more information, see Defining an Automated Workflow Step. |
|||||||||
|
Automated Validation |
When a user clicks this workflow step name on the Workflow Request page, Workflow Manager will run a user-supplied IPlugin assembly that will programmatically validate a package that was imported in a previous workflow step. After the IPlugin assembly completes, data will be sent back to Workflow Manager that will automatically mark this step complete and advance the workflow. For more information, see Defining an Automated Workflow Step. |
|||||||||
|
Automated Conflict Analysis |
When a user clicks this workflow step name on the Workflow Request page, Workflow Manager will run a user-supplied IPlugin assembly that will programmatically perform conflict analysis on a package that was imported in a previous workflow step. After the IPlugin assembly completes, data will be sent back to Workflow Manager that will automatically mark this step complete and advance the workflow. For more information, see Defining an Automated Workflow Step. |
|||||||||
|
Allocate Software License |
A workflow step of type Allocate Software License involves a web service call to FlexNet Manager Suite. Such a step can be included in a workflow after a software license and computer or end-user are selected in an earlier data entry step; completing the step then involves allocating the chosen computer or end-user to the selected software license. For more information, see Defining an Allocate Software License Workflow Step. |
|||||||||
|
Deallocate Software License |
A workflow step of type Deallocate Software License involves a web service call to FlexNet Manager Suite. Such a step can be included in a workflow after a software license allocated to a computer or end-user is selected in an earlier data entry step. Completing the step then involves deallocating the chosen computer or end-user from the selected software license. For more information, see Defining a Deallocate Software License Workflow Step. |
|||||||||
|
Custom Automated Task |
Workflow tasks often require you to launch other executables or tasks which are performed outside of Workflow Manager itself. Using a Custom Automated Task workflow step, you can instruct Workflow Manager to automatically execute a task outside of Workflow Manager and advance the workflow to the next step, all without manual intervention. For detailed instructions on setting up a workflow step with a Step Type of Custom Automated Task, see Defining a Custom Automated Task Workflow Step. |
If this option is selected, the time is tracked from the moment the request is submitted.
| 16. | If you want to instruct Workflow Manager to send out an email alert and change the workflow step’s SLA Status shown in the Workflow Step SLA Report) when a duration threshold is reached, select the Track for workflow step SLA option and enter a value in the Due period and Risk period fields. |
Note:For more information on SLA tracking of a workflow step, see SLA Settings on a Workflow Step.
| 17. | Enter a number in the Sort order field to specify in what order your workflow step will be displayed. Workflow steps are presented to the consumer from lowest sort order number to highest. |
| 18. | If you select the Disable Rollback for step option (by clicking the check box button), then the Rollback button will not appear in the Workflow for that particular step. If this option is not selected then the Rollback button will appear in the Workflow step. |
| 19. | If you selected the Normal step type, you need to specify the name of the HTML file that you want to display when a user clicks the Instructions icon in the workflow step completion area. Enter the name of this HTML file in the Popup HTML file field. This file must be located in the directory specified in the Folder field on the Template > Properties tab of the Template Details page. See Creating a New Template for details. |
| 20. | If you selected the Script Execution step type, select the name of an executable file from the Script path field. |
| 21. | If you selected the Custom Web Page step type, enter the absolute URL of a custom web page which you want the people using this workflow to complete in the Custom site URL field. |
Important:By default, the value of the Custom Site URL field begins with either localhost or an IP address. In order for this workflow step to work, this value must be modified to point to your Workflow Manager server.
| 22. | From the Email Templates lists, select the email templates which will be used to notify the workflow administrator, his company and/or the workflow consumer when this workflow step is initiated, rolled back, updated, or completed. See Customizing Email Templates for more information about the default email templates and how you can customize them. |
| 23. | To prompt the consumer to enter data during this workflow step, set Collect a data group in this workflow step? option to Yes, and then choose a data group from the Select the data group list. |
Note:If there are no data groups available, the Select the data group option is disabled.
| 24. | Optionally, provide information to conditionally display this workflow step. See Setting Up Conditional Display of Data Groups, Data Elements, or Workflow Steps for details. |
| 25. | Click Create. The new workflow step is now listed in the Workflow Phase tree, as a child of your new workflow phase. |
| 26. | To add more workflow phases, or to add more workflow steps to an existing phase, repeat the steps above. |
| 27. | The final step when creating a workflow template is to link the phases together, so that one is displayed following another. Do this as follows: |
| a. | Click the phase which you want to appear first in the Workflow Phase tree. The Workflow Phase Details view for that phase appears. |
| b. | From the Link to next phase list, choose the name of the workflow phase which you want to be displayed next. |
| c. | Save your changes by clicking the Update button. |
| d. | Repeat, clicking on each phase in turn until you have linked them in the desired order. |
| 28. | Test this new workflow template as described in Validating a Template. |
See Also