Generating a Refresh Token in ServiceNow
This section covers the steps required to generate a refresh token needed for customers who want their ServiceNow data to flow into Flexera One.
Note:Before setting up your connection to Flexera One, you must first log in to your ServiceNow instance and verify the ServiceNow Integration User has sufficient permissions to generate the OAuth token. See Create Integration User Account for more details about the roles required for the Integration User.
Caution:The Integration User created for the Refresh Token generation will have access to the ServiceNow Table API and the ability to access tables and records. ServiceNow Administrators are advised to limit the use of the Integration User.
Data Flow Direction: The following instructions are instrumental for setting up the connection to have the data flow from ServiceNow into Flexera One. If you do not want your ServiceNow data pushed to Flexera One, then you may skip the steps in both this topic as well as the instructions in the Configuring the IT Visibility Connection in Flexera One topic.
Create FlexeraOne OAuth and FlexeraOne OAuth Provider records in the Application Registries with custom credentials. Then generate the Refresh Token to use with the Flexera One IT Visibility connection.
| • | Creating FlexeraOne OAuth and FlexeraOne OAuth Provider With Custom Credentials |
| • | Generating the Token |
Creating FlexeraOne OAuth and FlexeraOne OAuth Provider With Custom Credentials
Use custom values for your Client ID and Client Secret for FlexeraOne OAuth and FlexeraOne OAuth Provider records. Keep in mind, when you use custom values to create the OAuth records in ServiceNow, you must also supply the Client ID and Client Secret in Flexera One IT Visibility, along with the Refresh Token, to complete the connection.
For existing Flexera One ServiceNow App users, Flexera recommends you first perform the following steps to remove your existing OAuth records prior to creating new, custom OAuth records.
To remove existing OAuth credentials:
| 1. | From the Navigation menu, search for Flexera One and select Flexera One > Advanced > Application Registry. |
This opens Application Registries for Flexera One.
| 2. | In Application Registries, delete the records for FlexeraOne OAuth and FlexeraOne OAuth Provider. |
With the default OAuth records deleted, existing customers are ready to create custom OAuth records for FlexeraOne OAuth and FlexeraOne OAuth Provider.
To create FlexeraOne OAuth with custom credentials:
| 1. | In Application Registries (Flexera One > Advanced > Application Registry), click New. |
This shows a list of options for a new OAuth application.
| 2. | Click Create an OAuth API endpoint for external clients. |
| 3. | Complete the fields for the FlexeraOne OAuth according to the table below: |
|
Name |
Value |
Comments |
|
Name |
FlexeraOne OAuth |
Name should be exactly match the value shown: FlexeraOne OAuth. |
|
Client ID |
Auto Populated |
(Read-Only) The auto-generated unique ID of the application. The instance uses the client ID when requesting an access token. |
|
Client Secret |
any secret value |
The instance uses the client secret when requesting an access token. Leave this field blank to have the instance auto-generate a client secret. To display existing client secrets, click the lock icon. |
|
Accessible from |
All application scope |
|
|
Refresh Token Lifespan |
13,140,000 |
The number of seconds that a refresh token is valid. The instance uses the lifespan value when requesting a refresh token. |
|
Access Token Lifespan |
86,400 |
The number of seconds that an access token is valid. The instance uses the lifespan value when requesting an access token. |
| 4. | Record the Client ID and Client Secret values. You will need to provide these values again in subsequent connection configuration steps. |
| 5. | Click Submit. |
Continue with the instructions for creating FlexeraOne OAuth Provider, below.
To create FlexeraOne OAuth Provider with custom credentials:
| 1. | In Application Registries (Flexera One > Advanced > Application Registry), click New. |
This shows a list of options for a new OAuth application.
| 2. | Click Connect to a third party OAuth Provider. |
| 3. | Complete the fields for the FlexeraOne OAuth Provider according to the table below: |
|
Name |
Value |
Comments |
|
Name |
FlexeraOne OAuth Provider |
Name should be exactly match the value show: FlexeraOne OAuth Provider. |
|
Client ID |
Must match the Client ID value generated for FlexeraOne OAuth. |
Use the same Client ID value that was used for FlexeraOne OAuth. The ServiceNow instance uses this Client ID when requesting an access token. |
|
Client Secret |
Must match the Client Secret value you used for FlexeraOne OAuth. |
Use the same Client Secret value that was used for FlexeraOne OAuth. To display an existing Client Secrets value, click the lock icon. |
|
Accessible from |
All application scope |
|
|
Refresh Token Lifespan |
13,140,000 |
The number of seconds that a refresh token is valid. The instance uses the lifespan value when requesting a refresh token. |
|
Access Token Lifespan |
86,400 |
The number of seconds that an access token is valid. The instance uses the lifespan value when requesting an access token. |
|
Token URL |
https://<instance-name>.service-now.com/oauth_token.do |
Replace <instance-name> with your organization’s customer instance. |
|
Redirect URL |
https://<instance-name>.service-now.com/oauth_redirect.do |
Replace <instance-name> with your organization’s customer instance.
|
| 4. | Record the Client ID and Client Secret values if you have not already done so. You will need to provide these values again in subsequent connection configuration steps. |
| 5. | Click Submit. |
With the FlexeraOne OAuth and FlexeraOne OAuth Provider created, you can continue with the instructions in Generating the Token, below.
The token you generate in this step is used to establish the connection with Flexera One at app.flexera.com. Insert the username and password for your ServiceNow Instance and, as a response, app.flexera.com returns a Refresh Token. This token helps pull data from ServiceNow to IT Visibility for normalization.
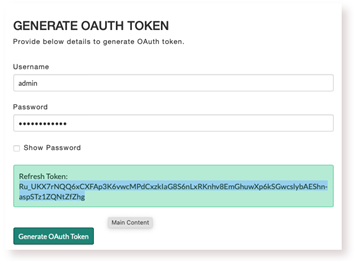
To generate a refresh token
| 1. | Login to your ServiceNow instance as the Integration User. |
| 2. | From the Navigation menu, search for Flexera One and select Export Configurations > Connection. |
| 3. | Enter the username and password for the Integration User. |
| 4. | Click the Generate OAuth Token button. |
This generates the OAuth token to be entered into IT Visibility. Save the token to a secure place; it will be required when you are configuring the IT Visibility Connection in Flexera One.
Tip:Copy the refresh token value generated in this instruction set so that you can quickly paste the value into the ServiceNow Token field when configuring the connection in Flexera One for the next step. There, you must also supply the Client ID and Client Secret values you used to create the OAuth records.
When the OAuth token is generated successfully, continue with the steps described in Configuring the IT Visibility Connection in Flexera One.