Salesforce Marketing Cloud
The following sections explain prerequisites, resources, and instructions for integrating with SaaS Management.
| • | Stored Salesforce Marketing Cloud Information |
| • | Required Minimum Permissions for Salesforce Marketing Cloud |
| • | Authentication Method for Salesforce Marketing Cloud |
| • | Prerequisite Salesforce Marketing Cloud Configurations |
| • | Required Credentials for Salesforce Marketing Cloud |
| • | Integrating Salesforce Marketing Cloud With SaaS Management |
| • | Salesforce Marketing Cloud Contact Usage |
| • | Salesforce Marketing Cloud API Endpoint |
Stored Salesforce Marketing Cloud Information
The following table describes the available integration task and stored data within SaaS Management.
|
Available Integration Task |
Information Stored |
|||||||||
|
Product Consumption |
|
Note:The information stored is subject to change as enhancements are made to the SaaS application.
Required Minimum Permissions for Salesforce Marketing Cloud
The minimum API required permissions are based on the Required Application Permissions for Salesforce Marketing Cloud and the Required Scope for Salesforce Marketing Cloud .
Required Application Permissions for Salesforce Marketing Cloud
Note:The following SaaS application user role is not applicable to Flexera One roles.
|
Application Permission |
Description |
||||||
|
Administrator |
This role is required to configure the Prerequisite Salesforce Marketing Cloud Configurations. |
||||||
|
Data Extension: Read, Write |
This scope is required to perform the following tasks when Integrating Salesforce Marketing Cloud With SaaS Management:
|
Required Scope for Salesforce Marketing Cloud
|
Scope |
Description |
Integration Task Name |
||||||||||||
|
Data Extension: Read, Write |
The data extension read permission grants access only to the:
The data extension write permission grants access to the data. |
Product Consumption |
Authentication Method for Salesforce Marketing Cloud
The required authentication method is OAuth 2.0 With Client Credentials. For more information, see Salesforce Marketing Cloud’s documentation topic, Create an OAuth 2.0 API Integration in Enhanced Packages.
Prerequisite Salesforce Marketing Cloud Configurations
The following tasks are required to configure your Salesforce Marketing Cloud account.
| • | Creating a Contacts Counts Report in Salesforce Marketing Cloud |
| • | Creating a Data Extension for Your Contacts Counts Report |
| • | Building an Automation to Import Contacts Counts Report Data in Your Data Extension |
Creating a Contacts Counts Report in Salesforce Marketing Cloud
Important:The Salesforce Marketing Cloud Administrator role is required to create a Contacts Counts report.
Create a Contacts Counts report to retrieve and display the total number of billable contacts in your Salesforce Marketing Cloud account.
To create a Contacts Counts report in Salesforce Marketing Cloud:
| 1. | From a web browser, go to your Salesforce Marketing Cloud instance. |
| 2. | Sign in using your administrator credentials. |
| 3. | On the page header of your instance, click the business unit profile icon. Select the top-level parent business unit so that your Contacts Counts report includes data for both the parent business unit and all corresponding child business units. |
| 4. | From the list of available Salesforce Marketing Cloud applications, click the Analytics Builder app icon, and then select Reports. The Reports app overview opens. |
| 5. | In the Report Catalog section, click View Catalog. |
| 6. | From the Reports Catalog, search for Contacts Counts and click Create. The Create Report dialog opens. |
| 7. | In the Create Report dialog, go to the Date Range list and select the time period that you want to retrieve and display data. The default value is the Last 30 Days. |
Tip:Select the last 7 Days as the Date Range value to ensure consistent contacts counts between SaaS Management and your Salesforce Marketing Cloud Contacts Counts report.
| 8. | Click Submit. Your Salesforce Marketing Cloud instance generates the report and displays the results on the Results: Contacts Counts page. |
| 9. | On the Results: Contacts Counts page, click Save. The Save Report dialog opens. |
| 10. | Refer to the following table for completing the Save Report fields. |
|
Save Report Field |
Description |
|
Report Name |
Enter a report name. |
|
Report Source |
Select the default report source option—Contacts Counts. |
|
Description |
Enter a report description. |
| 11. | Click Save. |
| 12. | Complete the following steps to create a schedule and automatically run the Contacts Counts report. |
| a. | On the page header of the Reports app, select the Overview tab to return to the Reports app overview. |
| b. | From your list of reports, select your newly created Contacts Counts report. The report details open. |
| c. | In the Schedule Options section, click Edit. The Edit Schedule Options dialog opens. |
| d. | Refer to the following tables for entering information in the Edit Schedule Options dialog. |
|
Schedule Options for the Edit Schedule Options Dialog |
Description |
|
Start |
Enter the date and time to start running the report. |
|
Time Zone |
Select the desired time zone for the scheduled report. |
|
Repeat |
Enter the frequency for running the report. Tip:Configure the report to run Daily to see more accurate data in the SaaS Management user interface. |
|
End |
Enter the date to stop running the report. |
|
Delivery Options for the Edit Schedule Options Dialog |
Description |
|||||||||
|
Format |
Select Data as the file type. Select (.csv) as the file extension for the report results. |
|||||||||
|
Location |
To save or share the report, select Save report for FTP and complete the following fields:
|
| e. | Click Save. |
Creating a Data Extension for Your Contacts Counts Report
Important:Note the following:
| • | The Salesforce Marketing Cloud Administrator role is required to create a data extension for your Contact Counts report. |
| • | Do not set up this data extension as a population. If you set it up as a population, every record in the data extension will contribute to the contact count. |
Data extensions are tables that contain attributes representing your report data. Complete the following steps to create a data extension to store your Contacts Counts report data on your Salesforce Marketing Cloud instance.
To create a data extension for your Contacts Counts report:
| 1. | On the page header of your Salesforce Marketing Cloud instance, hover over the Salesforce icon to display the list of available Salesforce Marketing Cloud applications. |
| 2. | Click the Audience Builder app icon, and then select Contact Builder. The Contact Builder app opens. |
| 3. | Select the Data Extensions tab, and then click Create. The Create New Data Extension dialog opens. |
| 4. | Refer to the following table for completing the Properties fields. |
|
Properties Field |
Description |
||||||
|
Creation Method |
Select Create from New as the method for creating the data extension. |
||||||
|
Name |
Enter a name for the data extension. |
||||||
|
External Key |
This optional key uniquely identifies the data extension. You can use the predefined key or enter a key of your choice. |
||||||
|
Description |
Enter a description for the data extension. |
||||||
|
Type |
Select the appropriate data extension type.
|
||||||
|
Location |
Select the appropriate location for storing the data extension.
|
||||||
|
Is Sendable? |
Select this option to send the data extension to your subscribers. |
| 5. | Click Next. |
| 6. | For the Data Retention Policy step, go to the Retention Setting field and select Off. |
| 7. | Click Next. |
| 8. | For the Attributes step, add the attributes that you want to include in the data extension. Attributes are used to map and import data from a report to a data extension. You must create an attribute for each report column that you want to import data from. Each attribute name must exactly match the corresponding report column name. |
Attributes are required for the following Salesforce Marketing Cloud Contacts Counts report columns:
| • | Count_Date |
| • | Total_Distinct_Contacts_Count |
| • | Flag |
Attributes for all other Contacts Counts report columns are optional. Refer to the following table for completing the required and optional Attributes.
|
Attribute |
Description |
||||||
|
Primary Key |
This attribute provides an option to include a unique identifier for all records in the data extension. Important:This option must be enabled for the Contacts Counts report Count_Date column and the Count_Date attribute. |
||||||
|
Name |
When entering an attribute name, this name must exactly match the corresponding Contacts Counts report column name. |
||||||
|
Data Type |
Enter the attribute data type. |
||||||
|
Required |
Select this option when the attribute requires a value for each record in the data extension. |
||||||
|
Length |
Select the maximum number of characters allowed in the attribute value. |
||||||
|
Default Value |
You can set an optional default value for an attribute. Important:Note the following:
|
| 9. | Click Complete. The Data Extension Created dialog opens. |
| 10. | Click OK. |
Building an Automation to Import Contacts Counts Report Data in Your Data Extension
Important:The Salesforce Marketing Cloud Administrator role is required to complete this task.
Create an automation to automatically import Contacts Counts report data into your data extension after the report is generated.
To build an automation to import Contacts Counts Report data in your data extension
| 1. | On the page header of your Salesforce Marketing Cloud instance, hover over the Salesforce icon to display the list of available Salesforce Marketing Cloud applications. |
| 2. | Click the Journey Builder app icon, and then select Automation Studio. The Automation Studio app overview opens. |
| 3. | Click New Automation. The workflow for the new automation opens. |
| 4. | Create a scheduled automation by dragging the Schedule icon from the Starting Sources section of the left menu pane to the Starting Source section of the workflow canvas. |
| 5. | Define a schedule for the automation. |
| a. | In the Starting Source section of the workflow canvas, click Configure. The Define Schedule dialog opens. |
| b. | Refer to the following table for completing the Define Schedule dialog fields. |
|
Define Schedule Dialog Field |
Description |
||||||
|
Start Date |
Enter the date and time to start the automation. |
||||||
|
Time Zone |
Select the appropriate time zone to schedule the automation. |
||||||
|
Repeat |
This field enables you to select the frequency for running the automation. Configure the automation to run after the Contacts Counts report is generated. Select Daily to see more accurate data in the SaaS Management user interface. Tip:If you configure the automation to run on the same day that the report is generated, select a start time that allows enough time for the report to finish generating. It is recommended to set a start time of at least two hours after the report start time. |
||||||
|
End |
Select the appropriate response for running the automation until the schedule ends.
|
| 6. | Add a script activity to execute the Server-Side JavaScript for all activities that require it. |
| a. | In the Activities section of the left menu pane, drag the Script icon into the workflow canvas. The script activity becomes the first step of the automation workflow. |
| b. | For the Script Activity step, click Choose. The Choose Script Activity dialog opens. |
| c. | Click Create New Script Activity. The Create New Script Activity dialog opens. |
| d. | Refer to the following table for completing the Properties fields. |
|
Properties Field |
Description |
||||||
|
Name |
Enter a name for the script activity. |
||||||
|
External Key |
This optional key uniquely identifies the script activity. You can use the predefined key or enter a key of your choice. |
||||||
|
Folder Location |
Select the appropriate location for storing your scripts.
|
||||||
|
Description |
Enter a description for the script activity. |
| e. | In the following Server-Side Javascript, replace *<data-extension-name>* with the Data-Extension name created in the step Creating a Data Extension for Your Contacts Counts Report. Then copy and paste the script into the Server-Side JavaScript text box. |
<script runat="server">
var rows = Platform.Function.DeleteData('*<data-extension-name>*',['Flag'],['1']);
</script>
| f. | Click Validate Syntax to verify that the Server-Side JavaScript syntax is valid. |
| g. | Click Next. |
| h. | For the Summary step, verify that the script activity configuration is correct. |
| i. | Click Finish. |
| 7. | Add a data extract activity to copy the Contacts Counts report from the SFTP Reports folder to the SFTP Import folder. |
The Salesforce Marketing Cloud instance uses the SFTP Import folder to locate and import report data into your data extensions. To enable your instance to import data from the Contacts Counts report into the corresponding data extension, you must copy the report to the SFTP Import folder.
| a. | In the Activities section of the left menu pane, drag the Data Extract icon into the workflow canvas. The data extract activity becomes the second step of the automation workflow. |
| b. | Click Choose on the data extract activity step. The Choose Data Extract Activity dialog opens. |
| c. | Click Create New Data Extract Activity. The Create New Data Extract Activity dialog opens. |
| d. | Refer to the following table for completing the Properties fields. |
|
Properties Field |
Description |
|
Name |
Enter a name for the data extract activity. |
|
External Key |
This optional key uniquely identifies the data extract activity. You can use the predefined key or enter a key of your choice. |
|
File Naming Pattern |
Enter the file name of the Contacts Counts report that you want to extract data from. This name must exactly match the file name of the Contacts Counts report that you created in Creating a Contacts Counts Report in Salesforce Marketing Cloud, including the file extension. |
|
Extract Type |
Select Enhanced FTP File Move and Copy as the extract method. |
|
Description |
Enter a description for the data extract activity. |
| e. | Click Next. |
| f. | Refer to the following table for completing the Configuration fields. |
|
Configuration field |
Description |
|
Input Folder |
Enter \reports\ as the location in which you saved the Contacts Counts report. |
|
Output Folder |
Enter \Import\ as the location you want to copy the report to. |
|
Copy to Folder |
With this option, you can copy instead of moving the report from the input folder to the output folder. This option also enables you to keep the report in both locations. Select the checkbox to enable this option. |
| g. | Click Next. |
| h. | For the Summary step, verify that the data extract activity configuration is correct. |
| i. | Click Finish. |
| 8. | Add an import file activity to import the Contacts Counts report data into the data extension. |
| a. | In the Activities section of the left menu pane, drag the Import File icon into the workflow canvas. The import file activity becomes the third step of the automation workflow. |
| b. | For the Import File Activity step, click Choose. The Choose Import File Activity dialog opens. |
| c. | Click Create New Import File Activity. The Create New Import File Activity dialog opens. |
| d. | Refer to the following table for completing the Activity Info fields. |
|
Activity Info Field |
Description |
|
Name |
Enter a name for the import file activity. |
|
Description |
Enter a description for the import file activity. |
|
External Key |
This optional key uniquely identifies the import file activity. You can use the predefined key or enter a key of your choice. |
|
Send notification email to |
Enter the email address for sending notifications. After a successful import, a notification email with the number of inserted and updated rows is sent to the specified email address. Note:The notification email will contain an Invalid Field Count validation error due to the presence of empty lines in the imported CSV file. These empty lines appear automatically when you save the report to FTP. However, they have no impact on the integration. |
| e. | Click Next. |
| f. | Refer to the following table for completing the Import File fields. |
|
Import File Field |
Description |
||||||
|
File Location |
Select ExactTarget Enhanced FTP as the location for importing data from the Contacts Counts report. |
||||||
|
File Naming Pattern |
This file name represents the Contacts Counts report that you want to import data from. When entering a file name, this name must exactly match the corresponding Contacts Counts report that you created in Creating a Contacts Counts Report in Salesforce Marketing Cloud, including the file extension. |
||||||
|
Date Format |
Select the format for displaying the date and time of the report data. |
||||||
|
Delimiter |
Select the appropriate format for separating each report record.
|
||||||
|
Bad Data Behavior |
If you want to skip rows with bad data, select the checkbox to enable this option. |
| g. | Click Next. |
| h. | For the Destination step, search for and select the data extension that you created in Creating a Data Extension for Your Contacts Counts Report. |
| i. | Click Next. |
| j. | For the Mapping step, select the options Add and Update and Mapping By Header. |
| k. | Click Next. |
| l. | For the Review step, verify that the import file activity configuration is correct. |
| m. | Click Finish. |
| 9. | Click Save. The Save Automation dialog opens. |
| 10. | Refer to the following table for completing the Save Automation dialog fields. |
|
Save Automation Dialog Field |
Description |
|
Name |
Enter a name for the automation. |
|
Description |
Enter a description for the automation. |
|
External Key |
This optional key uniquely identifies the automation. You can use the predefined key or enter a key of your choice. |
|
Location |
Enter the location for saving the automation. |
| 11. | Click Save. |
| 12. | In the Starting Source section of the workflow canvas, click Active. The Activate Schedule Confirmation dialog opens. |
| 13. | Click Activate to activate the automation schedule. |
Required Credentials for Salesforce Marketing Cloud
The following credentials are required:
| • | Client ID |
| • | Client Secret |
| • | SOAP Base URI |
| • | Data Extension Name. |
Integrating Salesforce Marketing Cloud With SaaS Management
Complete the following steps to integrate Salesforce Marketing Cloud with SaaS Management.
To integrate Salesforce Marketing Cloud with SaaS Management:
| 1. | Add the Salesforce Marketing Cloud application in SaaS Management. For more information, see Adding an Application. |
| 2. | To obtain the Salesforce Marketing Cloud Client ID, Client Secret, and ServiceURL values: |
| a. | Sign in to the Salesforce Marketing Cloud portal with your admin username and password. |
| b. | Click your user profile in the upper-right corner and from the dropdown list select Setup. |
| c. | From the Platform Tools menu, select Apps. |
| d. | From the Installed Packages menu, click the installed package. |
| e. | In Installed Packages, click the New button and enter the Name and Description to create an app. |
| f. | After the app is created, go to the Installed Packages page, select the Details tab, and go to the Components section. Click the Add Component button. The Add Component dialog opens. |
| g. | For the component type, select API Integration. Then click Next. |
| h. | In the Integration Type column, select Server-to-Server. Then click Next. |
| i. | Under the Server-to-Server properties, go to the Data options. Select the Data Extensions permissions Read and Write. Click Save to generate the client credentials. |
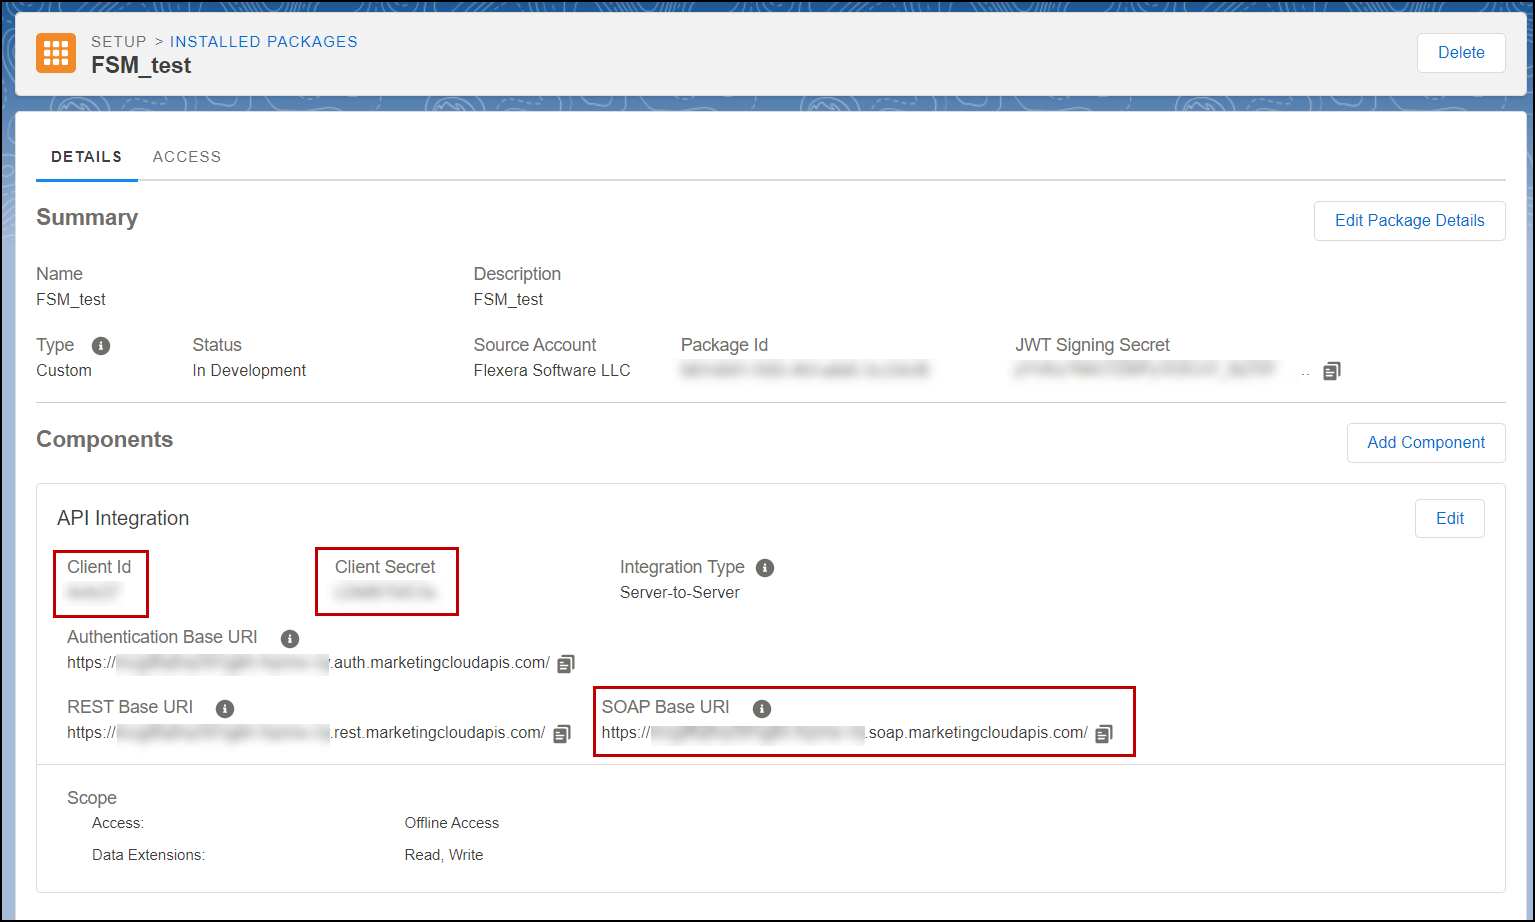
| j. | From Setup, go to the Installed Packages page. Select the Details tab, scroll down to the Components section, and obtain the values for: |
| • | Client ID |
| • | Client Secret |
| • | SOAP Base URI. The SOAP Base URI value is used for the SaaS Management ServiceURL field. |
| 3. | Enter the required Salesforce Marketing Cloud Data Extension Name. To obtain this information: |
| a. | On the page header of your Salesforce Marketing Cloud instance, hover over the Salesforce icon to display the list of available Salesforce Marketing Cloud applications. |
| b. | Click the Audience Builder app icon and select Contact Builder. |
| c. | Select the Data Extensions tab and note the Data Extension Name. |
| 4. | In the SaaS Management Add Application page, enter the following information in the Salesforce Marketing Cloud fields: |
| • | Client ID |
| • | Client Secret |
| • | SOAP Base URI |
| • | Data Extension Name |
| 5. | Click Authorize. The following Salesforce Marketing Cloud tabs will display: Contact Usage, Licenses, and Integration. |
For further information on these tabs, see:
| • | Salesforce Marketing Cloud Contact Usage for the Contacts Usage tab |
| • | Licenses Tab |
| • | Integration Tab |
Salesforce Marketing Cloud Contact Usage
The Contacts Usage tab displays your organization’s Salesforce Marketing Cloud Contacts’ entitlement and usage to control spend by minimizing contact usage overage fees.
The following prerequisites are required to display data in the Contacts Usage tab:
| • | Obtain a copy of your Salesforce Marketing Cloud contract |
| • | Complete the Prerequisite Salesforce Marketing Cloud Configurations |
| • | Complete the tasks for Integrating Salesforce Marketing Cloud With SaaS Management |
| • | Complete the License Details in the Salesforce Marketing Cloud Licenses Tab . |
| • | Enter your usage details from your Marketing Cloud contract in the Usage Details Slideout |
The Contacts Usage tab is further explained in the following sections. The Application Details link in the Contacts Usage tab is further explained in Application Details Slideout.
| • | Usage Details Slideout |
| • | Contacts Usage Tab |
| • | Salesforce Marketing Cloud Contact Usage Scenarios |
To better track your usage data, enter usage details from your Marketing Cloud contract in the Usage Details slideout. To access the Usage Details slideout, click the Enter Usage Details button in the Usage Details tile of the Contacts Usage tab. The following table describes how to complete the Contact Usage Details slideout. After this information is entered, the Contacts Details tile is displayed in the Contacts Usage tab.
|
Feature |
Description |
|
Start Date |
Choose the start date to calculate your average monthly growth. Tip:Flexera recommends using the very beginning date that you start using contracts. |
|
End Date |
Choose the end date to calculate your monthly allowance. Tip:Flexera recommends using your order end date. |
|
Quantity of purchased contacts |
Enter the total number of contacts you have purchased, including the base-contacts and the additional purchased contacts. |
|
Overage rate |
Calculates the overage cost when you have used more contacts than purchased. |
|
Associated license |
In this dropdown list, you have the option to associate the contact usage to a license you created in the Licenses Tab . Note:If no license is created in the Licenses Tab , this dropdown list is blank. |
The following table describes the information provided in the Contacts Usage tab. To display all the information in this tab requires prior entry in the Usage Details Slideout
|
Feature |
Description |
||||||||||||
|
Used |
The number for the total Used in the Usage tile is pulled in automatically after integrating with SaaS Management. Note:Usage data is updated when the latest Contacts Counts report is available in Salesforce Marketing Cloud. To create a Contacts Counts report, see Creating a Contacts Counts Report in Salesforce Marketing Cloud. |
||||||||||||
|
Remaining |
After the purchased contact quantity is entered in the Usage Details slideout, the number of Remaining contacts (Total purchased contacts - Total used) displays in the Usage tile. Example: On the first day of integration, SaaS Management pulls in 600 used contacts. 1000 purchased contacts are entered in the Usage Details slideout. Therefore, the remaining contacts is 1000 - 600 = 400. |
||||||||||||
|
% Used |
After the purchased contact quantity is entered in the Usage Details slideout, the % Used displays in the Usage tile. |
||||||||||||
|
Average Monthly Growth |
The Average Monthly Growth number represents how many contacts you are currently using on a monthly basis. To calculate this number, you need to create and update your Salesforce Marketing Cloud Contact Counts report. For more information, see Creating a Contacts Counts Report in Salesforce Marketing Cloud. Average Monthly Growth = (Total used contacts from the latest Contacts Counts report / days passed since start date) x 30 days Average Monthly Growth Example:
Average monthly growth: (10,000 contacts/100 days) x 30 days = 3,000 contacts Note:The Average Monthly Growth and Monthly allowance numbers are updated when the Salesforce Marketing Cloud Contacts Counts report is updated. |
||||||||||||
|
Monthly Allowance |
The Monthly Allowance is the maximum number of contacts you can use based on the remaining contacts and remaining days until the end date without overusing your contacts. Monthly Allowance = (Total remaining contacts/days remaining until end date) x 30 days Monthly Allowance Example:
Monthly Allowance: (5,000 contacts/50 days) x 30 days = 3,000 contacts Note:The Average Monthly Growth and Monthly Allowance numbers are updated when the Salesforce Marketing Cloud Contacts Counts report is updated. |
||||||||||||
|
Overused |
Number of overused contacts = Total used contacts - Total purchased contacts Overused Example:
Number of overused contacts: 1104 - 1000 = 104 contacts |
||||||||||||
|
Overage Cost |
Total overage cost = Overage rate x (Total used contacts - Total purchased contacts) Overage Cost Example:
Total overage cost: $1 x 10⁴ contacts = $104 |
||||||||||||
|
Usage Over Time |
This graph displays the count of your total used contacts from the Salesforce Marketing Cloud Contacts Counts report. Click the Calendar icon in the graph’s upper-right corner to select a date range of 90 days, 1 year, or 2 years for displaying contact usage over time. Note:When Salesforce Marketing Cloud is first integrated with SaaS Management, the first bar of the Usage Over Time trending graph is populated with the current usage count. You will be able to compare your total used contacts vs total purchased contacts after you enter your usage details from your Marketing Cloud contract in the Usage Details Slideout . |
Salesforce Marketing Cloud Contact Usage Scenarios
This section explains how Salesforce Marketing Cloud contact usage data appears based on the following scenarios:
| • | When Salesforce Marketing Cloud is added without contact usage details |
| • | Savings Mode: Contacts usage is less than the quantity of purchased contacts at the end date |
| • | Warning Mode: Monthly contacts usage is higher than the monthly allowance |
| • | Overage Cost Incurred: Contacts were overused before the end date |
When Salesforce Marketing Cloud is added without contact usage details
In this scenario, only the following contact usage data displays in the Contacts Usage tab:
| • | The Usage Over Time trending graph is populated with the current usage count pulled in from the Salesforce Marketing Cloud Contacts Counts report. Over time, when the Salesforce Marketing Cloud Contacts Counts report is updated, the Usage Over Time trending graph is updated and additional bars are added. |
| • | The Used count in the Usage tile is populated with the current usage count pulled in from the Salesforce Marketing Cloud Contacts Counts report. |
Note:A dash “-” for other data (% used, Remaining, Avg. Monthly Growth, and Monthly Allowance) indicates the contact usage data is unavailable and requires entry by your organization. For more information, see the Usage Details Slideout.
Savings Mode: Contacts usage is less than the quantity of purchased contacts at the end date
This scenario occurs when all the following contacts usage factors are present:
| • | Total used contacts amount is less than the quantity of purchased contacts entered in the Usage Details slideout. |
| • | Average monthly growth is less than the monthly allowance. |
| • | No overage cost is incurred. |
Warning Mode: Monthly contacts usage is higher than the monthly allowance
This scenario occurs when the following contacts usage factors are present:
| • | Current monthly usage growth is higher than the monthly allowance. |
| • | In the Contacts Usage tab, High usage rate displays above the % Used donut chart in the Usage tile. |
Note:The high usage rate warning may go away based on the next Salesforce Marketing Cloud Contacts Counts report.
As a result of this scenario, a warning at the top of the Contacts Usage tab appears: Your current monthly usage growth is higher than the monthly allowance, you may run out of contacts before the end date.
Overage Cost Incurred: Contacts were overused before the end date
This scenario occurs when the following contact usage factors are displayed within the Contacts Usage tab:
| • | The total Used count from the Usage tile exceeds the Quantity of purchased contacts before the End Date listed in the Usage Details tile. |
| • | The Usage tile displays: |
| • | Percentage used |
| • | Number of overused contacts |
| • | Overage cost. |
| • | You ran out of contacts before the End Date displayed in the Usage Details tile. |
As a result of this scenario, a red banner appears at the top of the Contacts Usage tab: You’ve used ‘xxx’ more contacts than you’ve purchased. You’ll pay an overage cost of $’xxx’.
Salesforce Marketing Cloud API Endpoint
Product Consumption
https://<ServiceURL>.soap.marketingcloudapis.com/Service.asmx