AdminStudio Inventory and Rationalization 2015 SP1
You use the Rationalization Wizard to create and edit rationalization projects. Creating a rationalization project consists of several steps:
| • | Assign actions to applications—Review the application list and assign an action to each application: Retire, Upgrade, Retain, Research, or No Action. |
| • | Launch workflows—For those applications that have been assigned an Upgrade or Retain action, you need to launch a workflow to prepare the application for deployment. |
To create a new rationalization project, perform the following steps.
To create a new rationalization project:
| 1. | On the Rationalize menu, select one of the following options: |
| • | New Project for Current Environment—Select this option if you are attempting to consolidate your current application list, but are not migrating to a new environment. With this option, you will be able to assign the Retire option to an application. |
| • | New Project for New Environment—Select this option if you are consolidating your current application list in preparation for moving to a new environment. |
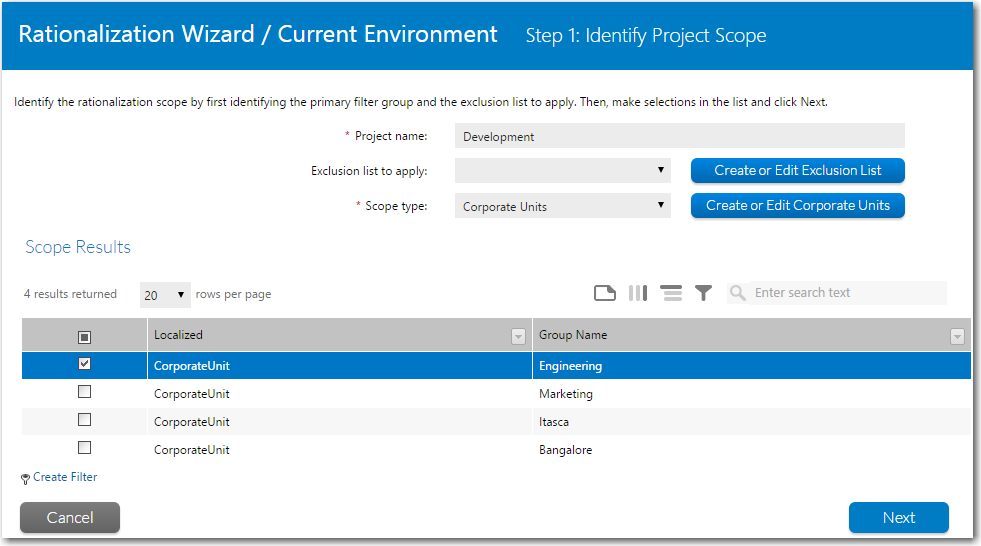
The Step 1: Identify Project Scope panel opens.
| 2. | Enter a name for this project in the Project name field. |
| 3. | From the Exclusion list to apply list, select an exclusion list to exclude applications from appearing in the selection list for this project. To create a new exclusion list, click Create or Edit Exclusion List to jump to the Exclusion List Administration Page. For more information, see Creating a New Exclusion List. |
Tip • It is highly recommended that you create an exclusion list before creating a rationalization project.
| 4. | From the Scope type list, select one of the following options to set the scope of this rationalization project: |
| • | Corporate Units—Filter the application list to display only those applications used by users in the selected corporate unit / enterprise group. |
Note • If you have not yet imported your corporate units into AdminStudio Inventory and Rationalization, you can click Create or Edit Corporate Units to jump to the Corporate Units page of the Application Recognition Service and follow the instructions in Adding Enterprise Groups to Application Recognition Service.
| • | Machine Names—Filter the application list to display only those applications installed on the selected machines. |
| • | Users—Filter the application list to display only those applications installed on the selected users’ machines. |
| • | Applications—Filter the application list to display only the applications that you select. |
After you select the Scope type, the list changes to reflect your choice.
| 5. | Select items in the list to include in your rationalization project. You will select a different item type depending upon what you selected for Scope type: |
| • | If you selected Corporate Units—Select the corporate unit or units that you want to include in this project. All of the applications used by members of the selected corporate units will be included in this project (except for those on the selected exclusion list). |
| • | If you selected Machine Names—Select the machine or machines that you want to include in this project. All of the applications installed on the selected machines will be included in this project (except for those on the selected exclusion list). |
| • | If you selected Users—Select the user or users that you want to include in this project. All of the applications used by the selected users will be included in this project (except for those on the selected exclusion list). |
| • | If you selected Applications—Select the applications that you want to include in this project. |
| 6. | After you make selections in this list, click Next to continue. The Step 2: Select Actions to Rationalize Applications panel opens, listing identification, category, classification, usage, and AdminStudio test result status for each application that has been included in this project (based up on the selections made on Step 1: Identify Project Scope Panel). |
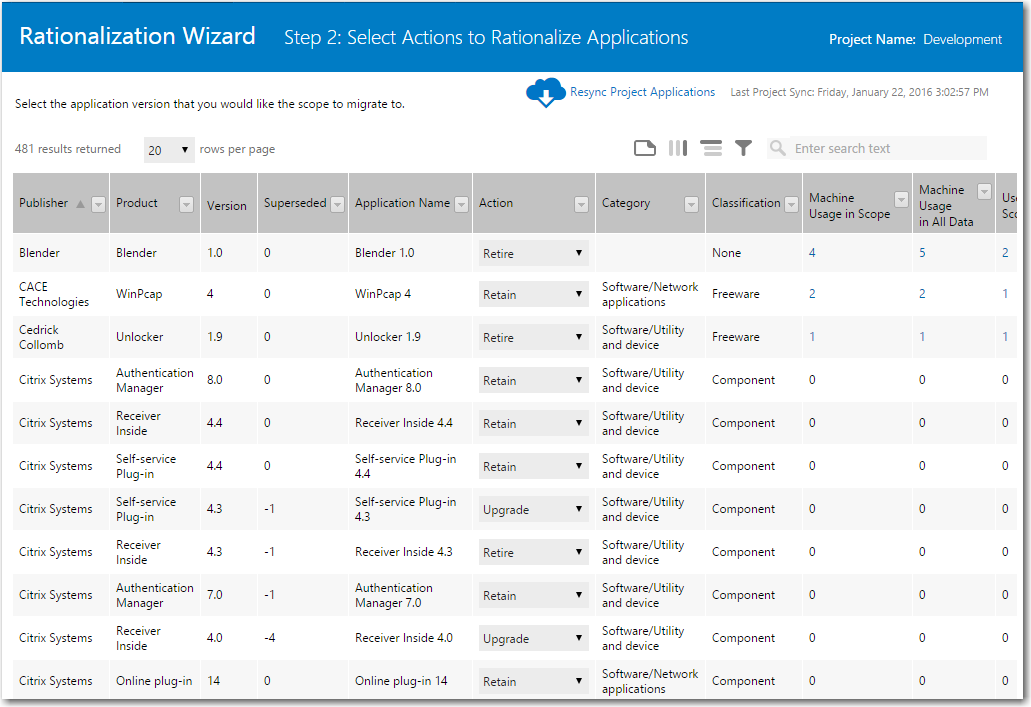
| 7. | Review all of the information provided on each application: |
|
Property |
Description |
|
Publisher |
Manufacturer of the application. |
|
Product |
General product name of the application (without version indicator). |
|
Version |
Version of application. |
|
Superseded |
Lists a number that identifies how many more recent versions of this same application have been released. For example, if Adobe Reader Version 8 has a -4 in the Superseded column, while Version 15 has a 0 in that column, it indicates that Adobe Reader Version 15 is the most recent version, while Version 8 has been superseded by four more recent versions. |
|
Application Name |
Specific name of application with a version indicator. Note • If Unrecognized App is displayed in this column, you will need to add this application to the Application Resource Library, as described in Adding Unrecognized Applications to Application Resource Library. |
|
Category |
The default list of software categories is taken from the United Nations Standard Products and Services Code standard (http://www.unspsc.org/). Applications are assigned to a category in the Application Resource Library. |
|
Classification category of application, as described in Classification. |
|
|
Machine Usage in Scope |
Number of machines this application is installed on in the selected scope. Click this link to view a Machine Report. |
|
Machine Usage in All Data |
Number of machines this application is installed on in the entire enterprise. Click this link to view a Machine Report. |
|
Users in Scope |
Number of users who are using this application in the selected scope. Click this link to view a User Report. |
|
Users in All Data |
Number of users who are using this application in the entire enterprise. Click this link to view a User Report. |
|
Usage |
Click the Report link to view a usage report of the number of users who have used this application over the last three, six, and twelve months. |
|
Operating System Compatibility Remote Publishing Compatibility Virtualization Compatibility |
If an application with a matching Flexera ID has been tested in AdminStudio, one of the following icon will be displayed in these columns to indicate test status in that category:
For more information, see Using Test Center to Perform Package Testing in the AdminStudio Help Library. |
|
Owner |
Enter the name of the person responsible for specifying an Action for this application. |
|
Notes |
Click the pencil icon to add a note to this field. You may want to add notes when performing research, or when indicating that an application will be replaced by a more recent version. |
| 8. | After reviewing all of the listed information, specify one of the following values for each application: |
| • | Upgrade—Upgrade all users of this application in the scope to this version of the application. |
| • | Retain—For current environment, keep this product version (take no action). For new environment, prepare this application version for deployment. |
| • | No Action—This product version will not be prepared for deployment in the new environment. |
| • | Research—Research is still being performed in order to decide what action to take for this product version. |
| • | Retire—[For current environment projects only] Uninstall this product version from the current environment. If you are upgrading users to a newer version, enter that version number in the Notes column. |
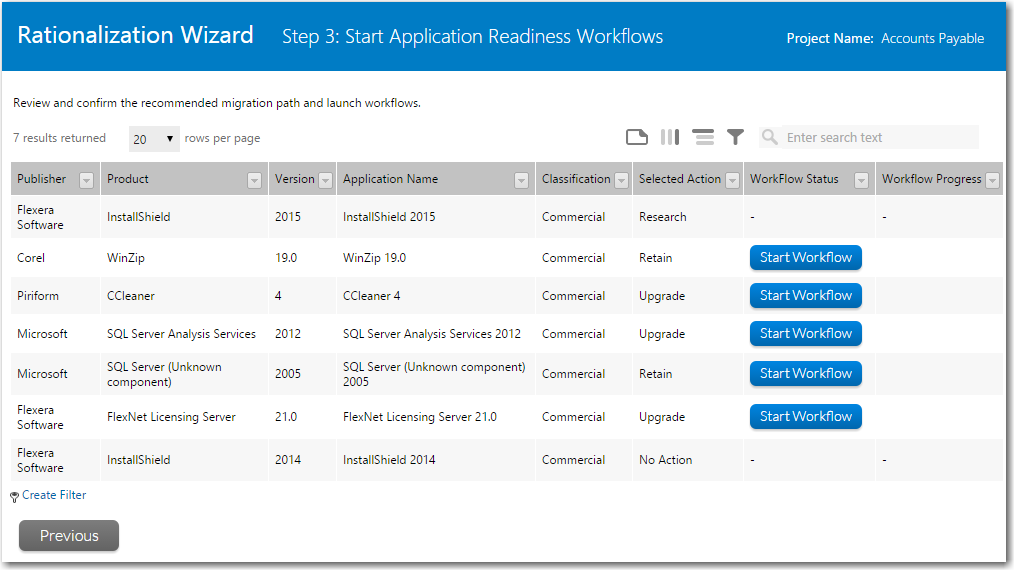
| 10. | If you have chosen the Retain or Upgrade action for an application, a Start Workflow button is listed in the Workflow Status column. Click Start Workflow to launch the workflow, which will open in a new window. |
After you have started the workflow, the button changes to In Progress. You can then view the workflow by clicking the In Progress button on this page or by selecting View Workflows on the Rationalize menu.
| 11. | Continue with Viewing the Progress of Rationalization Project Workflows. |
AdminStudio Inventory and Rationalization 2015 SP1 Help Library26 January 2016 |
Copyright Information | Flexera Software LLC |
